# Business Logic Overview
# What
# What is business logic and what does it do?
Business logic is code that interfaces with a database or an API outside the Clinc AI Platform. The Clinc AI Platform allows you to insert arbitrary business logic into a custom competency by using a webhook (opens new window).
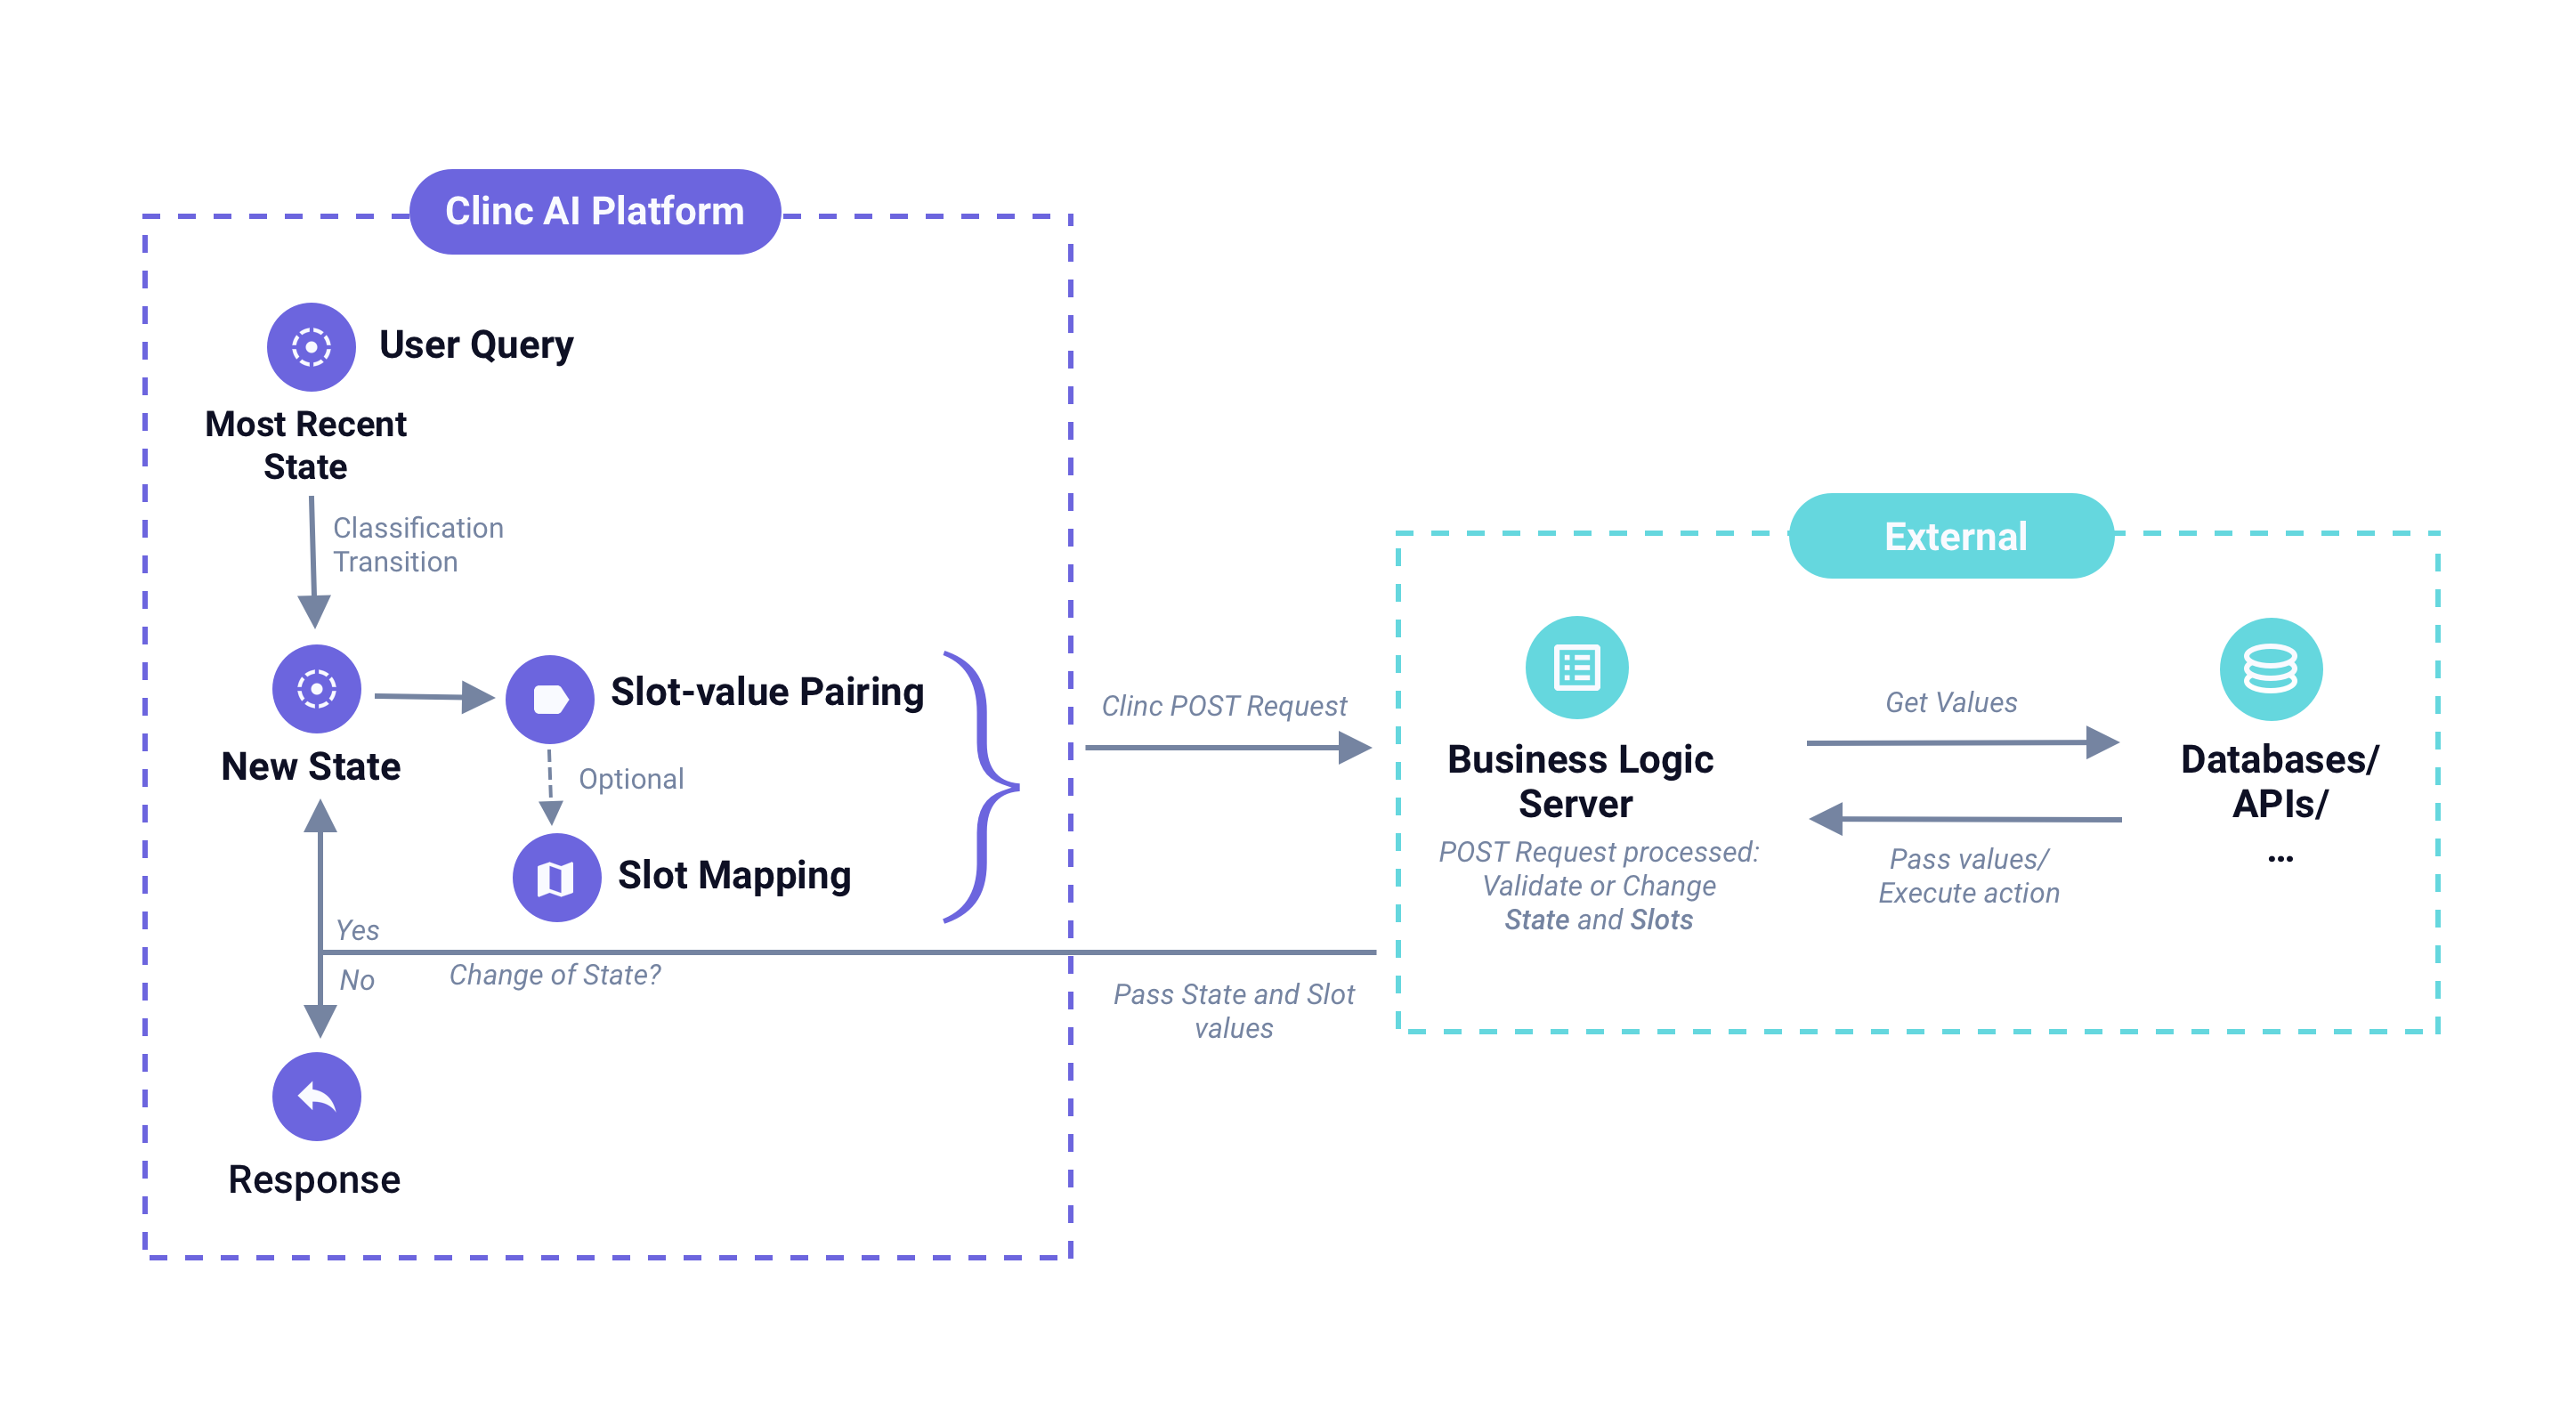
On the one hand, business logic acts as a guard that checks if the state and slots are valid. On the other hand, you can have it override the state that the query is supposed to land on according to the classification transition or slot transition earlier as long as you have a business logic transition in place. See the graph below to learn when business logic fits in Clinc’s architecture.
Note: You can write your business logic in any language.
# What do I need to do to get started?
From the diagram, we can see that all of the utterance’s information (such as the state and slot values) that is extracted by the Clinc AI Platform is mapped to a JSON payload. The JSON payload is then posted to a configured webhook endpoint.
First, you need to set up a business logic server to receive this payload in your application (i.e. expose an endpoint for the Clinc Platform to POST to). For a simple solution for spinning up a server, check out Heroku (opens new window).
Next, let's take a look at the shape of a sample business logic payload using Protocol 2.
In a nutshell, with business logic you can:
- Configure business logic to overwrite State.
- Validate Slots, add new slots or add slot Keys.
- Get Values for users' query.
# How
How to set up business logic in the platform?
# How to set up business logic in the platform?
To set up business logic in the platform, you only need to add the url(s) of the webhook(s) you have set up to which the Clinc Platform can POST the payload.
Navigate to the ** Version Setttings** page, you will see business logic section on the top of the page.
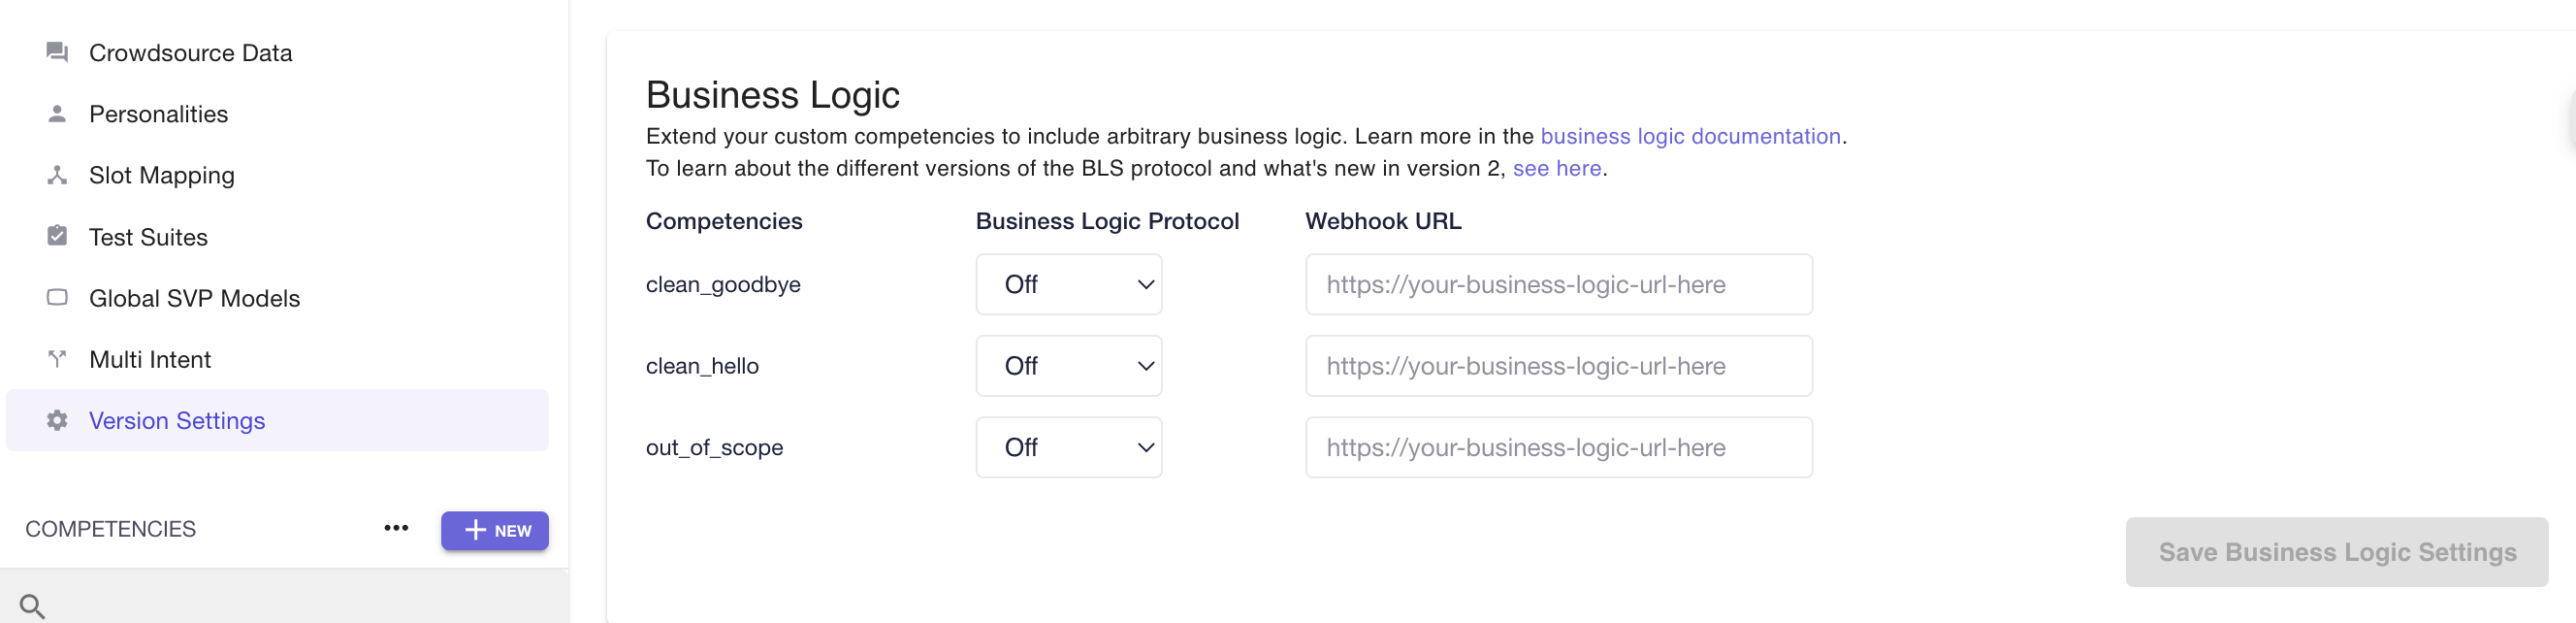
To set up business logic:
- Select business logic version next to the competency that you are enabling. Consult Business Logic Protocol 2 to learn more about business logic server protocol 2.0.
- Paste the webhook url into the corresponding field. They don't have to be the same url.
- Click Save Settings.
Setting up a webhook for each competency provides a few benefits. You can have separate business logic server per competency so that you can have a team collaborating on an AI version and they can each work on a competency independently.
# How to write business logic?
For those who don't have a technical background but wants to gain a holistic understanding of the conversational AI building work flow, we show you a sample business logic code snippet, read Transformation 1: Account Balance through Process POST Requests.
# How to add slots?
Based on the results of your business logic, you'll likely want to add data to be used in the Jinja response templates. You have three options for doing so.
response_slots
For data that does not need to persist throughout the conversation, you should add response_slots as a top-level key to the response body.
response_slots is a dictionary with three required keys:
response_typespeakablesvisuals
response_type should match the state value. So if you are not changing the state to trigger a business logic transition, response_type should match the state value in the request body.
speakables and visuals are dictionaries with arbitrary data. It's easiest to assign these the same dictionaries, but they do not have to be the same. The data added in visuals will only be available in your Jinja templates for
visual responses, and speakables for the spoken responses.
Here is a concrete example of including transfer fee information:
Sample Payload
{
    "query": "I want to transfer $400 from my checking account to my savings account.",
    "state": "transfer_confirm",
    "slots": {...},
    "response_slots": {
        "response_type": "transfer_confirm",
        "visuals": {
            "transfer_fee": "$5.00",
            "currency": "USD"
        },
        "speakables": {
            "transfer_fee": "$5.00",
            "currency": "USD"
        }
    }
}
In the Jinja template for account_confirm, you will have access to the variables transfer_fee and currency.
Your transfer will incur a fee of {{ transfer_fee }} {{ currency }}. Is that
okay?
- Add data to an existing slot
For data you want to persist through multiple turns of conversation, you should add data to the values element(s) dictionary.
Here is an alternative to the transfer fee example above:
Sample Payload
{
    "slots": {
        "_TRANSFER_AMOUNT_": {
            "type": "money",
            "values": [
                {
                    "tokens": "$400",
                    "resolved": 1,
                    "value": "400.00",
                    "currency": "USD",
                    "transfer_fee": "$5.00"
                }
            ]
        }
    }
}
- Add to the
slotsdictionary
You can also add an entirely new slot.
{
    "slots": {
        "_SLOT_NAME_": {
            "type": "string",
            "values": [
                {
                    "resolved": 1,
                    "value": "whatever you need"
                }
            ]
        }
    }
}
Here is a concrete example with the added slot TRANSFER_FEE:
Sample Payload
HTTP/1.1 200 OK
{
    "lat": 42.2730207,
            "values": [
                {
                    "tokens": "$400",
                    "resolved": 1,
                    "value": "400.00",
                    "currency": "USD"
                }
            ]
        },
        "_TRANSFER_FEE_": {
            "type": "money",
            "values": [
                {
                    "tokens": "$5.00",
                    "resolved": 1,
                    "value": "5.00",
                    "currency": "USD"
                }
            ]
        }
    }
}
# How to handle UI data?
For supplementary data that is not needed for the Jinja templates (e.g., graph data, images, etc.), you can set visual_payload as a top level key on the response body.
{
    "visual_payload": {
        "anything_you_want": "can go here",
        "maybe_a_list_of_things": ["like", "this", "list", "of", "things"]
    }
}
In your client application, the response from Clinc would look something like:
{
    "visuals": {
        "formattedResponse": "Here is the balance for your checking account: 4000.",
        "speakableResponse": "Here is the balance for your checking account: 4000.",
        "anything_you_want": "can go here",
        "maybe_a_list_of_things": ["like", "this", "list", "of", "things"]
    }
}
An example use case for this is when a user asks for their balance without specifying an account. A nice default experience would be to have a Jinja response of something like:
Here are the balances on your accounts. Let me know if you want a specific balance.
Along with visually rendered list of the accounts. To implement that experience, you would do something like:
{
    "visual_payload": {
        "accounts": [
            { "type": "checking", "balance": 100 },
            { "type": "savings", "balance": 1000 },
            { "type": "credit_card", "balance": 2000 }
        ]
    }
}
With a simple Jinja response (assuming a slot named acct_type:
{% if acct_type is not defined %}
Here are the balances on your accounts. Let me know if you want a specific
balance.
{% endif %}
And iterate through accounts in your client app. Here is an example in JavaScript/JSX:
const { accounts } = response.body.visuals;

const accountsList = accounts.map(({ type, balance }) => (
    <li>
        {type}: ${balance}
    </li>
));
# How to add business logic transition?
Business logic transitions can be made by overwriting the state key in the business logic payload. There must be an existing business logic transition between the state the user was previously in, and the state to which they are trying to transition. These transitions can be configured via the state graph editor for the relevant competency.
To see a sample code for a business logic transition, read Transformation 2: Transfer Money in the Advanced Starter Guide.
# How to reporting latency?
No matter what business logic protocol you use, the BLS protocol offers a way to self-report latencies. These latencies will be included in the latencies dictionary with every response, but will not count towards the reported total latency, as that's tracked separately.
The self-reported latencies must come in a format of a dictionary of latency description and amount.
{
    "slots" : {},
    "intent: "clean_hello",
    "latency": {
        "i did this first":  0.03,
        "then i did that": 0.002,
        "but really most of the time i spent doing that": 0.5
    }
}
This latency field will then be propagated under webhook_latencies in the latencies object returned in the response.
"latencies": {
    "total": 0.5669832460116595,
    "trace": [
      {
        "category": "INFERENCE",
        "label": "queryclassifier",
        "start_time": 430121.543902242,
        "latency": 0.04129160800948739
      },
      {
        "category": "INFERENCE",
        "label": "slotvaluepairer",
        "start_time": 430121.657319628,
        "latency": 0.13118016498629004
      },
      {
        "category": "WEBHOOK",
        "label": "http://my_bl_website:8000/",
        "start_time": 430121.791387094,
        "latency": 0.07614171301247552
      }
    ],
    "webhook_total": 0.07614171301247552,
    "webhook_latencies": {
        "i did this first":  0.03,
        "then i did that": 0.002,
        "but really most of the time i spent doing that": 0.5
    }
  }
The self reported webhook_latencies do not affect the total and it is only meant as a latency tracking and debugging mechanism.
Last updated: 04/02/2024