# AI FAQ
# What
# What is AI FAQ?
AI FAQ is a feature that allows the Clinc Platform to fulfill queries from externally sourced data. Users will be able to import files or add URLs to create documents that can be referenced during the query.
# How
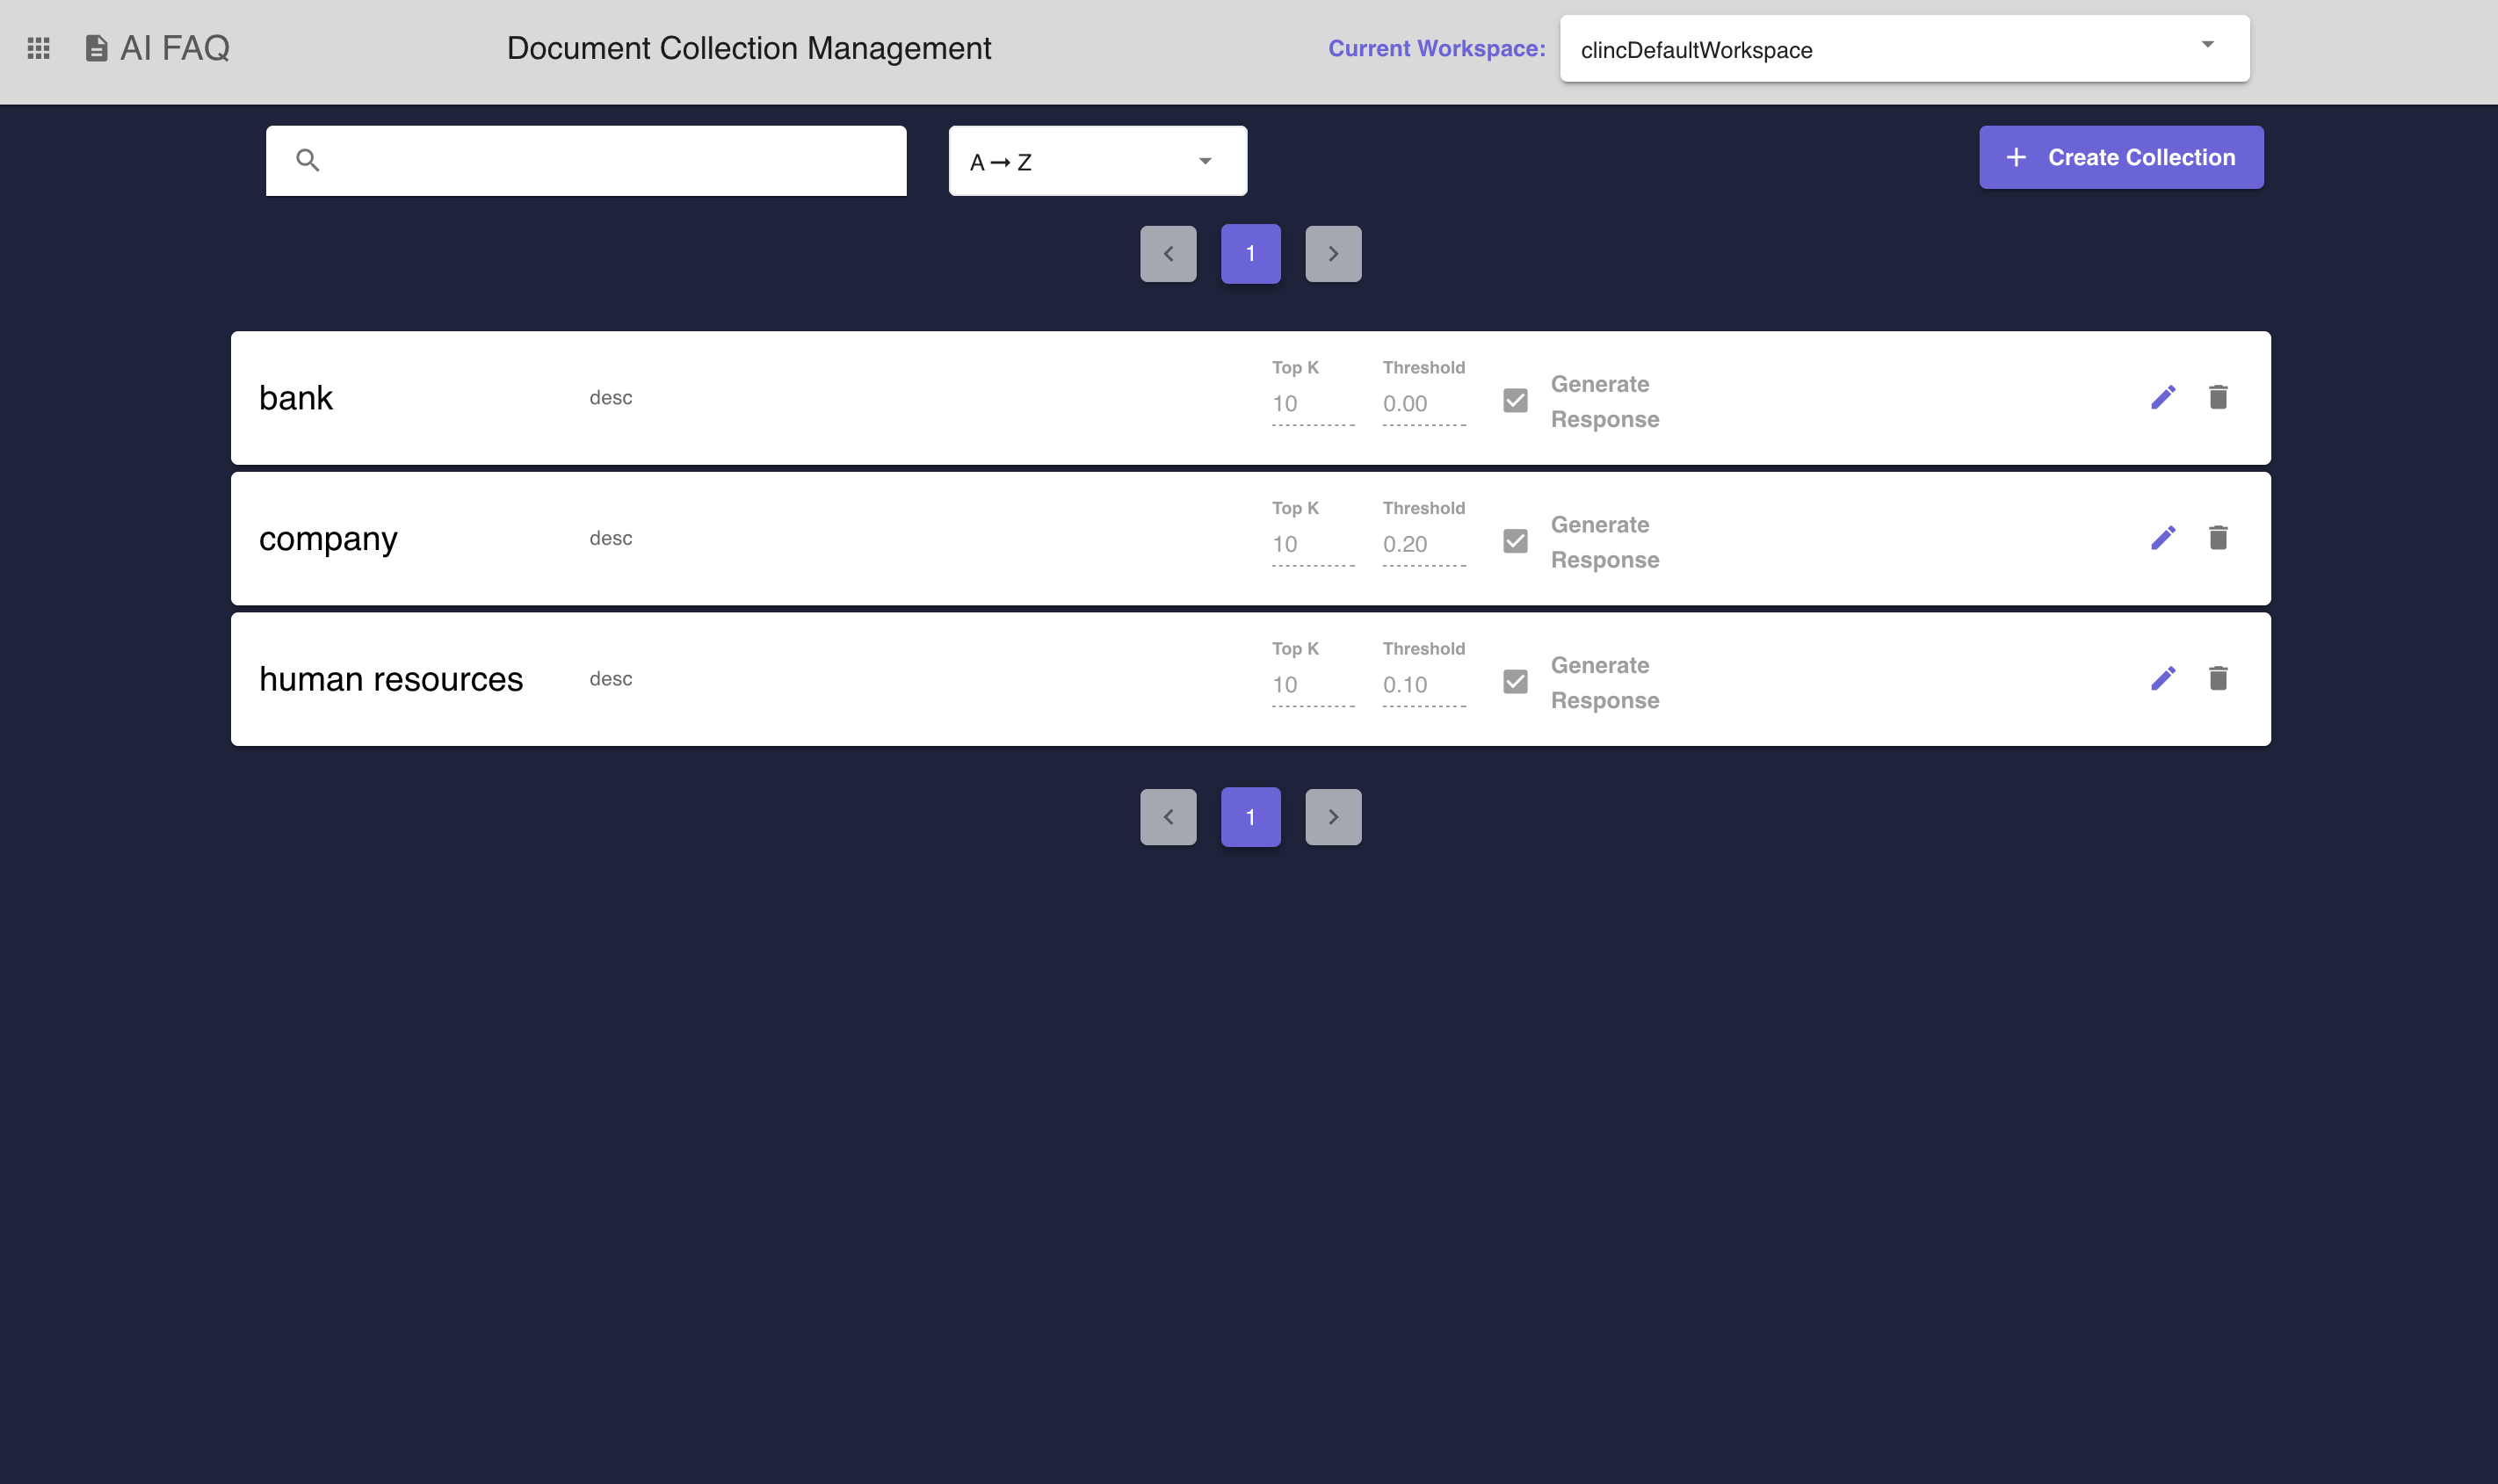 Figure 1 - The AI FAQ Collection Management Page displays all collections within a given institution. Collections can be created on this page and documents can be accessed by clicking into each row.
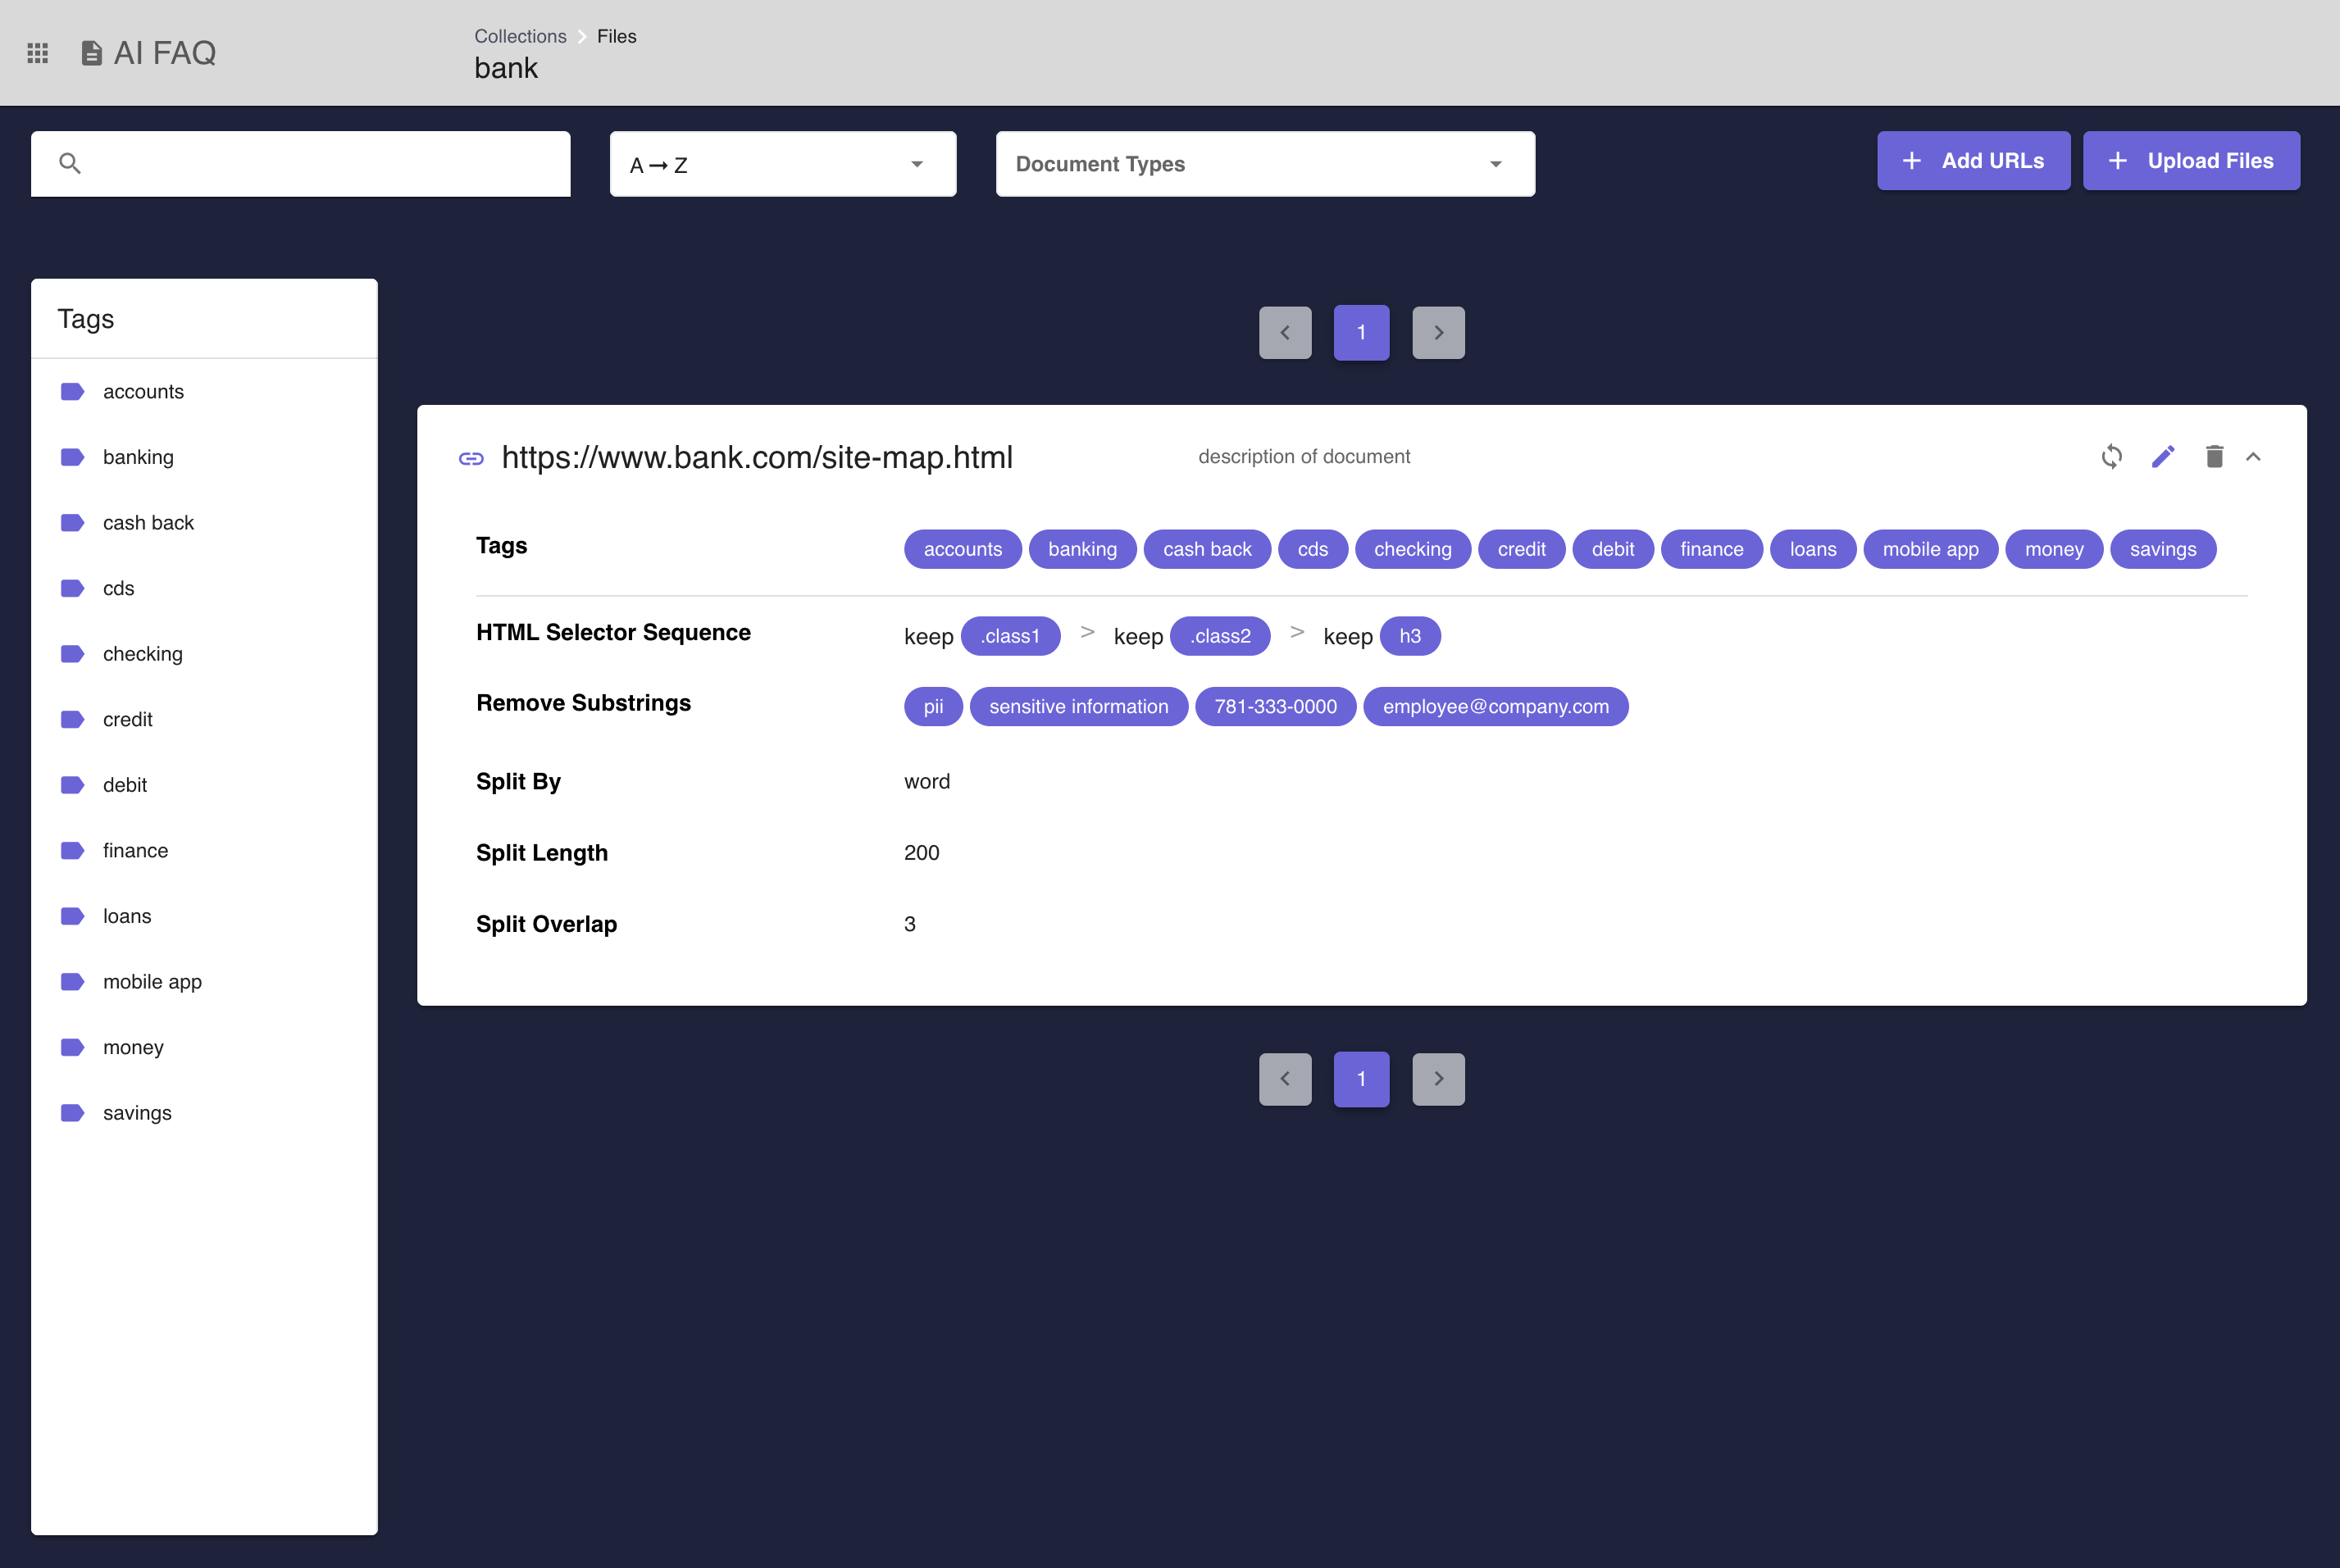 Figure 2 - The Document Listing Page displays all documents that belong to a specific collection. Each row can be expanded for relavent information pertaining to the document's preprocessing.
# How to use AI FAQ
In order to use this feature, the institution needs the
AI FAQentitlement. TheAI FAQfeature must also be enabled under the institution settings page.The
AI FAQ Collection Managementpage contains a listing of all existing collections for an institution. New collections can also be created on this page (See Figure 1).To create a collection, click on the
Create Collectionbutton on the AI FAQ Collection Management Page (See Figure 1). The dialog will appear prompting the user to name the collection and offer an opportunity to add a Top K and Threshold to the collection. Refer to setting advanced query options for a deeper understanding onThresholdandTop K.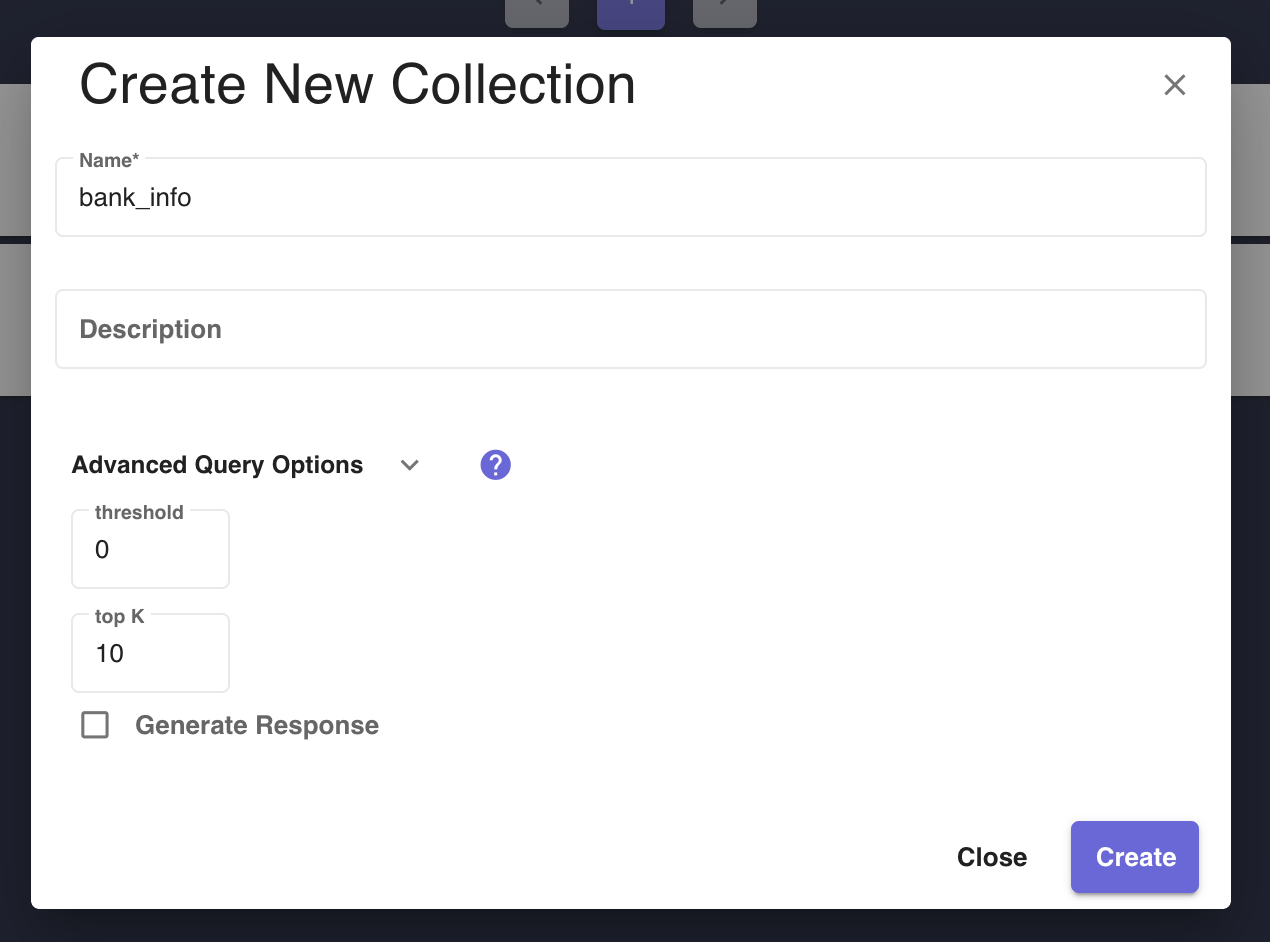 Figure 3 - Create Collection Dialog displays a form for a user to create a collection and configure its advanced options.
Click on a collection to view a listing of all the documents in that collection. Users can create new documents by uploading files or adding URLs. Documents can be filtered by tags using the tag sidebar and the same sort/filter options that exist elsewhere on the platform. URL-type documents have a sync button that will index the newest version of that webpage's data. See Figure 2 for an example of the AI FAQ Collection Document Listing Page, including an example of the tag sidebar.
Click the
+ Upload Filesbutton to add files to a collection. Accepted files are.pdf, .docx, .txt, and .json.jsonfiles must be in the following format:[ { "source": "gcp", "filename": "ai_platform_data_labeling_docs_faq", "content": "what quality control methods can i use to ensure the labeling quality?", "answer": "you can request multiple human labelers to annotate each piece of your\n data" } ]Multiple files can be uploaded at once as long as each file size is under 5MB and does not have spaces in the filename. Descriptions can be specified for each of the uploaded files and provided tags will be applied to all files. Refer to advanced options to learn more about each of the options in the
Advance Upload Optionsdropdown.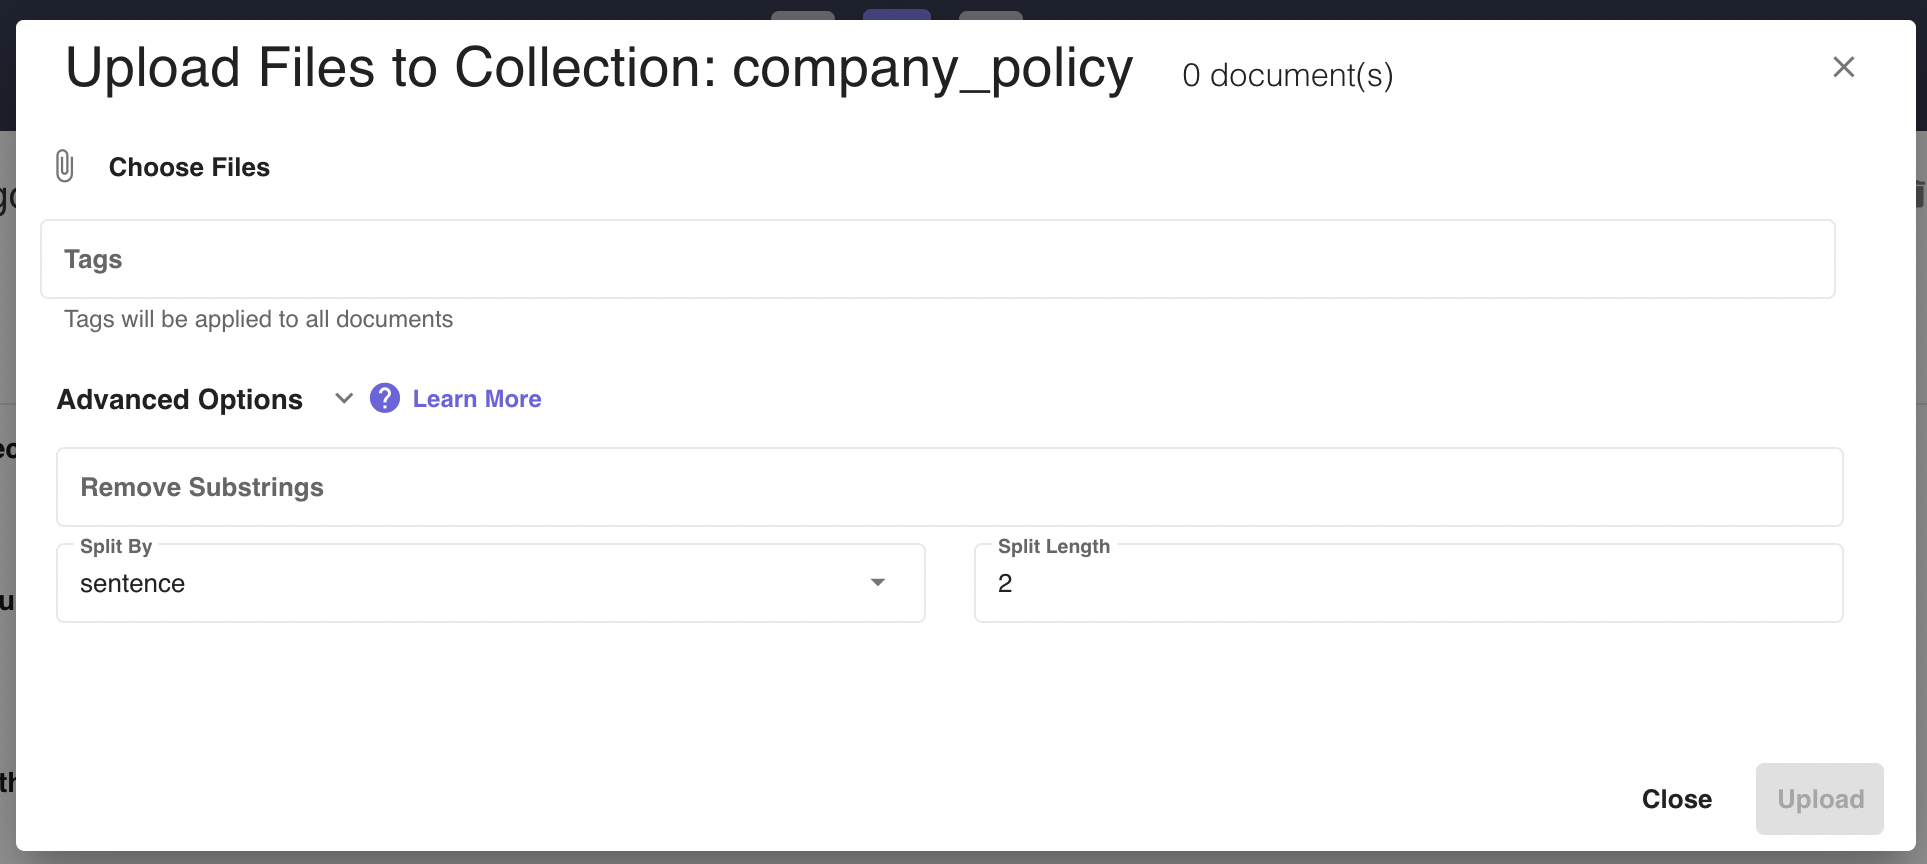 Figure 4 - File Document Entry Dialog displays a form for a user to create a file document inside of a collection and configure its advanced options.
Click the
+ Add URLsbutton to add web content to a collection as documents. Similar to files, multiple websites can be added at a time via manual entry, webscraping, or import. Any tags added or advanced settings configured will be applied to all websites. URLs have an extra advanced option,HTML Selector Sequences, which is defined in the advanced options section.Entering urls manually can be done by clicking the
+ Add Urlbutton and specifying the url and an optional description.Urls can be imported into the platform to aid in data entry. Importing urls requires a CSV file with a specific format to be used. There is no limit to the amount of urls that can be entered via CSV import. To import a CSV file, click on the `Import` button seen in the screenshot. A dialog will appear and a user should enter a valid CSV file here containing the urls to be added. Below is an example of a valid CSV file that can be used to input many urls at once.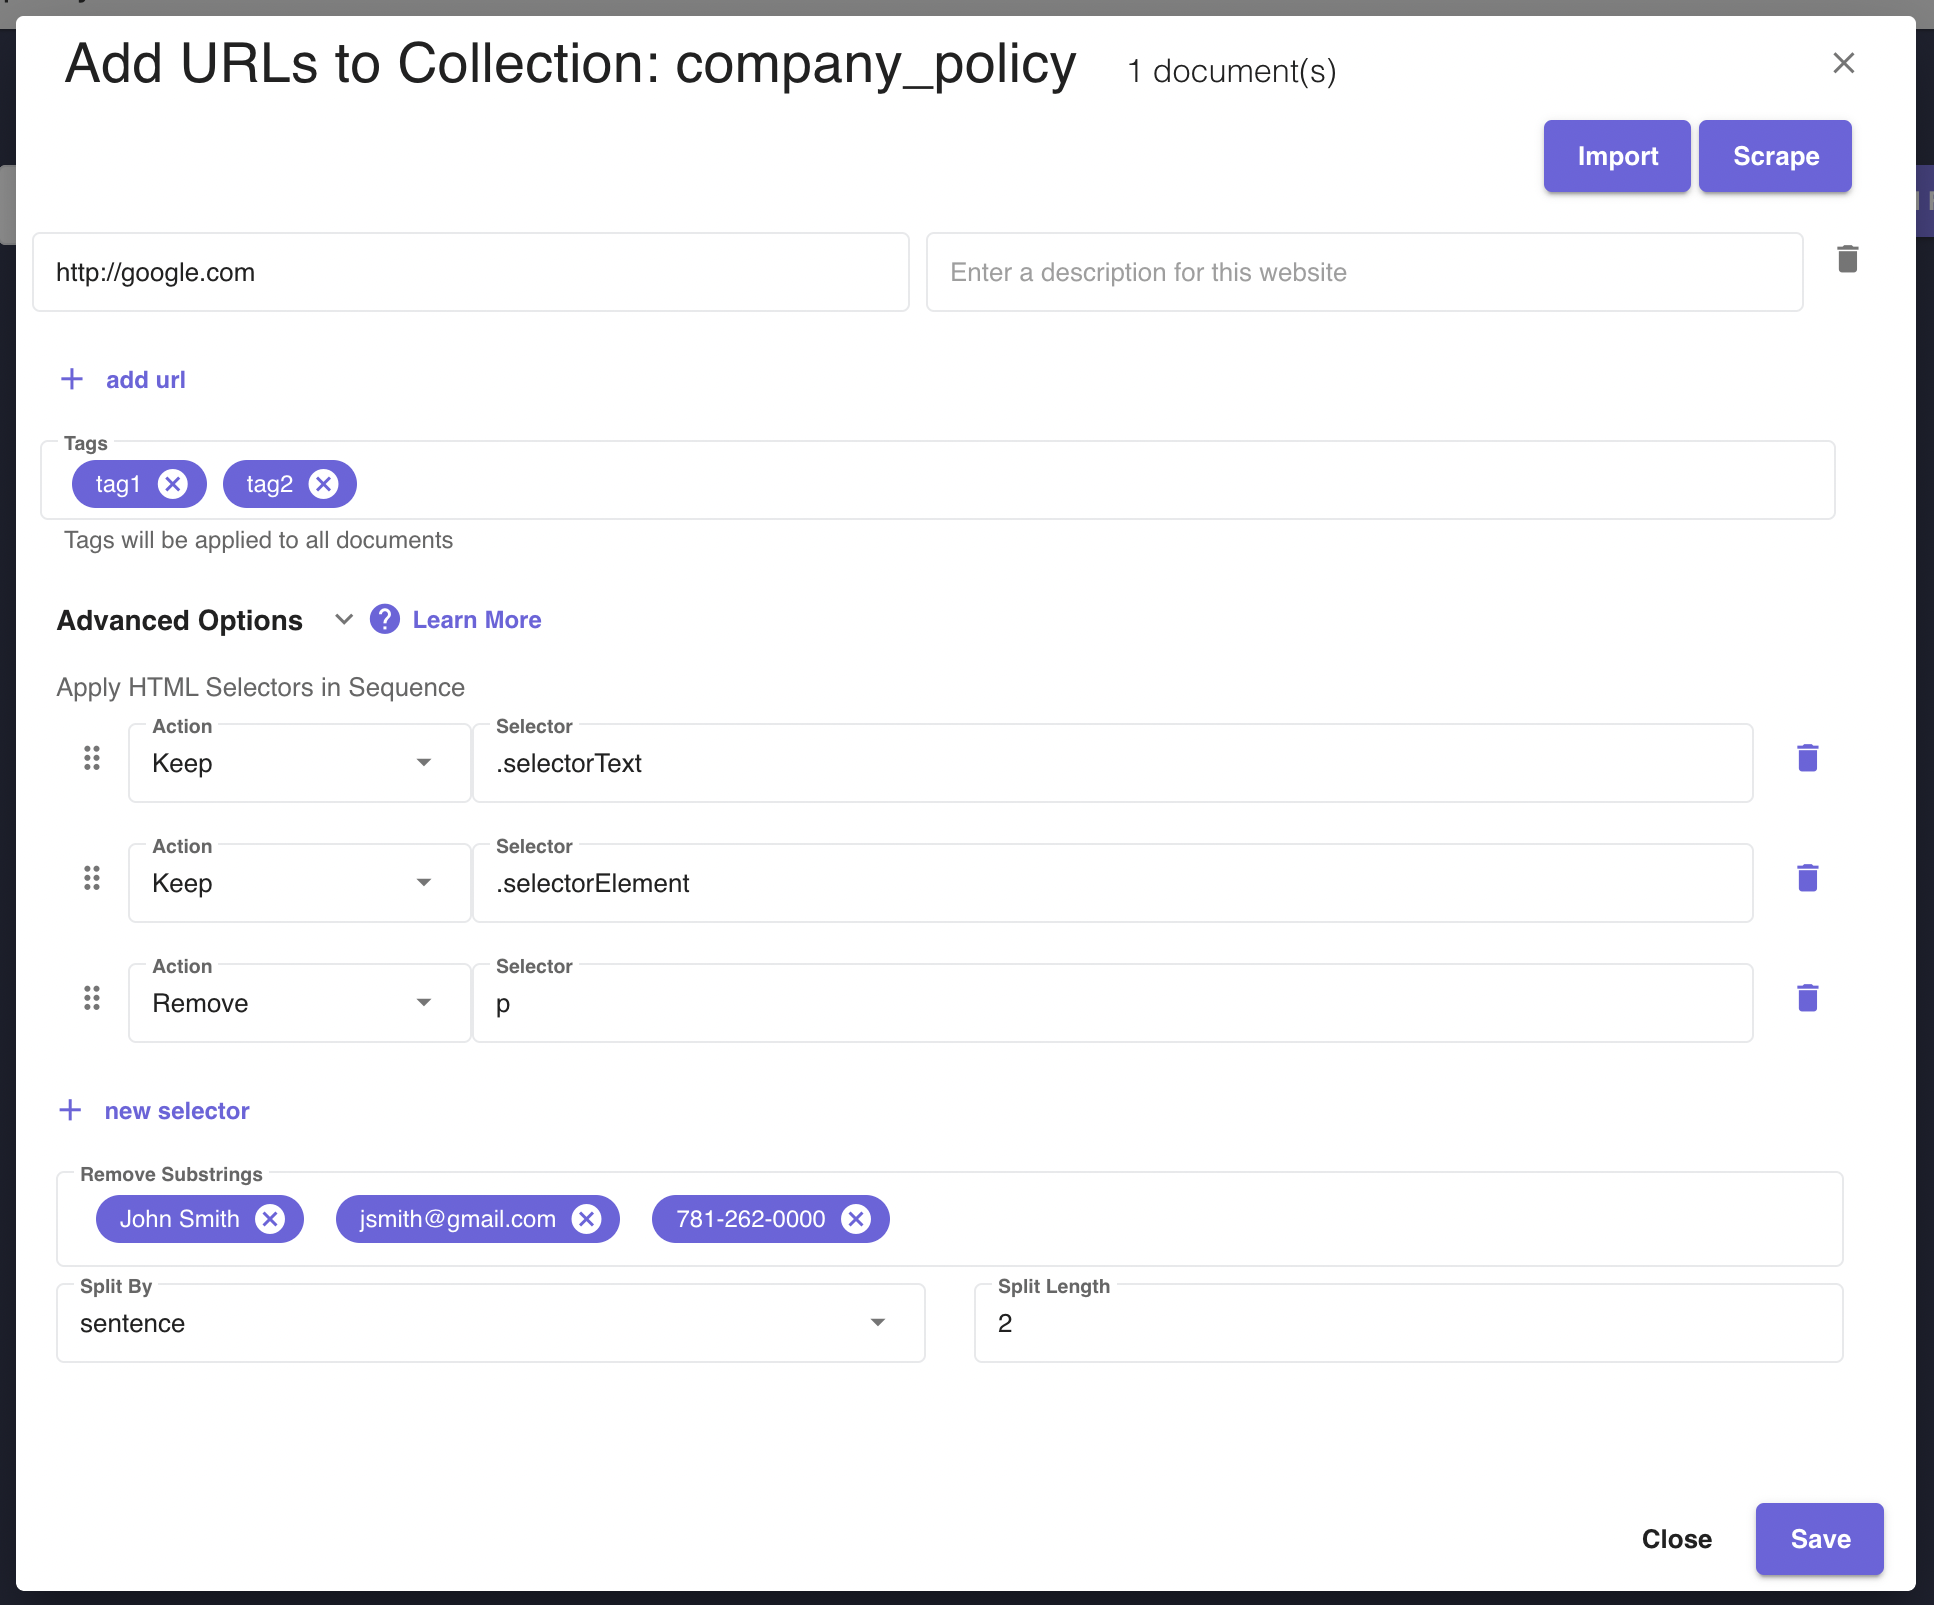 Figure 5 - URL Document Entry Dialog displays a form for a user to create a URL document inside of a collection and configure its advanced options.
url,description
https://www.company.com
https://www.company.com/human-resources.html
https://www.company.com/employee-handbook.html
https://www.company.com/faq
URL Webscraping is another tool Clinc offers to automate the process of adding URLs. It differs from the scraping done while preprocessing the document and can be configured in advanced options. Clinc can scrape static sites, such as site maps, for urls to be used for web content. The urls extracted will be used to curate web content for AI FAQ. To get started with this feature, click on the
Scrapebutton seen in the screen shot. A dialog will appear and a user should enter the URL that they intend to scrape. Html class attributes specify one or more class names for an element and are mostly used to point to a class in a style sheet, in this case they can be used to narrow scrape results. An optional class selector field can be included in the url entry dialog to narrow down results of a scrape. Class attribute names can viewed by inspecting the page source of the site a user wished to scrape. The results will contain a list of urls consisting of all urls nested inside of the elements selected by the class attribute. See the screenshot below for an example of how to use the css class selector option in the Webscrape URL dialog. In the example, the user has enteredsiteMapfor the css class selector. This will select all html elements that match withclass=siteMap.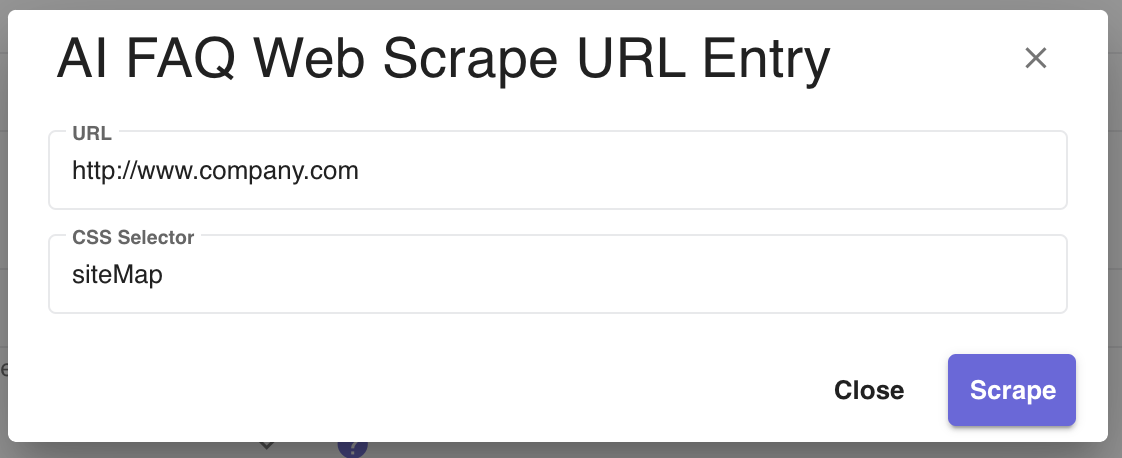 Figure 6 - AI FAQ Web Scrape URL Entry Dialog is a form where the user can input a static site and scrape the data for urls to curate web content.
After uploading files or adding URLs, a reindexing process for the collection will start and will be visible via the notification icon. New documents will be queryable upon completion of reindexing.
Make a request to the
/v1/ai-faq/queryendpoint from Business Logic to start query a collection. The endpoint accepts a number of parameters, refer to the ai faq query endpoint to learn more.Clicking on an existing document will display more information about the file such as its tags and the advanced options configured to the file.
# How to Configure Advanced Options
The platform offers several preprocessors that allow users to customize the way documents are processed before they are stored in the datastore. These parameters are crucial for optimizing the retrieval and generation processes based on the user's specific requirements. See Figure 5 for an example of the Advanced Options section of the URL Document Entry Dialog.
Remove Substrings
Remove substrings can be used to redact Personable Identifiable Information and other sensitive information. In this field a user can specify any substrings they that would like to be excluded from processing.
HTML Selector Sequences
HTML Selector sequences is a tool for preprocessing URL web content. They can be used to extract specific information from the document. To use this feature, a user should specify an action and a selector in the document entry dialog. A user can chain together multiple actions in a sequence to narrow documents down to specific segments of data for indexing. There are two actions a user can choose from and they are keep and remove.
Keep - Preserves all HTML elements and thier nested contents matching the specified selector in the indexed data.
Remove - Excludes all HTML elements and thier nested contents matching the specified selector from the indexed data.
The sequence will be applied in the order that is specified on the dialog and can be reordered by dragging the rows up and down to the desired position. See the Apply HTML Selectors in Sequence section in Figure 5 for an example of what creating a sequence looks like on the URL Document Entry Dialog. Below is the sequence from Figure 5 in a list.
[
   {
       "selector": ".selectorText",
       "action": "keep"
   },
   {
       "selector": ".selectorElement",
       "action": "keep"
   },
   {
       "selector": "p",
       "action": "remove"
   }
]
First, it keeps all HTML elements with the div class
selectorTextand their child elements. Next, it keeps all HTML elements with the div classselectorElementand their child elements. Finally, it removes allparagraph tags from the remaining HTML in the document. The sequential processing means that earlier rules. For example, if a paragraph tag exists inside an element with class
selectorText, it would initially be kept by the first rule but then removed by the third rule.The syntax for the selector field abides by the standard defined here on this website (opens new window), please see the table below for a quick reference to acceptable syntax for using HTML Sequence Selectors.
CSS Selector Description Examples Universal Selector Selects all the elements * Element Selector Selects Element(s) ex. <p>,h1p,h1,h2Class Selector Select all elements with the specified class name <div class="myclass1">.myclass1ID Selector Select the element with the specified ID <div id="myid">myidMultiple Selectors Chain two or more classes or IDs to select the element(s) that have all the specified classes/IDs <div class="myclass1 myclass2">.myclass1 myclass2Please visit this website (opens new window) for more information about the supported selectors.
Split By and Split Length
Large documents should be broken down into smaller chunks for more efficient processing. Users can specify whether they want to split it by words, sentences, or passages. The split length value describes the maximum number of units (words, sentences, or passages) allowed in one document after splitting. Depending on the split by option, the split length value will update automatically to the default.
Split By Default Split By Value Lower Convert text to all lowercase sentence 2 word 200 passage 1 split_by: "sentence" split_length: 2 Explanation: This configuration will split the document into chunks of two consecutive sentences each. For example: Chunk 1: "You are processing a legal document with lengthy sentences and want to analyze each sentence individually for clarity and content." Chunk 2: "This configuration will split the document into chunks of two consecutive sentences each." ...split_by: "word" split_length: 2 Explanation: This configuration will split the document into chunks of two consecutive words each. For example: Chunk 1: "technical specifications" Chunk 2: "for a" Chunk 3: "product You" ...split_by: "passage" split_length: 2 Explanation: This configuration will split the document into passages, each containing two consecutive paragraphs.- Split By Overlap
The split by overlap value only applies to
wordsplitting. It describes the word overlap between two adjacent documents after a split. This provides overlap between adjacent splits to ensure continuity in the processed data. The overlap value must be less than the split length value. For example, consider the following configuration: Split byword, split length of5and a split overlap of2. In this scenario, the document will be split into chunks of five consecutive words each with an overlap of two words between adjacent chunks. Let's consider the following sentence from the document:"The experiment results indicated a significant improvement in the performance of the new algorithm compared to the previous one." Split Process: Splitting the sentence into chunks of five words each with an overlap of two words: Chunk 1: "The experiment results indicated a significant" Chunk 2: "a significant improvement in the performance" Chunk 3: "the performance of the new algorithm compared" Chunk 4: "the new algorithm compared to the previous" Chunk 5: "to the previous one."
# Creating a Personality and Editing Response Templates
In order to show the AI FAQ response when querying the collection, users need to modify the response template for the device they are querying.
The list of current AI FAQ personalities are shown in the Personalities tab of the collection page. A default personality is created when a user creates a new collection and users can also create new personalities. Attaching devices to personalities will work the same way as version personalities.
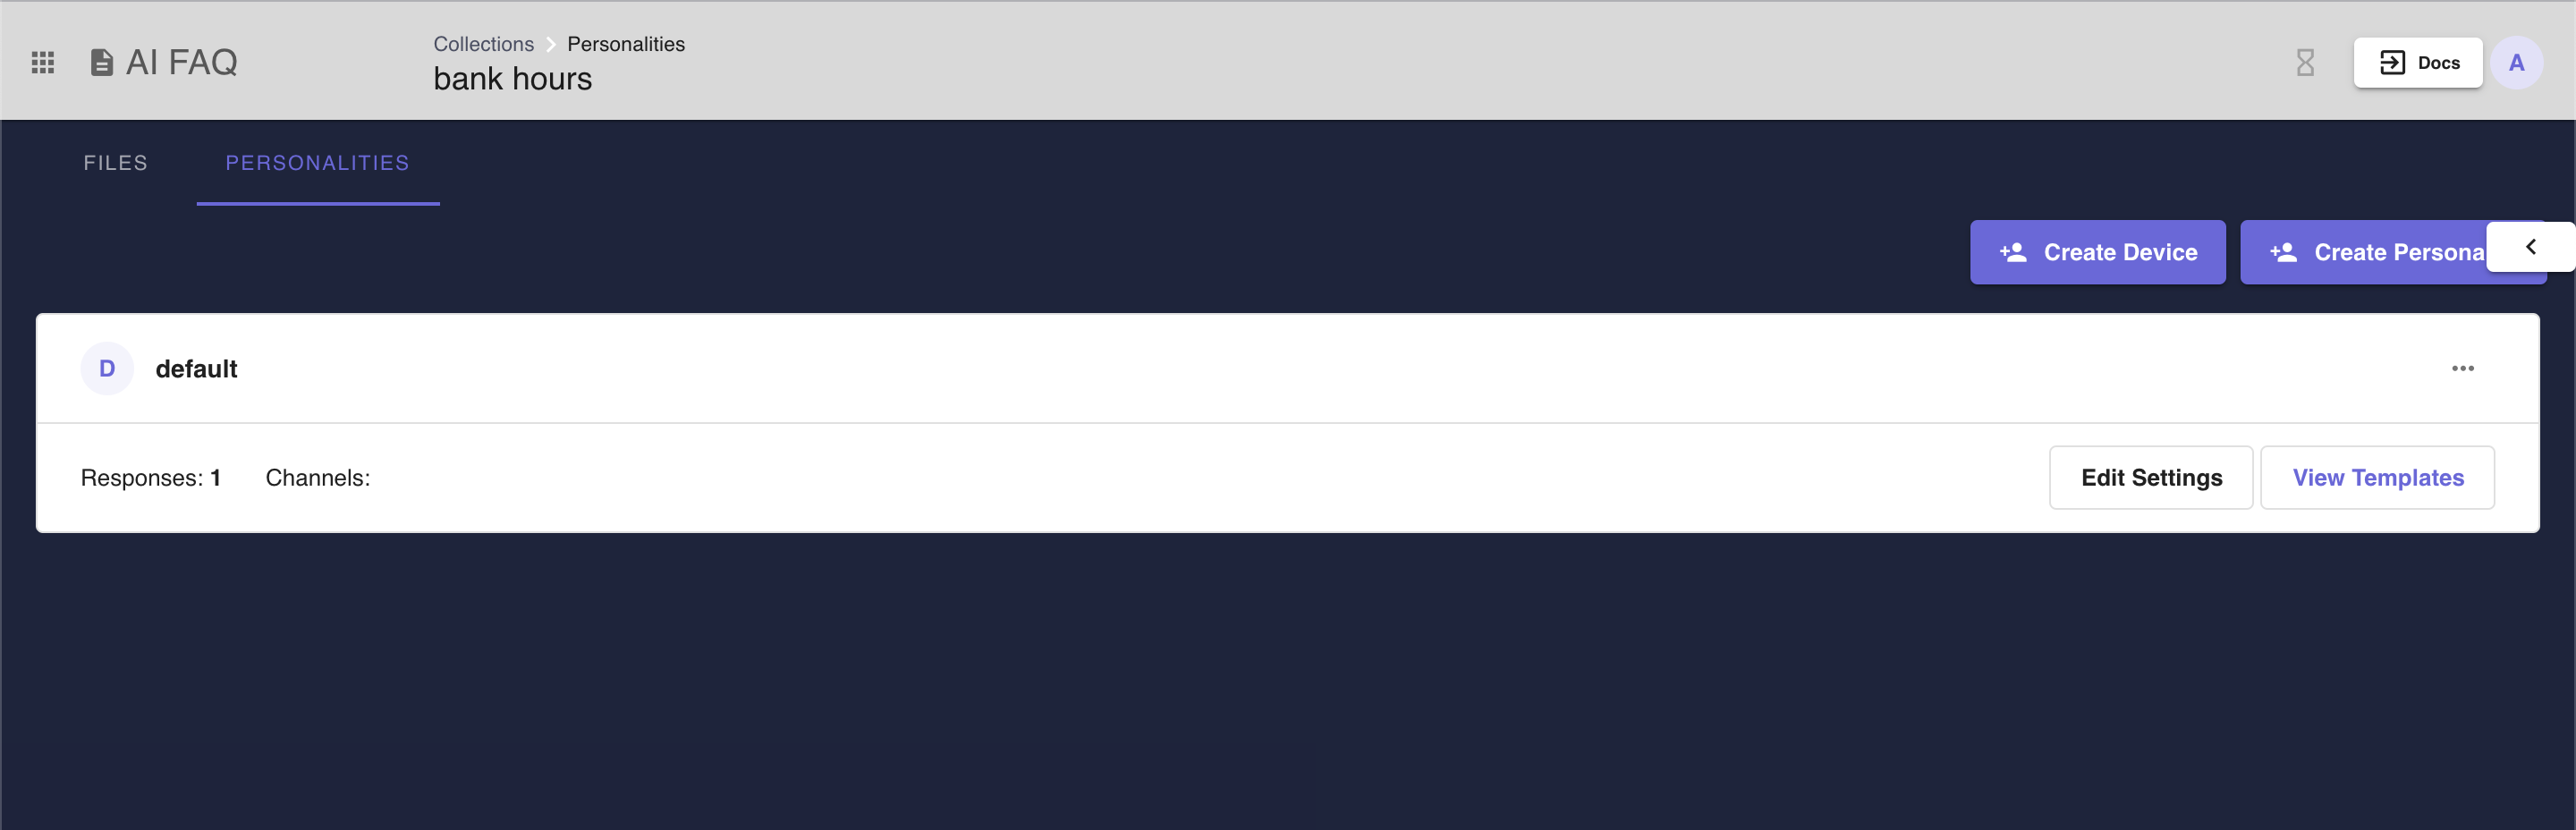 Figure 7 - AI FAQ Personalities Listing Page.
Each personality will have one response template and users can edit the contents of the response template by clicking View Templates.
The AI FAQ response variable is exposed as ai_faq_response. The ai_faq_response variable has the following format:
{
  "documents": [
    {
      "id": "997cc43e789c89e331890292ec27fc620caae31931325e9151acbb8860bac6bc",
      "content": "ThescenariofacedbythePacificIslandsisaprimeexampleofhowhuman-induced\nglobalwarmingduetogreenhousegasemissionsimpactscommunitiesthatcontributeminimally\ntotheproblem.AsdiscussedinLecture6.1,“Climatechangemeansthattherearebothnatural\nandhumancausesresultinginchangingweatherpatterns…Buthumancauseslikegreenhouse\ngasemissions…aredirectlylinkedtoglobalwarming.”ThePacificIslands,accordingtothe\nNationalScienceFoundation,“Areonlyresponsiblefor0.03%ofglobalgreenhousegas\nemissions,buttheyaredisproportionallyfacingmanyofthethreatsofclimatechangeheadon.”\nTheseislandcommunitiesfacearangeofenvironmentalrisks,includingflooding,coastal\nerosion,stormsurges,anddegradationofcoralreefs.Allthesearedirectoutcomesofthe\nchangingweatherpatternsassociatedwithclimatechange.Theseimpactsnotonlythreatenthe\nnaturalenvironmentoftheislandsbutalsosignificantlyendangerthelivelihoodsofcommunities\nheavilydependentonmarineecosystems.Moreover,traditionalknowledgesystems,whichhave\n\x0c3\naidedresourceconservationandthesustainabilityofthesecommunities,areatriskduetothe\nchangesbroughtbyclimatechange,highlightinganobviouscaseofdistributiveinequity.\nAlthoughthesecommunitiescontributenegligiblytotheglobalproblem,theyaretheones\nheavilybearingitsconsequences.Thissituationisaclearillustrationofthedistributiveinjustice\nmentionedinthelecture,demonstratingtheurgentneedforeffectiveandequitablesolutionsto\ncombattheimpactsofclimatechange.\n",
      "blob": null,
      "meta": {
        "source_id": "30fbc4f0253f61f27ca1ba94cf4e48e2f94532d65ae6907cabe5f8b23a11a946",
        "uuid": "0033f56e-acd3-4f27-91c0-9a6fa717e87f",
        "tags": [],
        "page_number": 2,
        "source": "Module_6_Portfolio_Essay.pdf",
        "file_path": "f761e58b46f84ce59bfed987ee069be5_Module_6_Portfolio_Essay.pdf",
        "embedded": true,
        "split_id": 1,
        "split_idx_start": 866
      },
      "score": 0.05785761773586273,
      "embedding": null,
      "sparse_embedding": null
    }
  ]
}
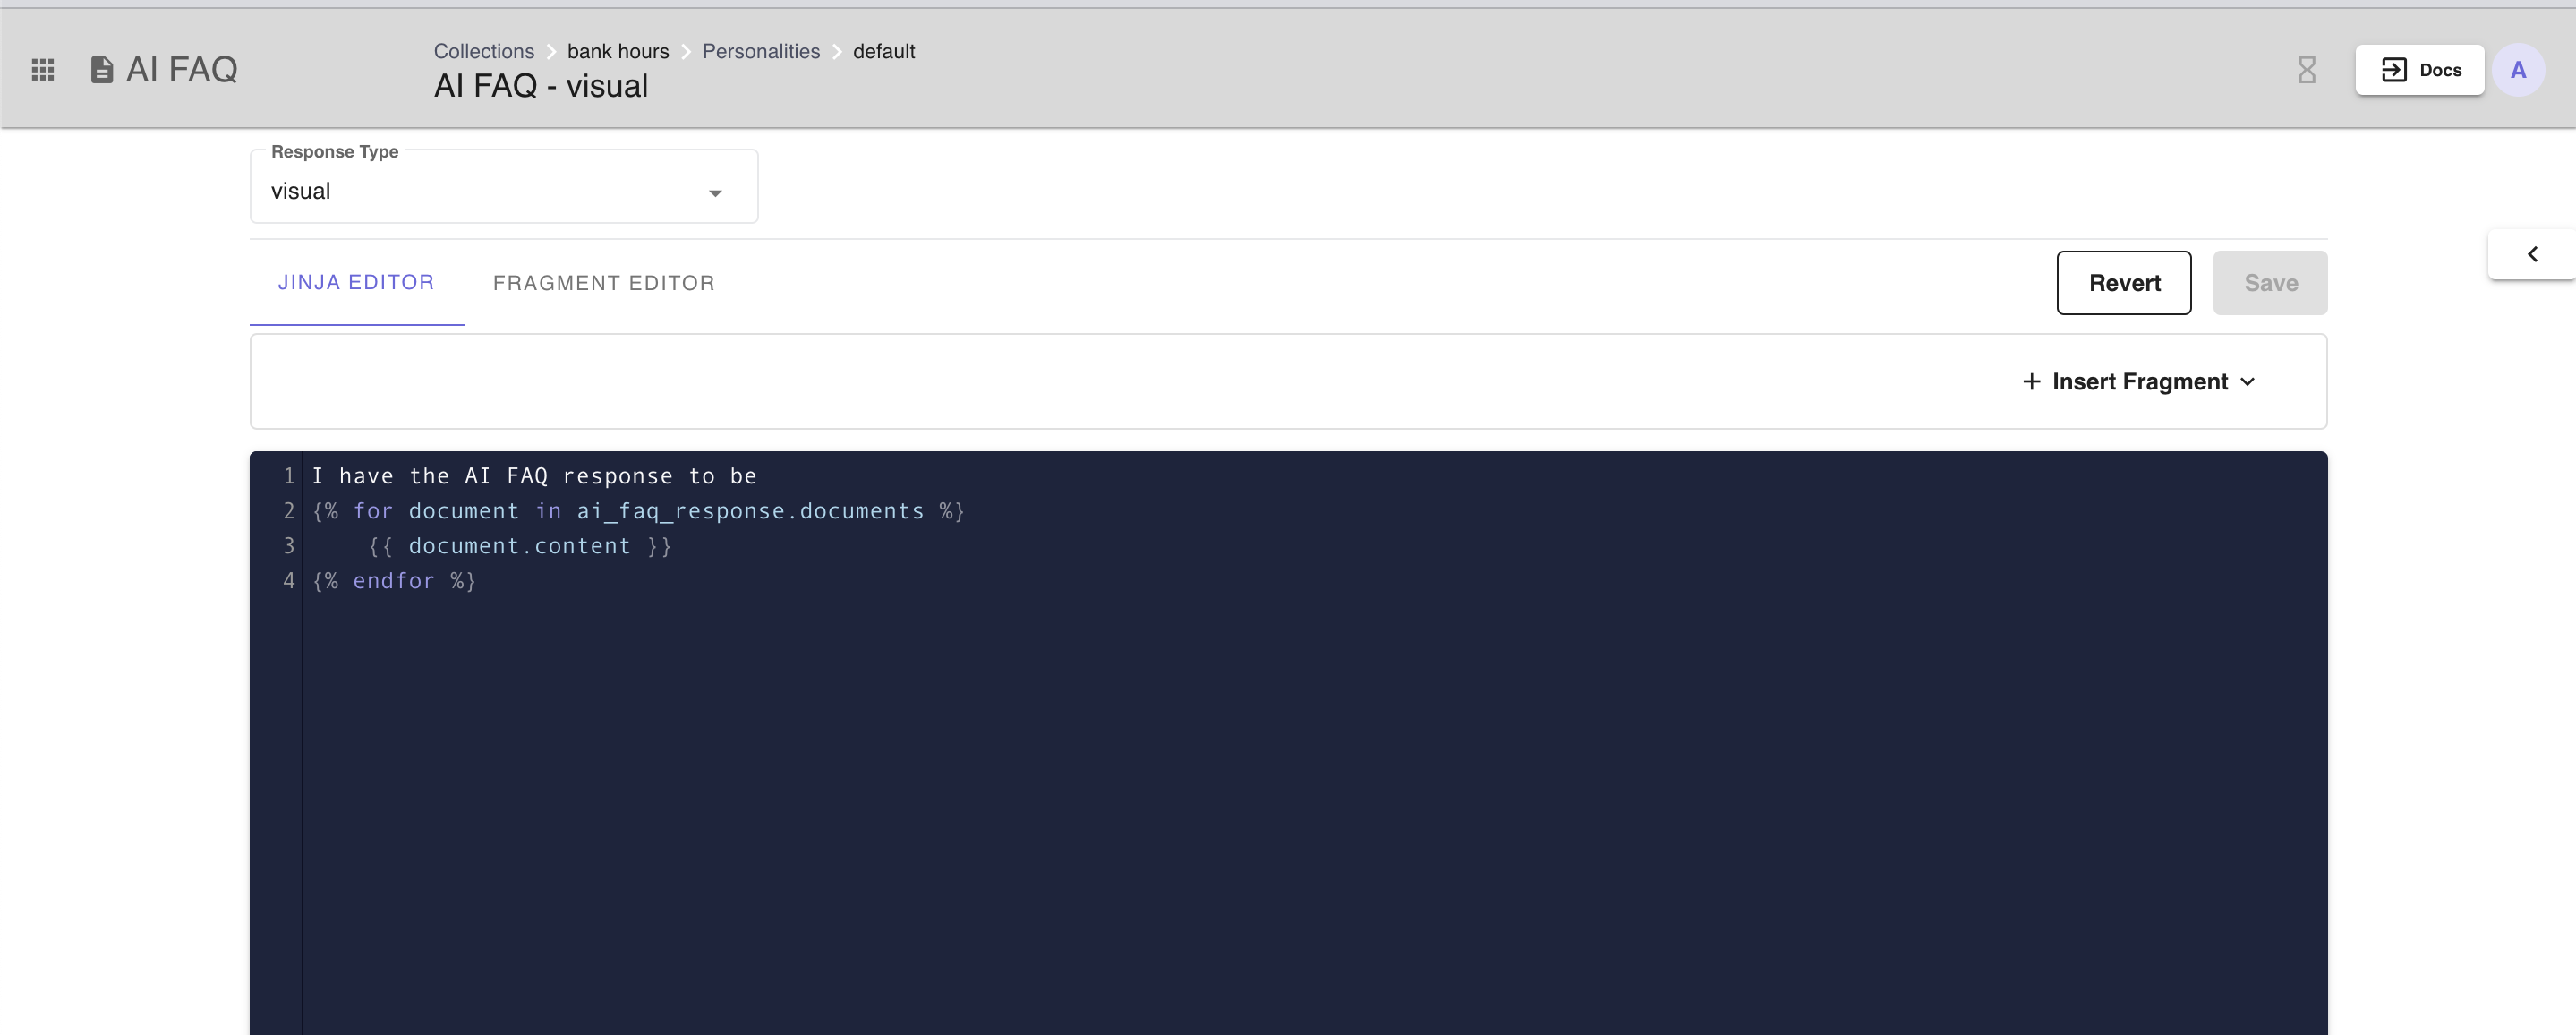 Figure 8 - Example response template that iterates over the documents and render the content of each document.
# How to Query a Collection
In order to query the collection, the user needs to associate the collection with an application.
- Create a new environment
- Create an application and attach the collection to it.
- There are multiple ways to query a collection once it is attached to an application. One way is to use the Query Sidebar and choose the environment/application. Another way is to attach the application to an integration and query the integration. A user can also query the collection directly using the query endpoint similar to querying an environment/application.
# How to Query from BLS
In order to query the collection from a business logic server, hit the /v1/ai-faq/query. The request requires a query, application which must be formatted as <env>:<app>, where env is the environment name and app is the application name. Optionally, advanced filtering can be applied using the ai_faq_filters field. This field must be an object containing three keys: field, operator, and value. The field specifies the document metadata field to filter on (e.g., meta.page_number), the operator determines how the comparison is made (e.g., ==), and value represents the expected value for the filter. Supported comparison operators include: ==, !=, >, >=, <, <=, in, not in. To combine multiple conditions, logical operators such as AND, OR, and (if supported) NOT can be used by nesting them within a conditions list.
Example payload:
{
    "query": "What is the marketing course about?",
    "device": "default",
    "external_user_id": "123",
    "language": "en",
    "application": "test_env:test_app",
    "ai_faq_filters": {
        "field": "meta.page_number",
        "operator": "==",
        "value": 2
    },
    "dialog": ""
}
{
    "query": "Show all courses related to finance",
    "device": "default",
    "external_user_id": "456",
    "language": "en",
    "application": "test_env:test_app",
    "ai_faq_filters": {
        "field": "meta.genre",
        "operator": "not in",
        "value": ["statistics", "mathematics"]
    },
    "dialog": ""
}
{
    "query": "Tell me about engineering courses published after 2021",
    "device": "default",
    "external_user_id": "789",
    "language": "en",
    "application": "test_env:test_app",
    "ai_faq_filters": {
        "operator": "AND",
        "conditions": [
            {
                "field": "meta.genre",
                "operator": "==",
                "value": "engineering"
            },
            {
                "field": "meta.page_number",
                "operator": "<",
                "value": 5
            }
        ]
    },
    "dialog": ""
}
# Setting Advanced Query Options
When querying a collection, the user can specify parameters to restrict the results of the query. These options are set on the collection level and can be set when creating a collection or by editing an existing collection. See Figure 3 for more information on where a user can configure these options. Once configured a user can view the Advanced Option of a collection on the Document Collection Listing Page, see Figure 1 for an example of where it is shown.
Top K determines the number of documents the service will return.
Threshold determines the level of confidence in returning the documents. A higher value will be stricter in returning results whereas a lower value will be more lenient and yield more results.
Generate Response uses generative AI to build a summarized response of all the returned documents. This is useful in cases where the user wants to provide an easy-to-read response.
Last Updated: 3/4/2025