# Bot Orchestration
# What
# What is Bot Orchestration?
Bot Orchestration is a feature on the Clinc AI development platform that facilitates the seamless integration of multiple AI Versions to produce a single queryable Mesh. This unified AI Version will be represented as a dynamic 'Bot Orchestration Mesh' which can be readily modified. A Mesh consists of multiple sockets into which existing AI versions can be referenced.
# Why use the Bot Orchestrator?
Large AI models are hard to maintain. Making small changes to data can cause significant negative impacts on the model. Bot Orchestration allows for breaking down of larger models into lighter, more consolidated models. AI versions can be built with more specific functionality or a more limited scope of competencies, and then combined into a single model via a mesh. By deploying and connecting versions with the Bot Orchestrator, one can ensure that models are only utilized when required, resulting in more efficient, maintainable, and cost effective models.
# What is a Valid Orchestration Graph?
A valid mesh must meet the following requirements:
All sockets in the Bot Orchestrator mesh have been filled with an AI version.
All socketed AI versions included in the mesh are individually trained.
All transitions between mesh sockets have both a source and destination state defined.
All socket classifiers to be trained will be trained on at least two intent classes.
This means that each socketed AI version state referenced by the mesh, which has a transition to another mesh socket, will gain a classifier model upon training the mesh. In order to train a mesh-level classifer on at least two intent classes, the sum of all unique classification transitions (both mesh-level and AI version-level) outgoing from the AI version state must be greater than one. A classification transition is unique in this case if its set of trigger intents differs from those of all other classification transitions outgoing from that state.
# How
# How to use the Bot Orchestrator
To use this feature, the institution needs the
Bot Orchestrationentitlement. To view the orchestrations, a user should have theView Bot Orchestratorscope and to edit or train orchestrations a user should have theEdit Bot Orchestratorand theView AI Modelsscope. TheView Trainingscope is required to navigate from a socket to its associated AI Version. To do this, click on the socket and selectView AI Versionin the menu options.On the
Orchestration ListingPage (Figure 1), a user will see a listing of all existing orchestrations for their institution. A user will have the ability to create a new orchestration by clicking on thecreatebutton.If a user clicks on the row itself, the row will expand out and they are able to view which Environment and Application the orchestration belongs too, should it be assigned any.
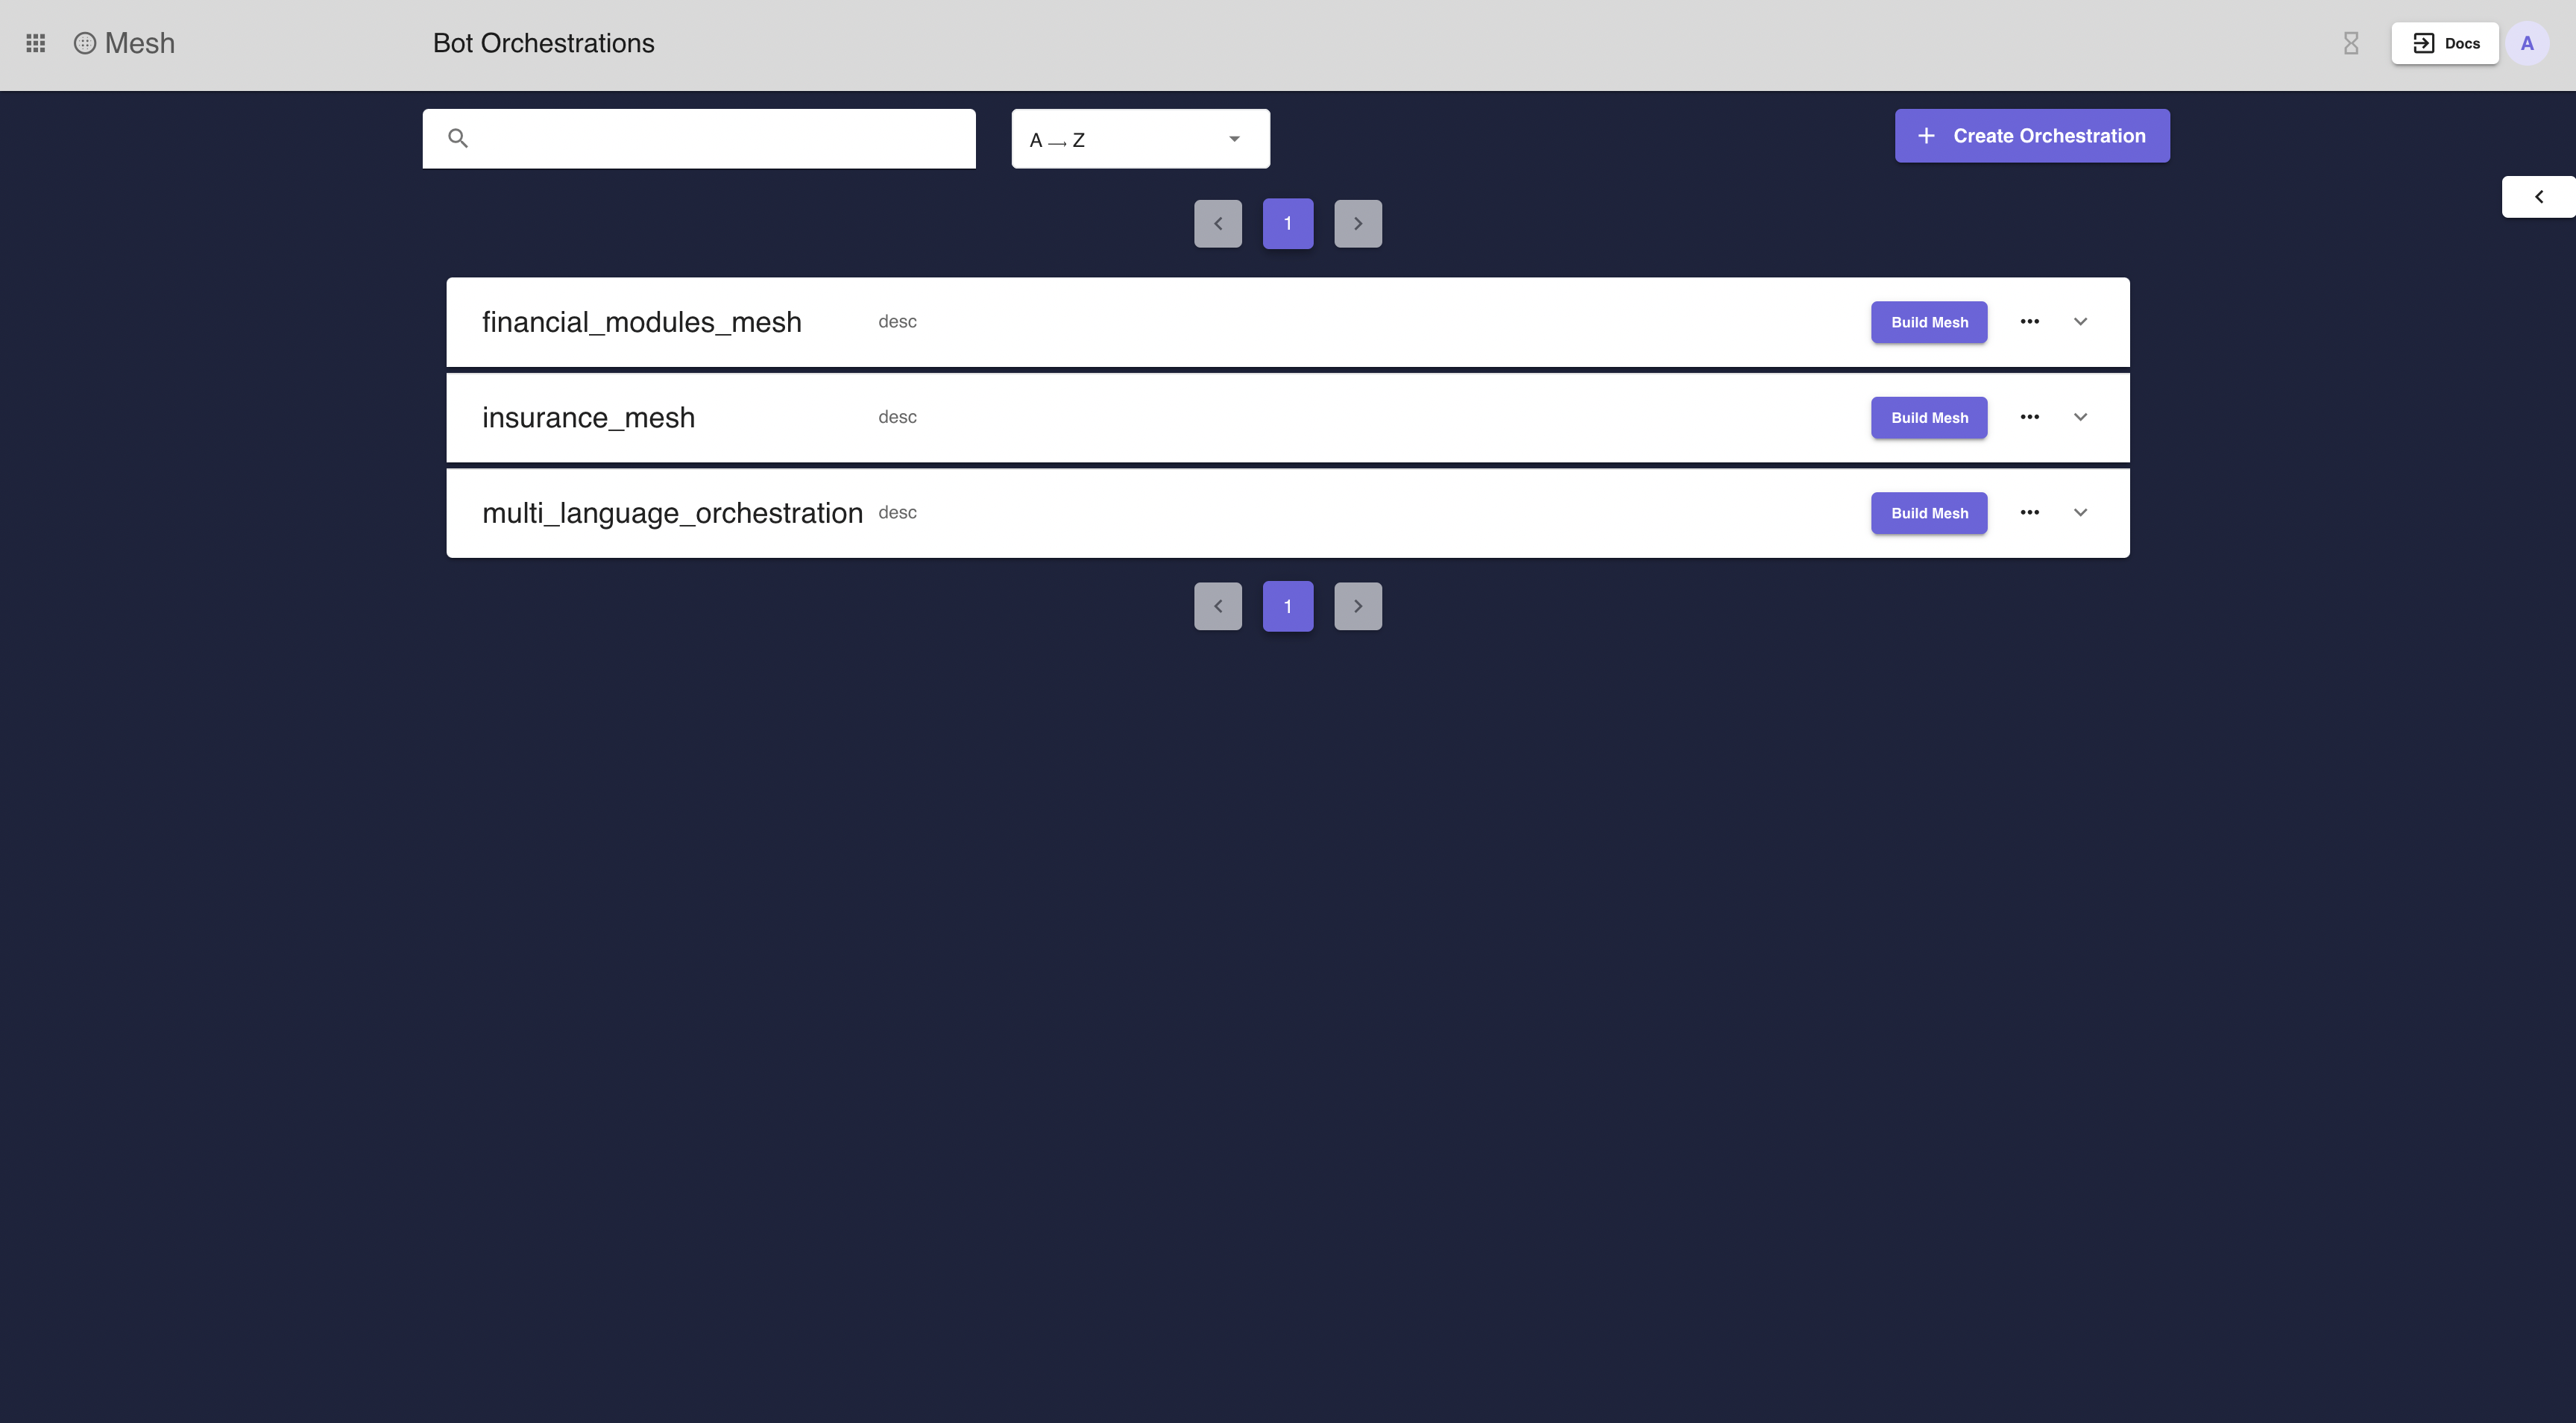 Figure 1: Orchestration Listing Page
Selecting the
Build Meshoption will navigate a user to the Orchestration Graph (Figure 2). When a user first arrives on this page the root socket will have no associated AI version so one must be selected as the entry point to the mesh. Additional options such asDeleteandEditare available in the overflow menu accessable by clicking on the socket.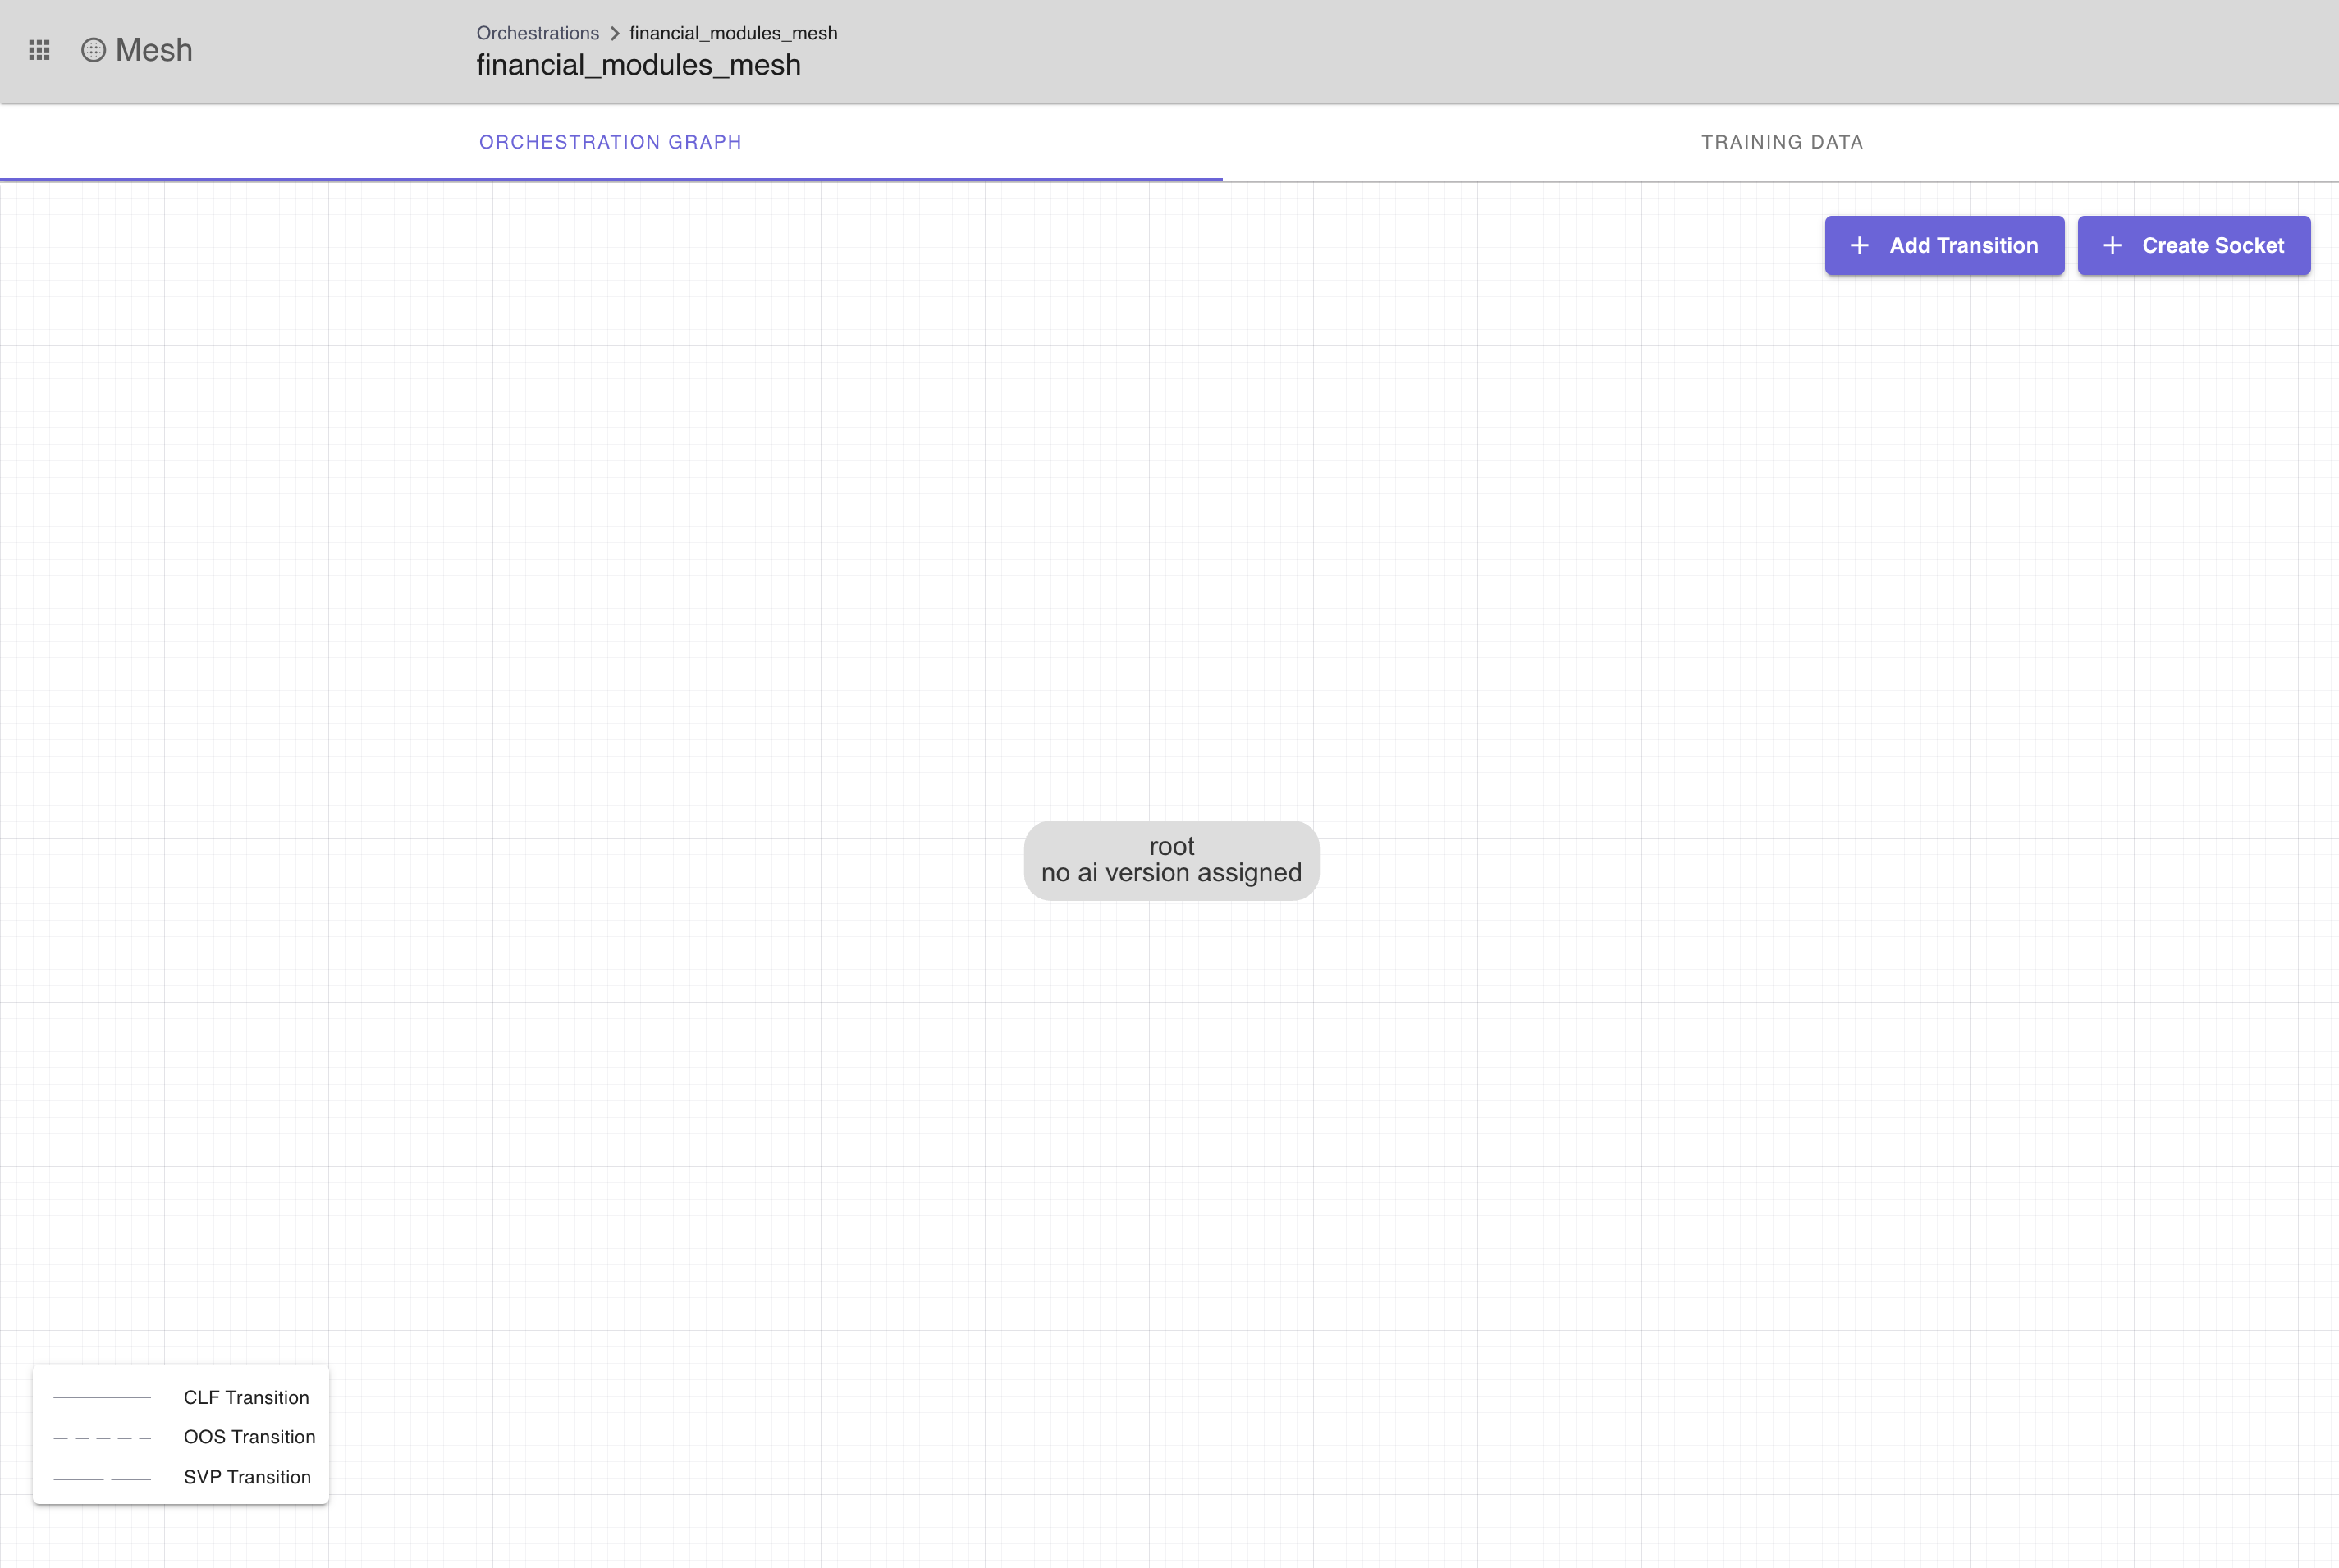 Figure 2: Orchestration Graph
On this page, a user can create sockets. Sockets represent AI Versions on the orchestration graph. To create a socket, click on the
Create Socketbutton. A dialog should appear and a user will be asked to select which AI Version they would like to attach to the socket (Figure 3).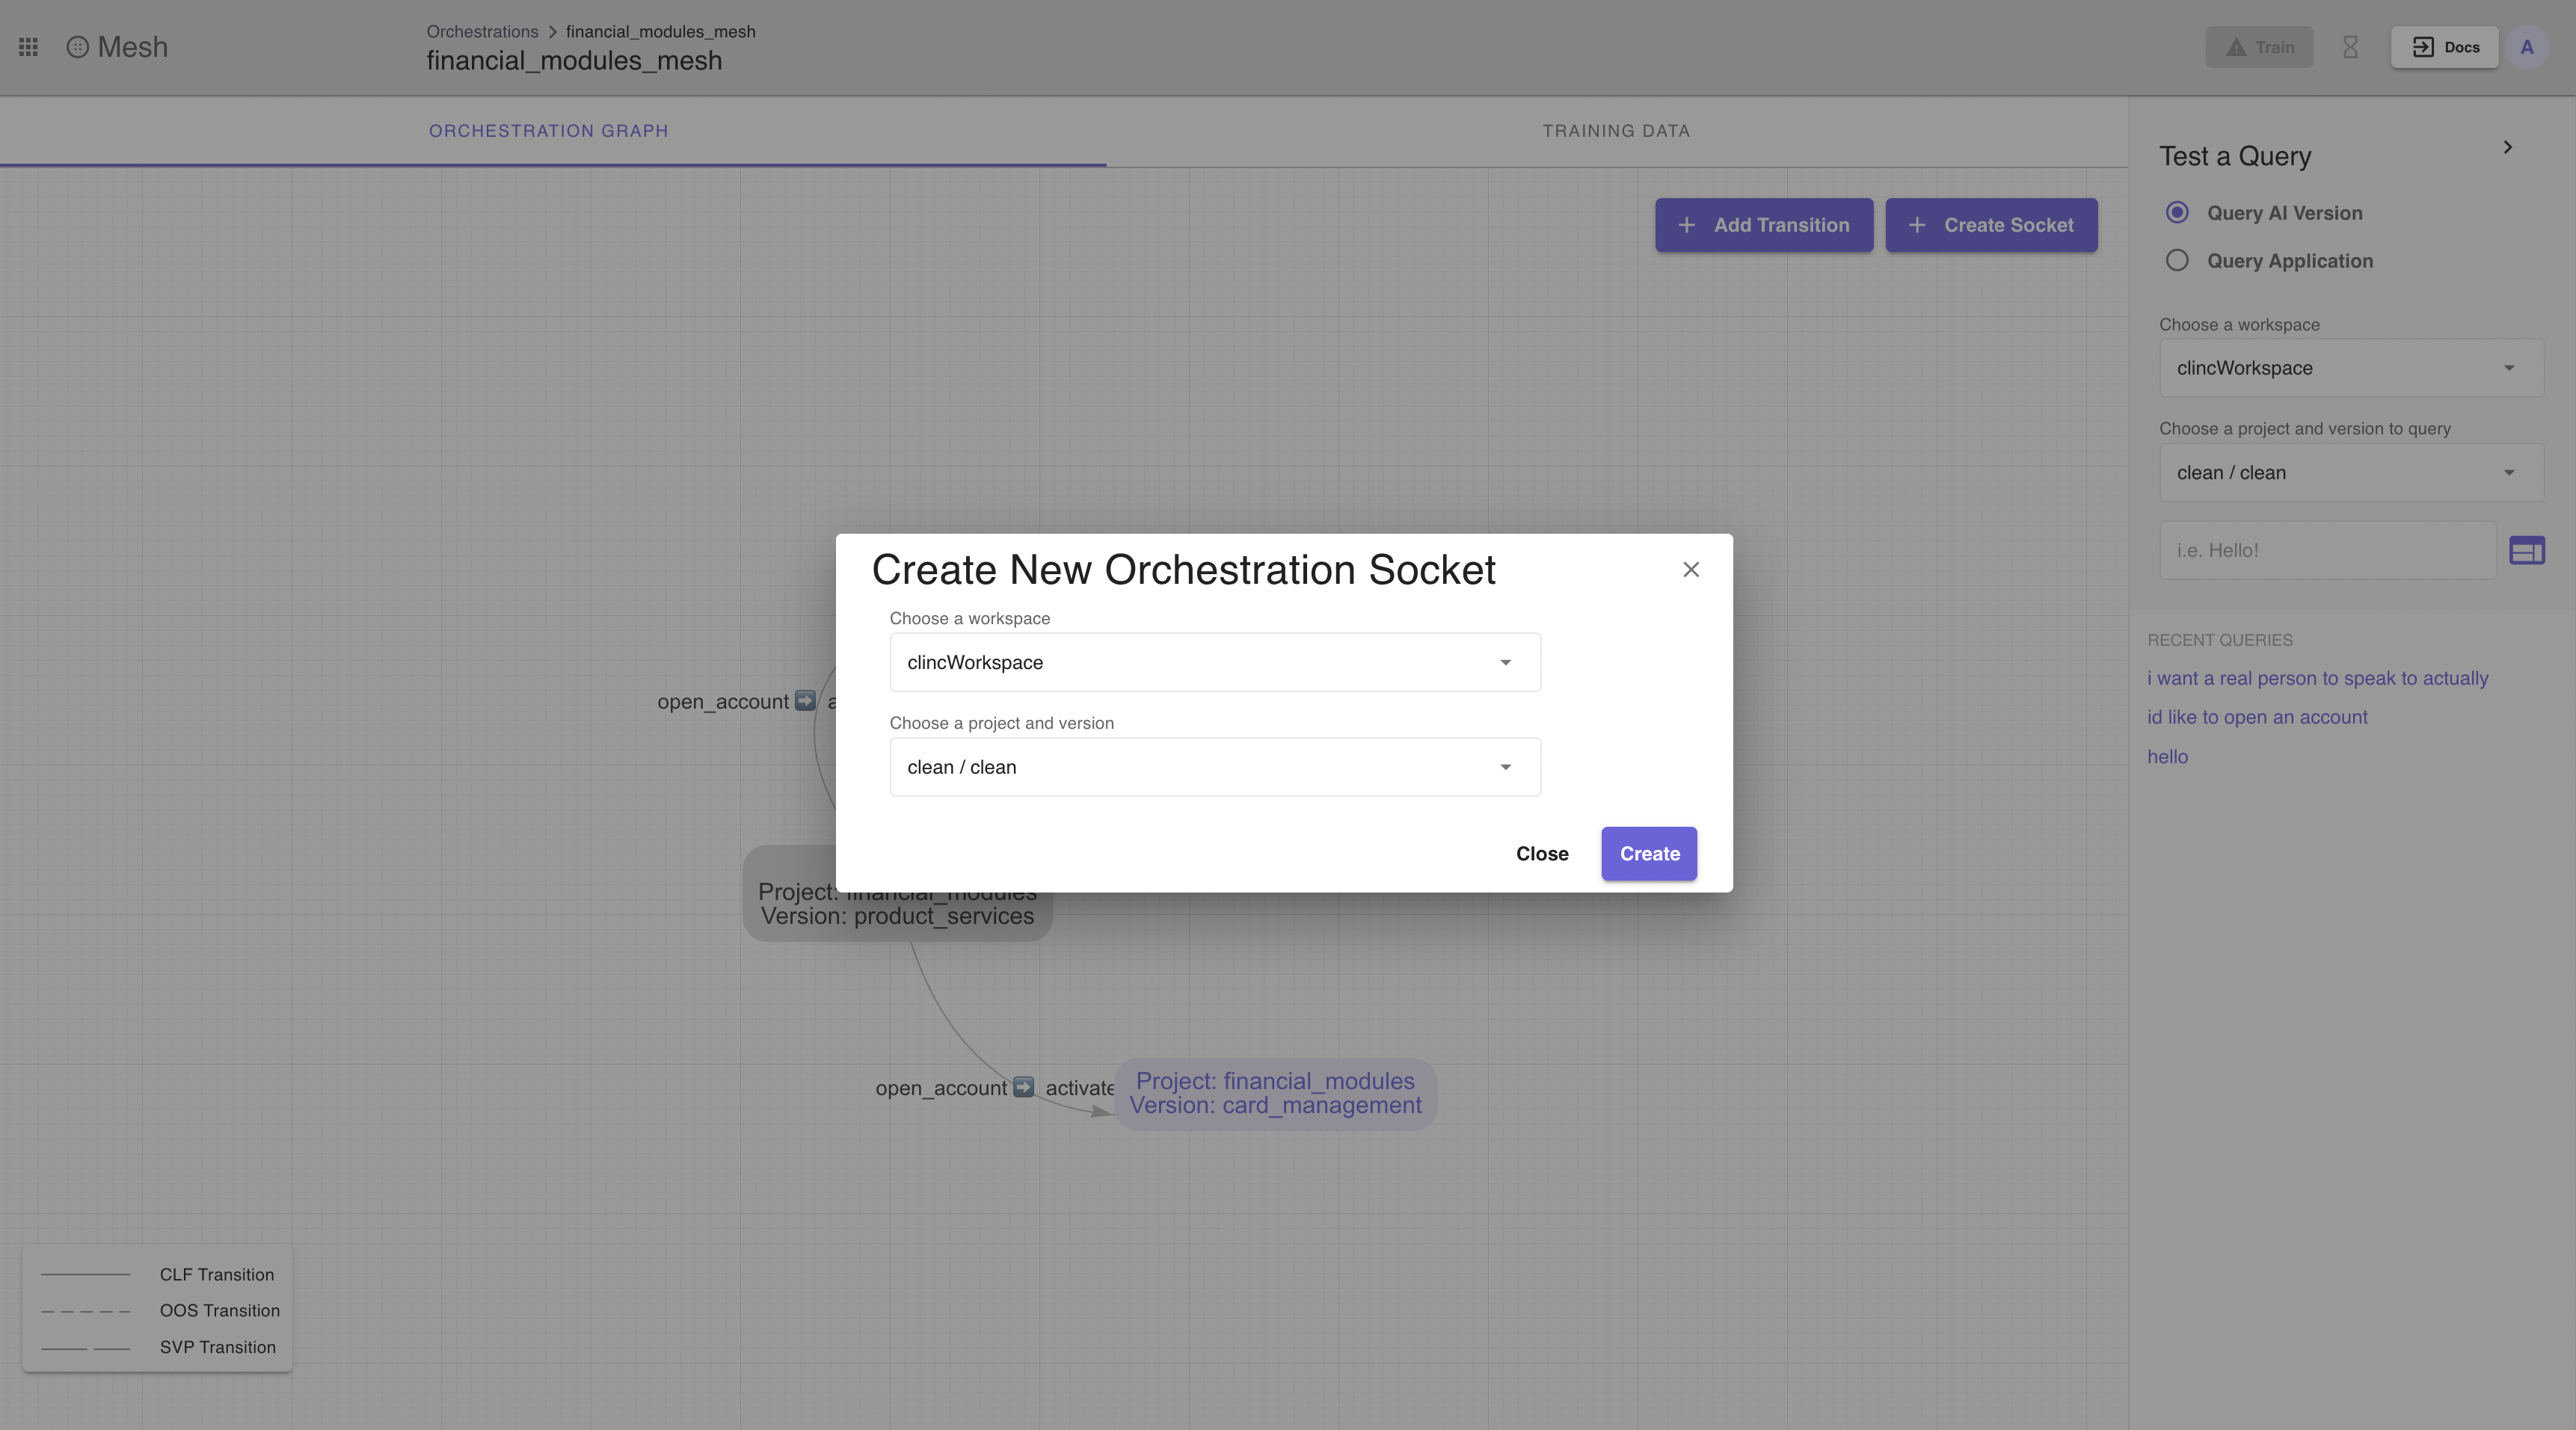 Figure 3: Orchestration Socket Dialog
Once a user has created a few sockets, the next step is to create orchestration transition from socket to socket. To create an orchestration transition, select the
Create Transitionbutton. This will activate the ability to drag the cursor from the source socket to the destination socket to create the transition. Orchestration transitions require a source socket (from) and a destination socket (to). The image below shows the orchestration graph when drag and drop mode is enabled (Figure 4).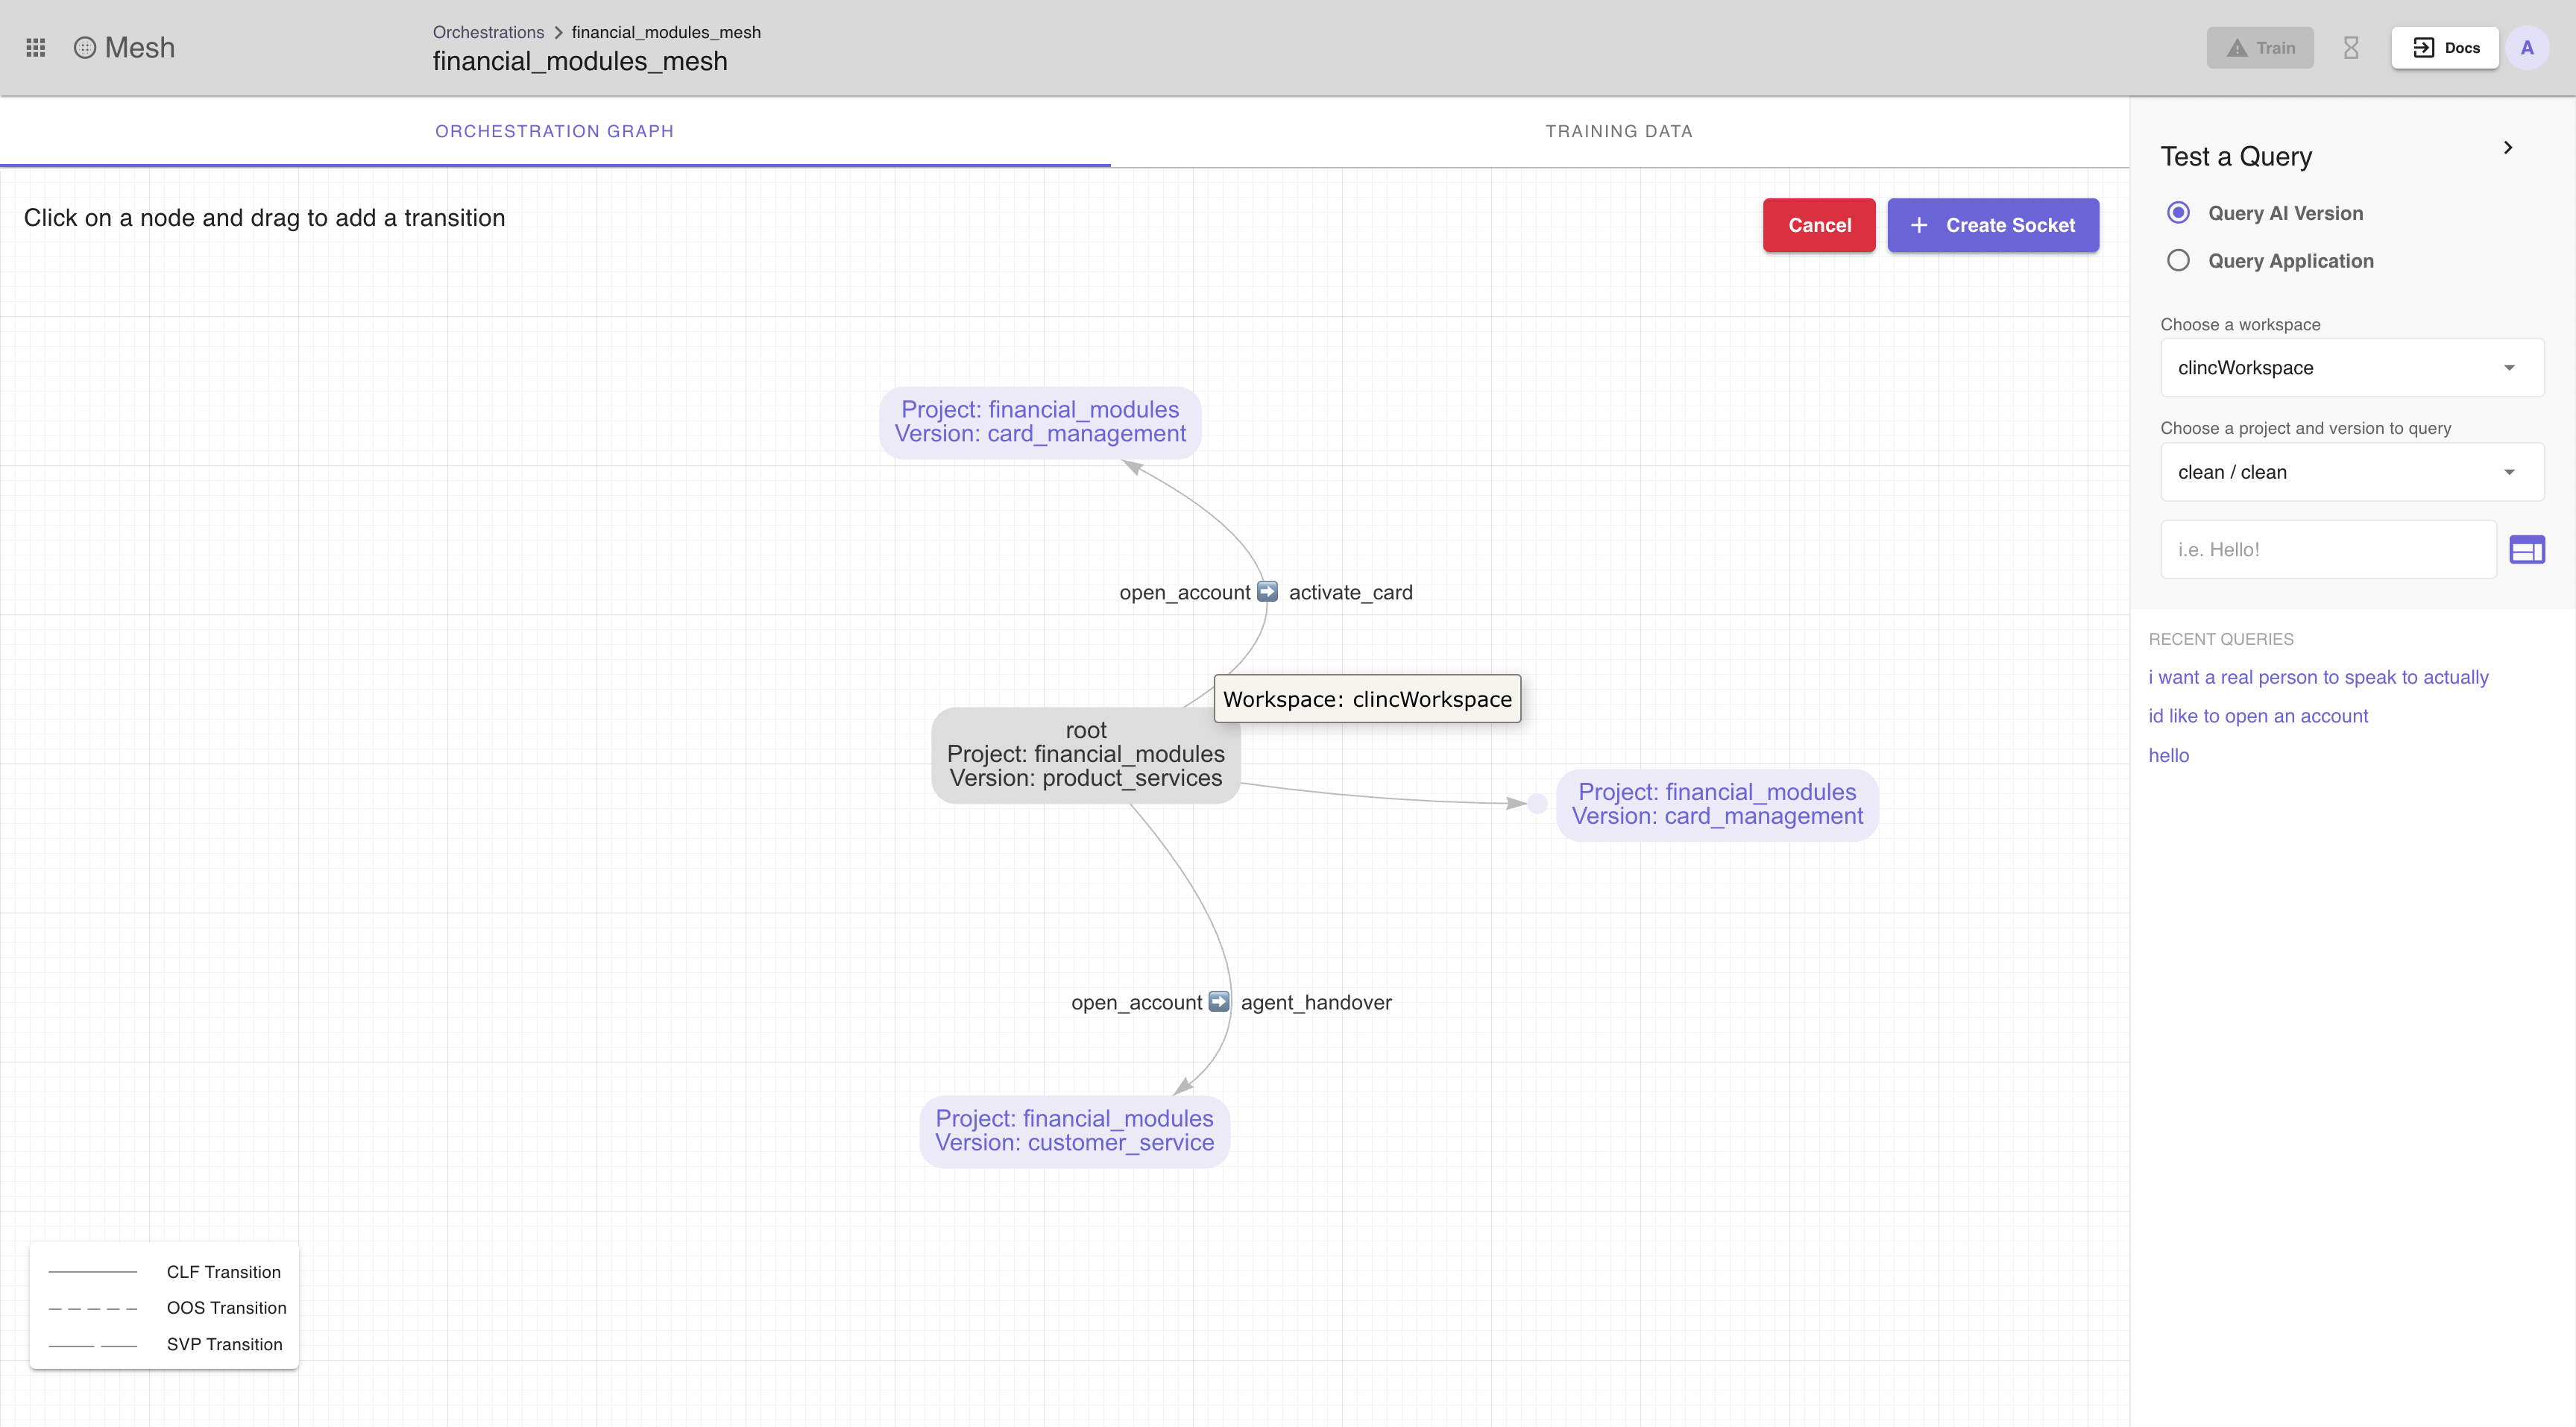 Figure 4: A user can drag and drop transitions from one socket to another
The user should drop the arrow on whichever socket they intend to create the destination transition. Upon dropping the transition arrow on the destination socket, a dialog will appear allowing the user to designate a state within the socketed AI version to be the destination state (Figure 5). The user is also responsible for defining the destination competency and state on the destination AI Version in which the incoming transition will reside.
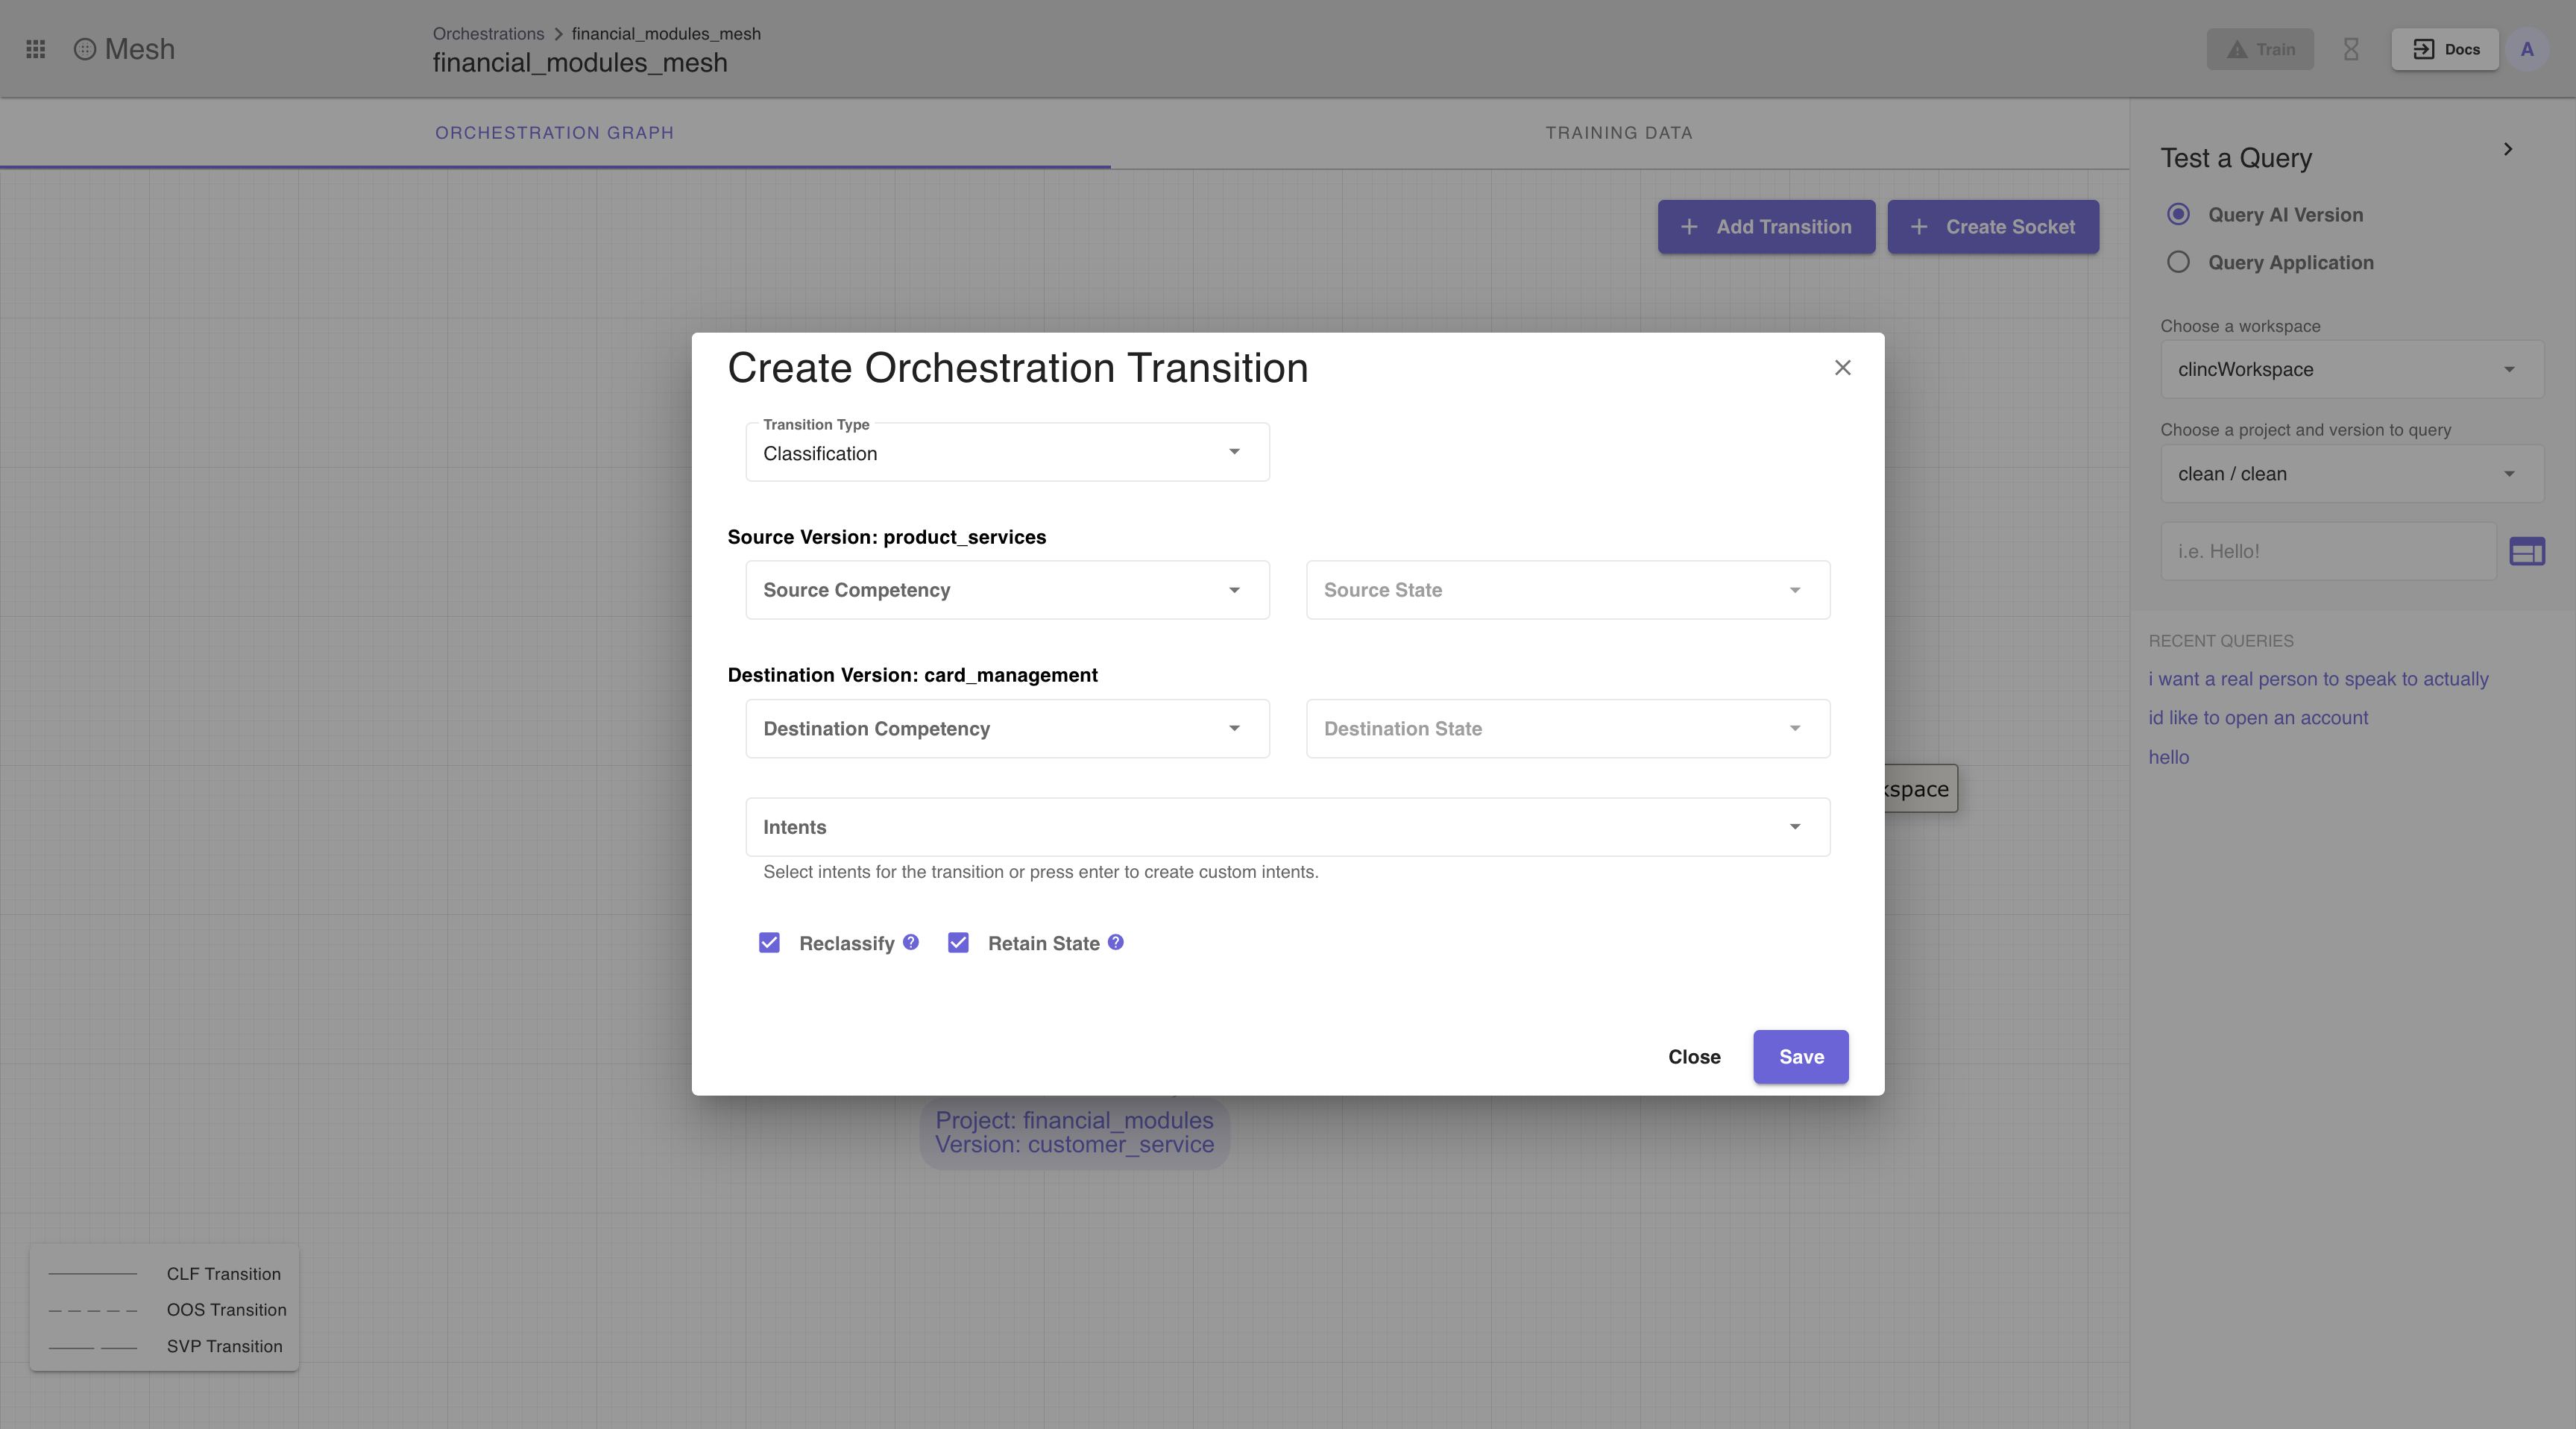 Figure 5: Orchestration Transition Dialog
There a multiple transition options, a user can designate a transition to either be triggered by classification intent or on the classifier going out-of-scope.
The transition dialog contains two checkboxes on the bottom of the dialog. Selecting the reclassify option causes the utterance to classify again when it arrives at the destination state. Selecting the retain state option will keep a users slots through transitions. By default, the reclassify option and retain state are enabled.
# Training
# Orchestration Training Data
When creating an orchestration transition a user will be required to select or create an orchestration trigger or "intent" on which the transition will be trained. Intents for the orchestrator require their own data for training. A user can add data for each intent on the orchestration training data page (Figure 6), a tab that exists when a user is viewing mesh details.
In the left sidebar, on the orchestration training data page, a user can create, delete, view, and edit the intents that exist on a specific Bot Orchestrator. Clicking on an intent in the sidebar will show you the data for the intent or "orchestration trigger". A user can add, delete, and edit orchestration utterances on this page.
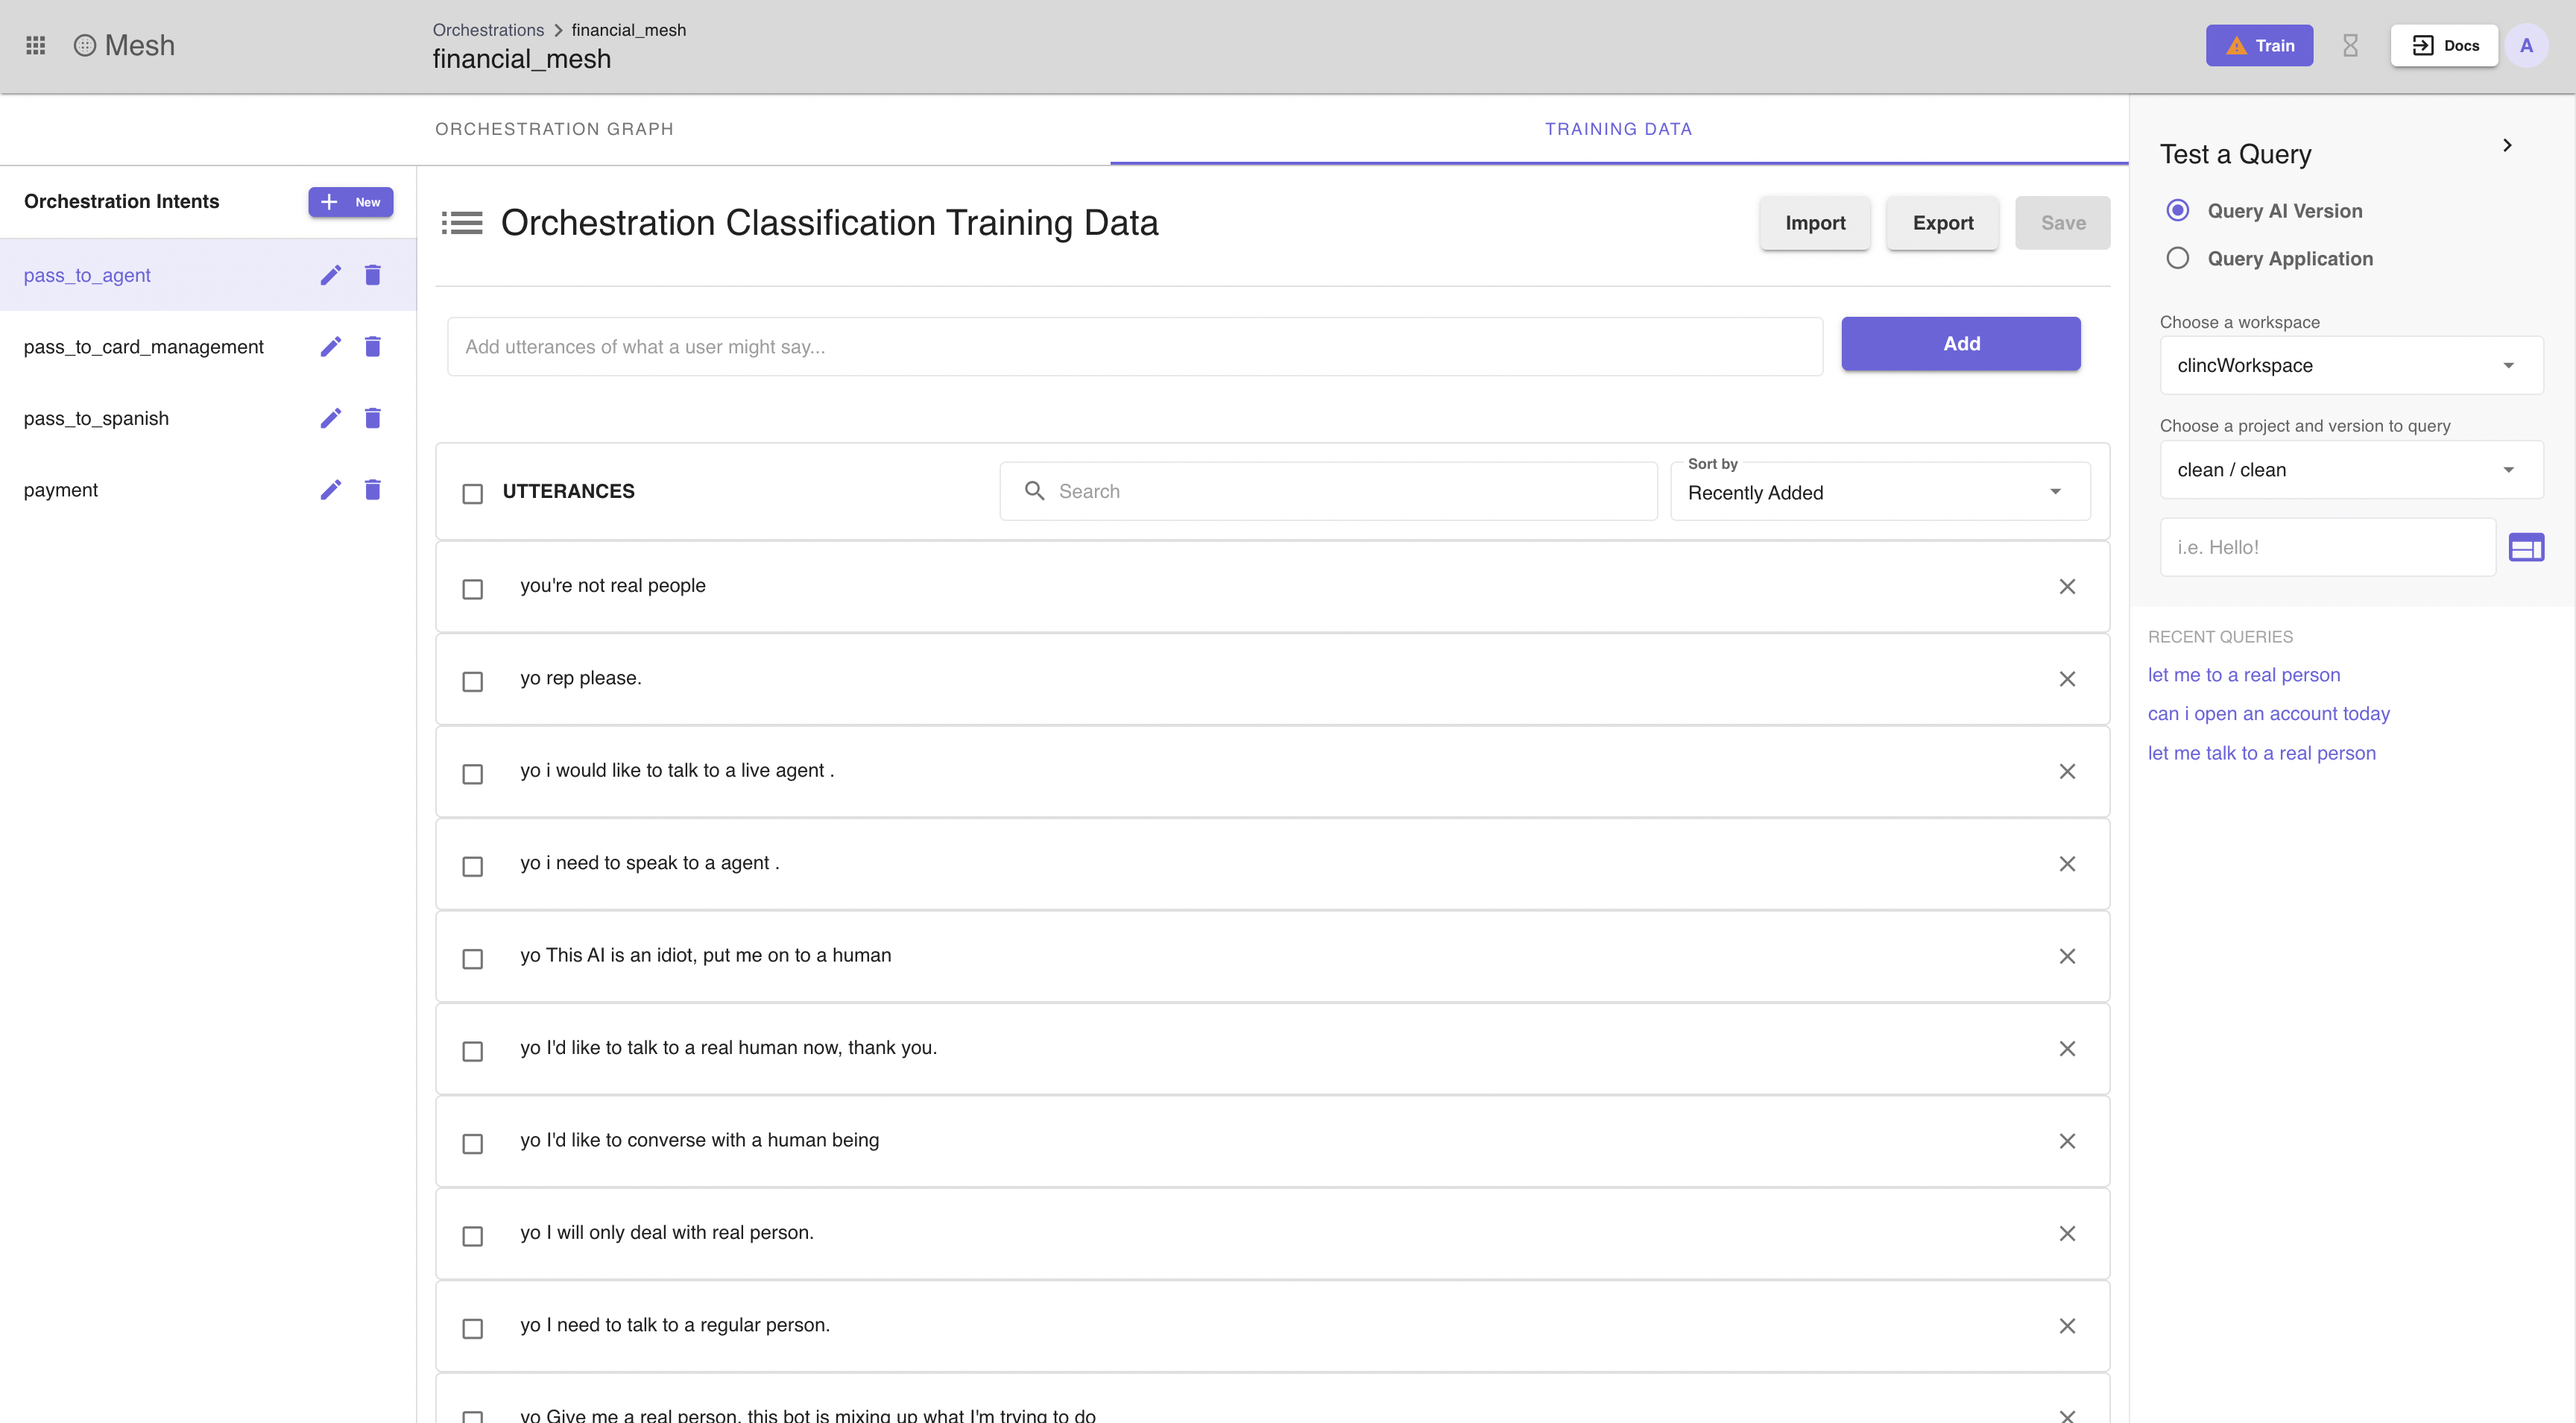 Figure 6: Orchestration Training Data Page
# Import
Data for an orchestration intent can be imported in csv or json format. The same format as classification data import can be used for the Bot Orchestrator. See classification import for an example of the data structure needed for import.
# Export
Bot Orchestrator data can be exported and used in multiple Orchestrations or in AI Versions for classification data. Export is supported for json or csv.
# Curating data
Like any AI Version, one of the most important aspects of a well designed orchestrator is the quality of the dataset. Be sure to include a variety of unique utterances to train the orchestration intent classifier. To support curating quality datasets, there is a uniquess sorting tool on the orchestration training data page (Figure 7). To use uniqueness sorting, simply Unique in the dropdown on the data table in the Training Data tab when you have an intent selected.
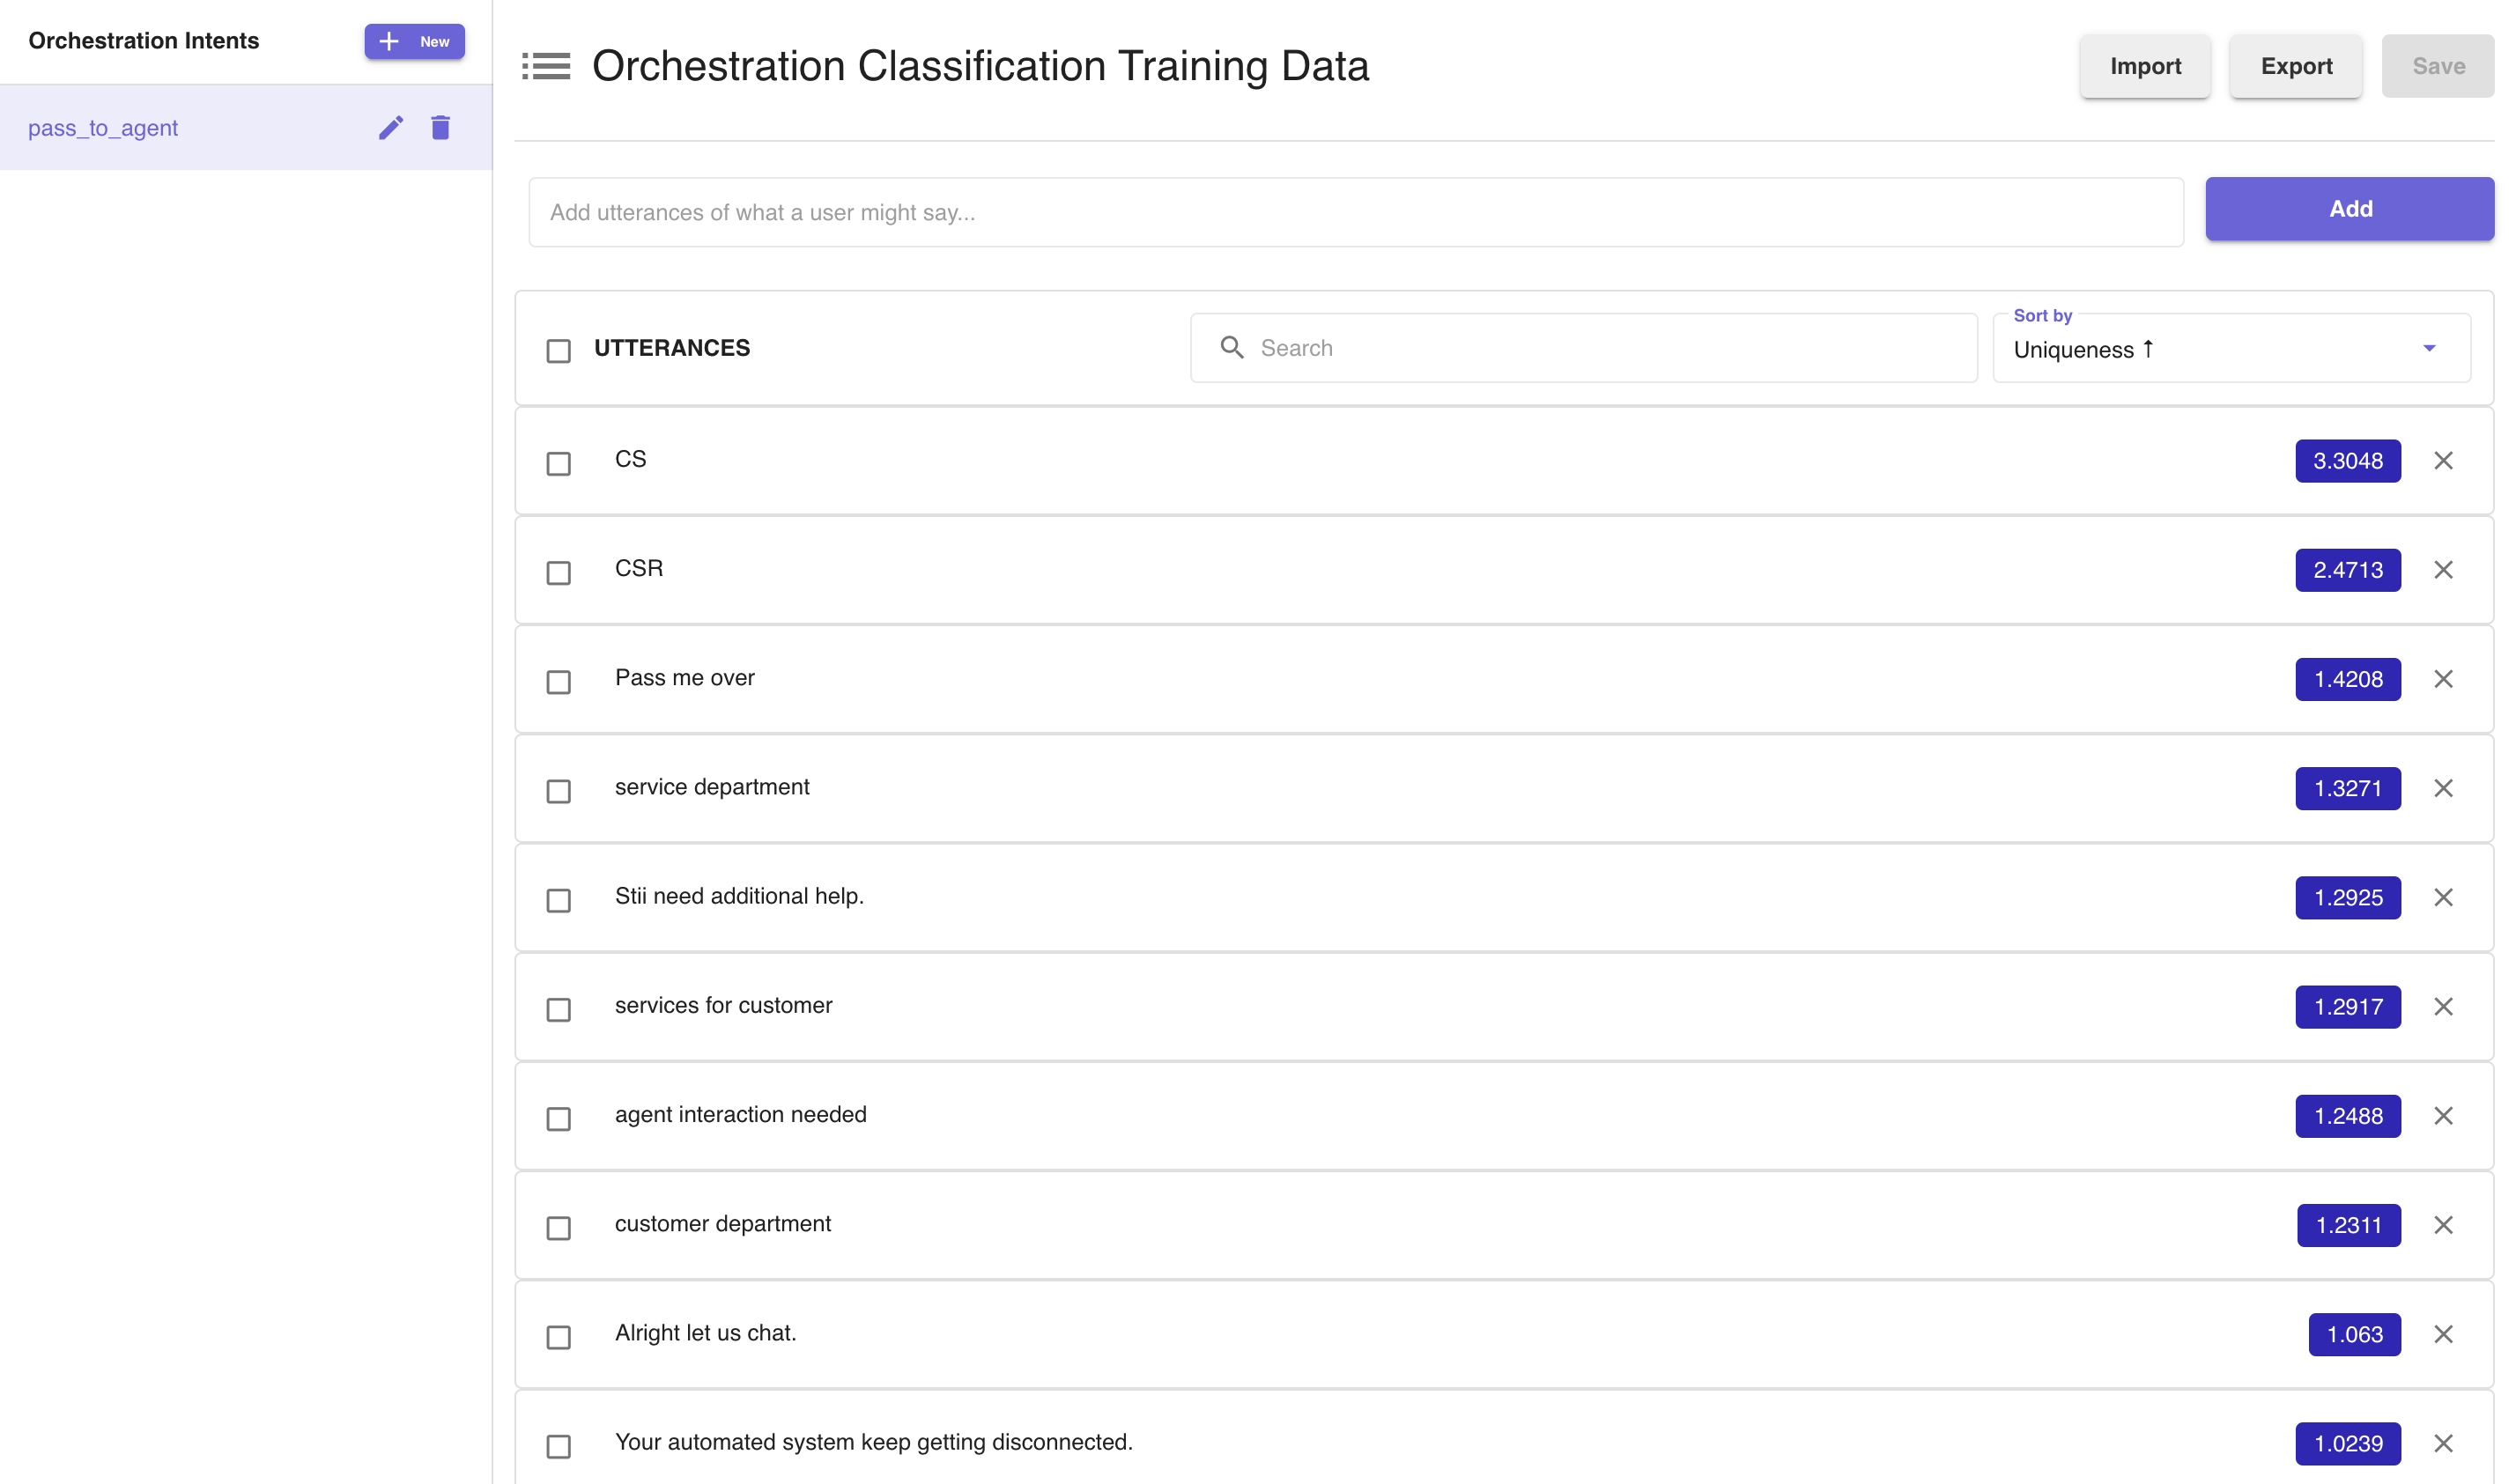 Figure 7: Orchestration Uniqueness Sorting
# Training the orchestrator
Once a suitable dataset has been curated, the Bot Orchestrator may be trained. The Bot Orchestrator is eligible for retraining if any of the following criteria apply.
a. The orchestration has never been trained before.
b. A mesh-level utterance (utterance used to train an orchestration intent) has been added or deleted from the training set.
c A new socket has been added to the mesh or when the AI version referenced by a socket is changed.
d. An utterance has been added or deleted from a socketed AI version's intent training data set and that intent is being used to train an "Orchestration Trigger" or intent on any Orchestration transition. This utterance must have been used in training an Orchestration intent on a transition outgoing from the socket's source state.
e. The set of Orchestration intents on transitions outgoing from a mesh socket has changed. Note that classifiers are trained on "intent classes" not on individual intents. An "intent class" is a single combined intent made up of all intents on a single transition. This means that if you were to have a socket with two transitions, one with intents {A, B} and another with intent {c}, the classifier will be trained on two classes: "A&B" and "C". Note that changing the transitions to have intents {A} and {B, C} respectively will require retraining even though the dataset has not changed at all. The classifier will be trained on different classes: "A" and "B&C".
f. When the source state of a mesh transition is changed. While most of the time, the former is true, if you changed the source state from a terminal state to another terminal state, it wouldn't require retraining.
# Dev Note
Orchestration triggers are used to train a classifier model which replaces the classifier belonging to the configured egress state (if any such a classifier exists) which allows classification to trigger transitions to other AI versions in the orchestrator mesh. This is an important distinction because the classifier can still trigger transition within the AI version state, should any exist.
# Training Examples
The following is an example of a scenario where the socket source state is terminal. Since an orchestration requires at least two valid transitions to be trained, Figure 8 is not trainable. Figure 8 shows the clean_hello state of a newly created AI Version. Click on edit settings for the clean_hello state and observe that the clean_hello state is terminal.
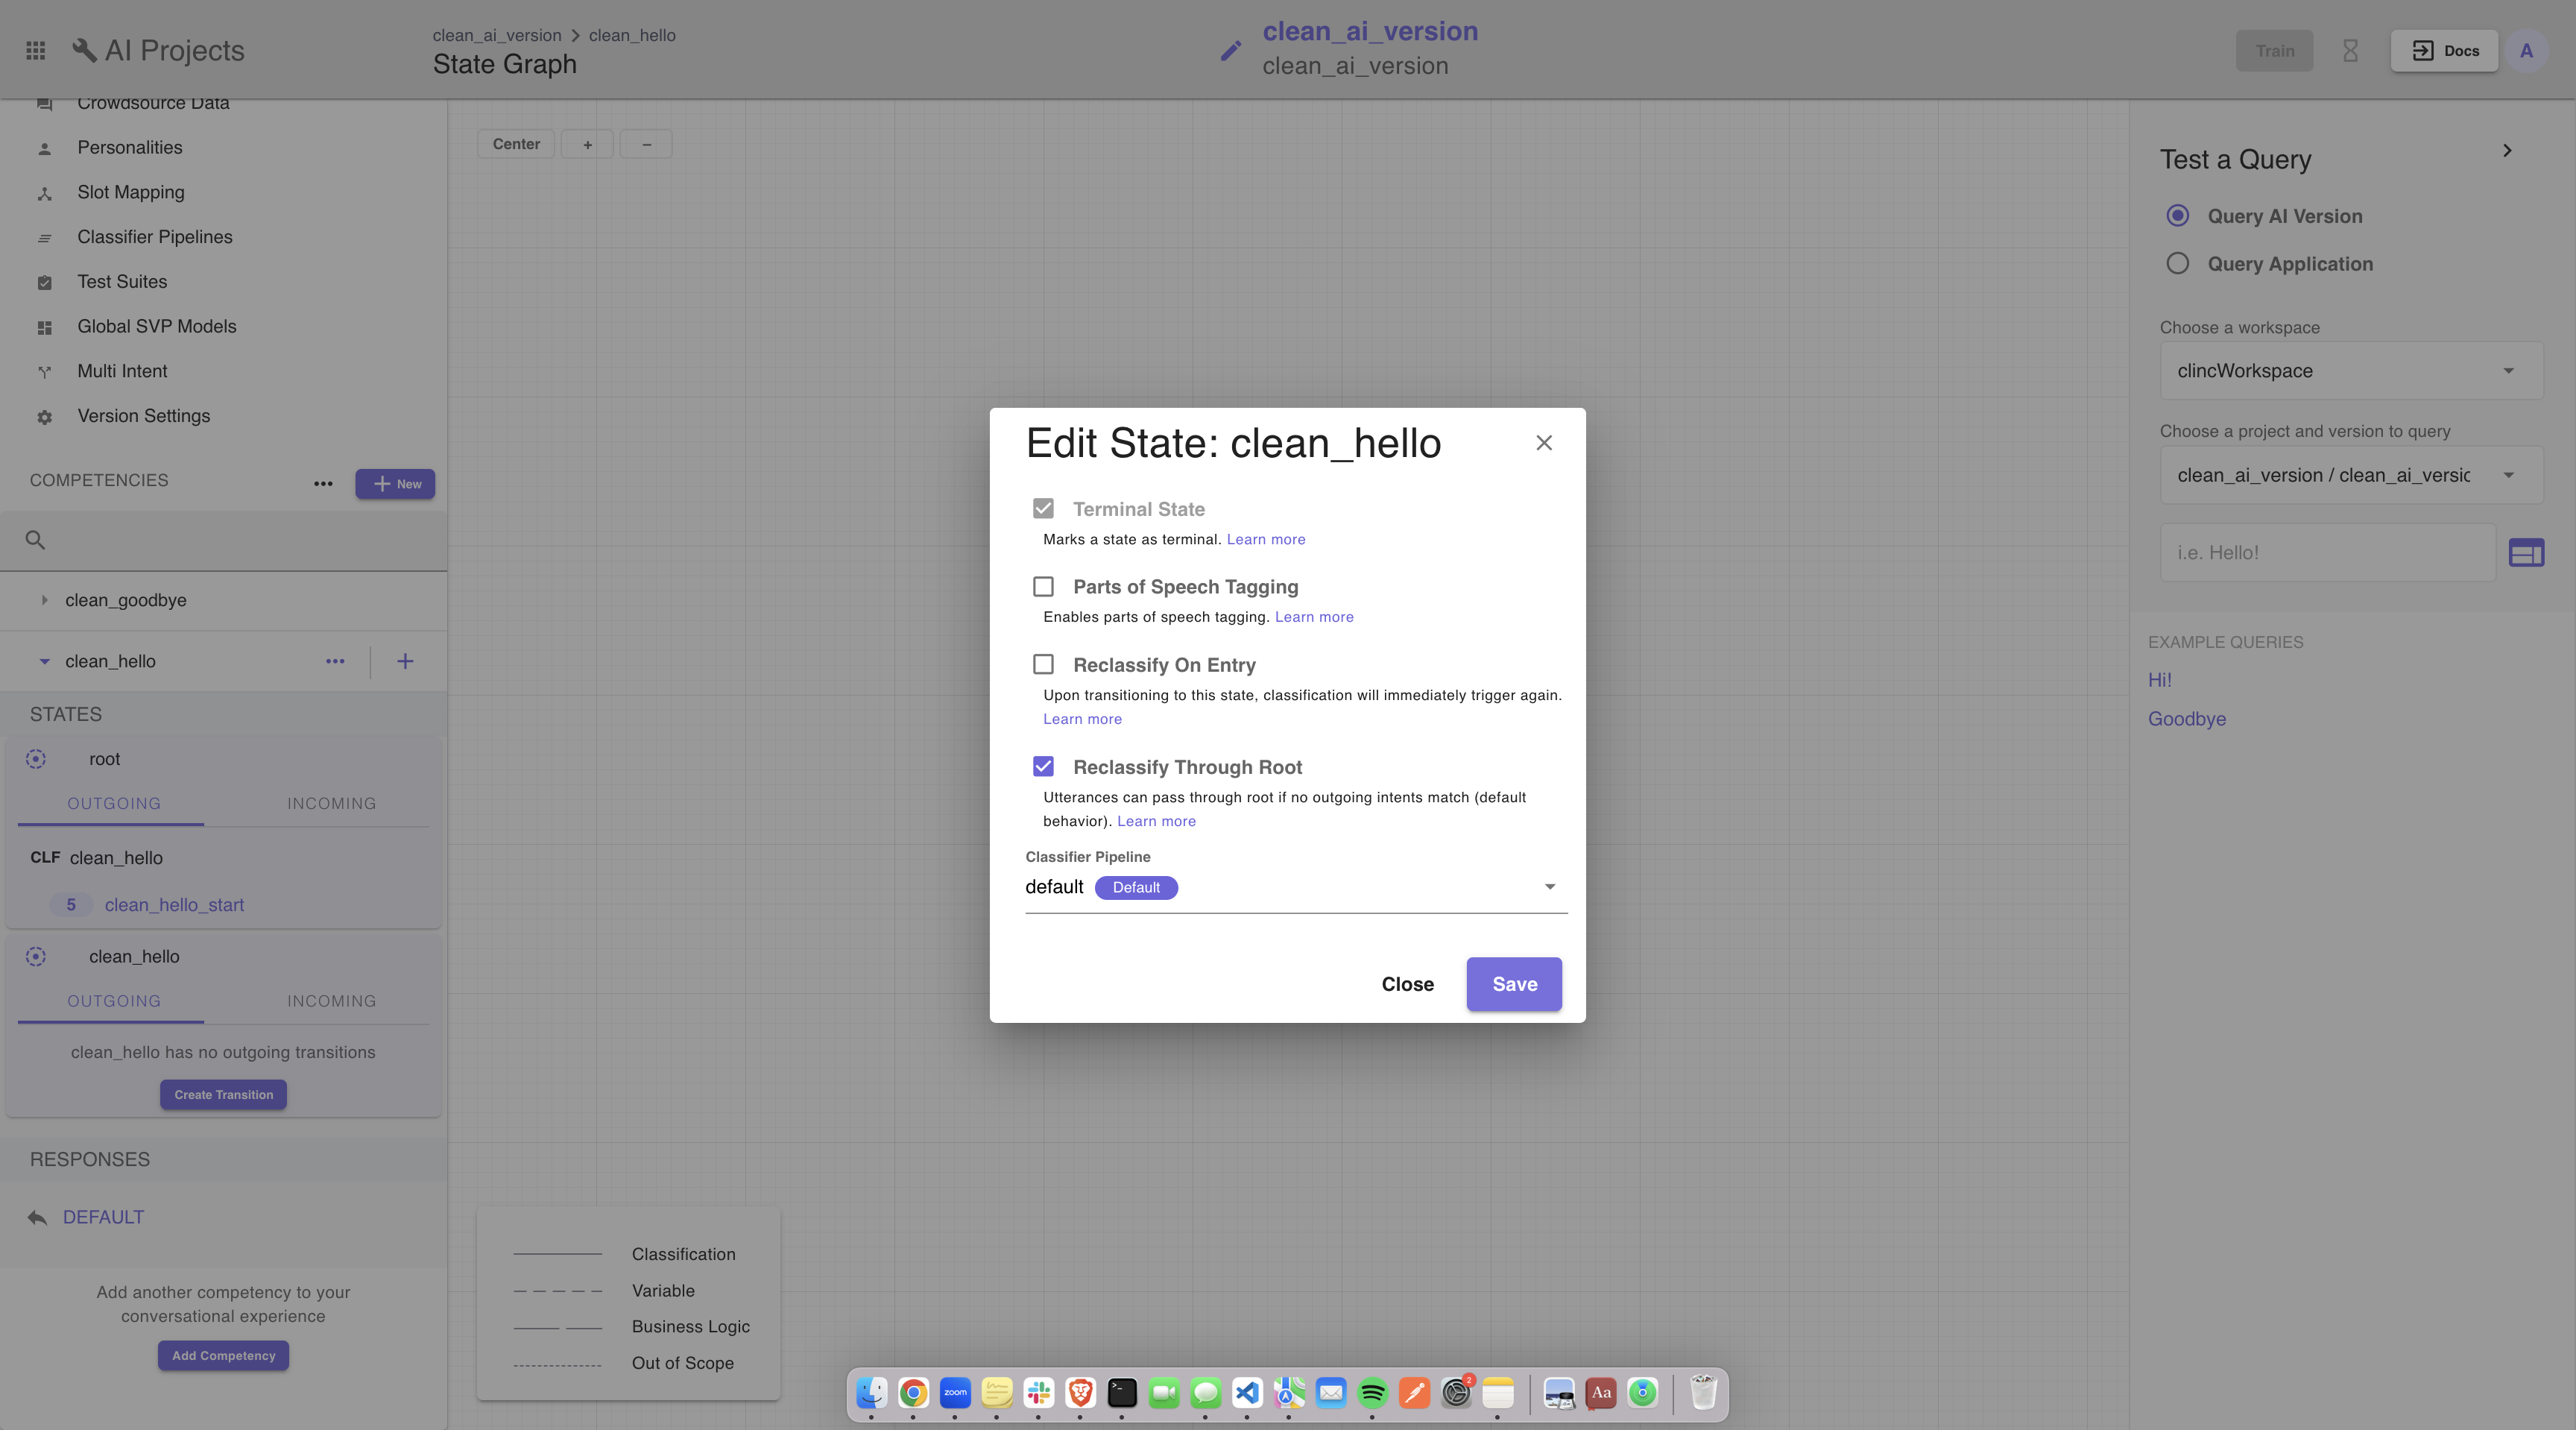 Figure 8: In this newly created AI Version clean_hello is a terminal state
Using the clean_hello state in an orchestration graph as seen in Figure 9, is NOT valid for training and will require at least two mesh-level transitions since there are no transitions that exist on the state itself.
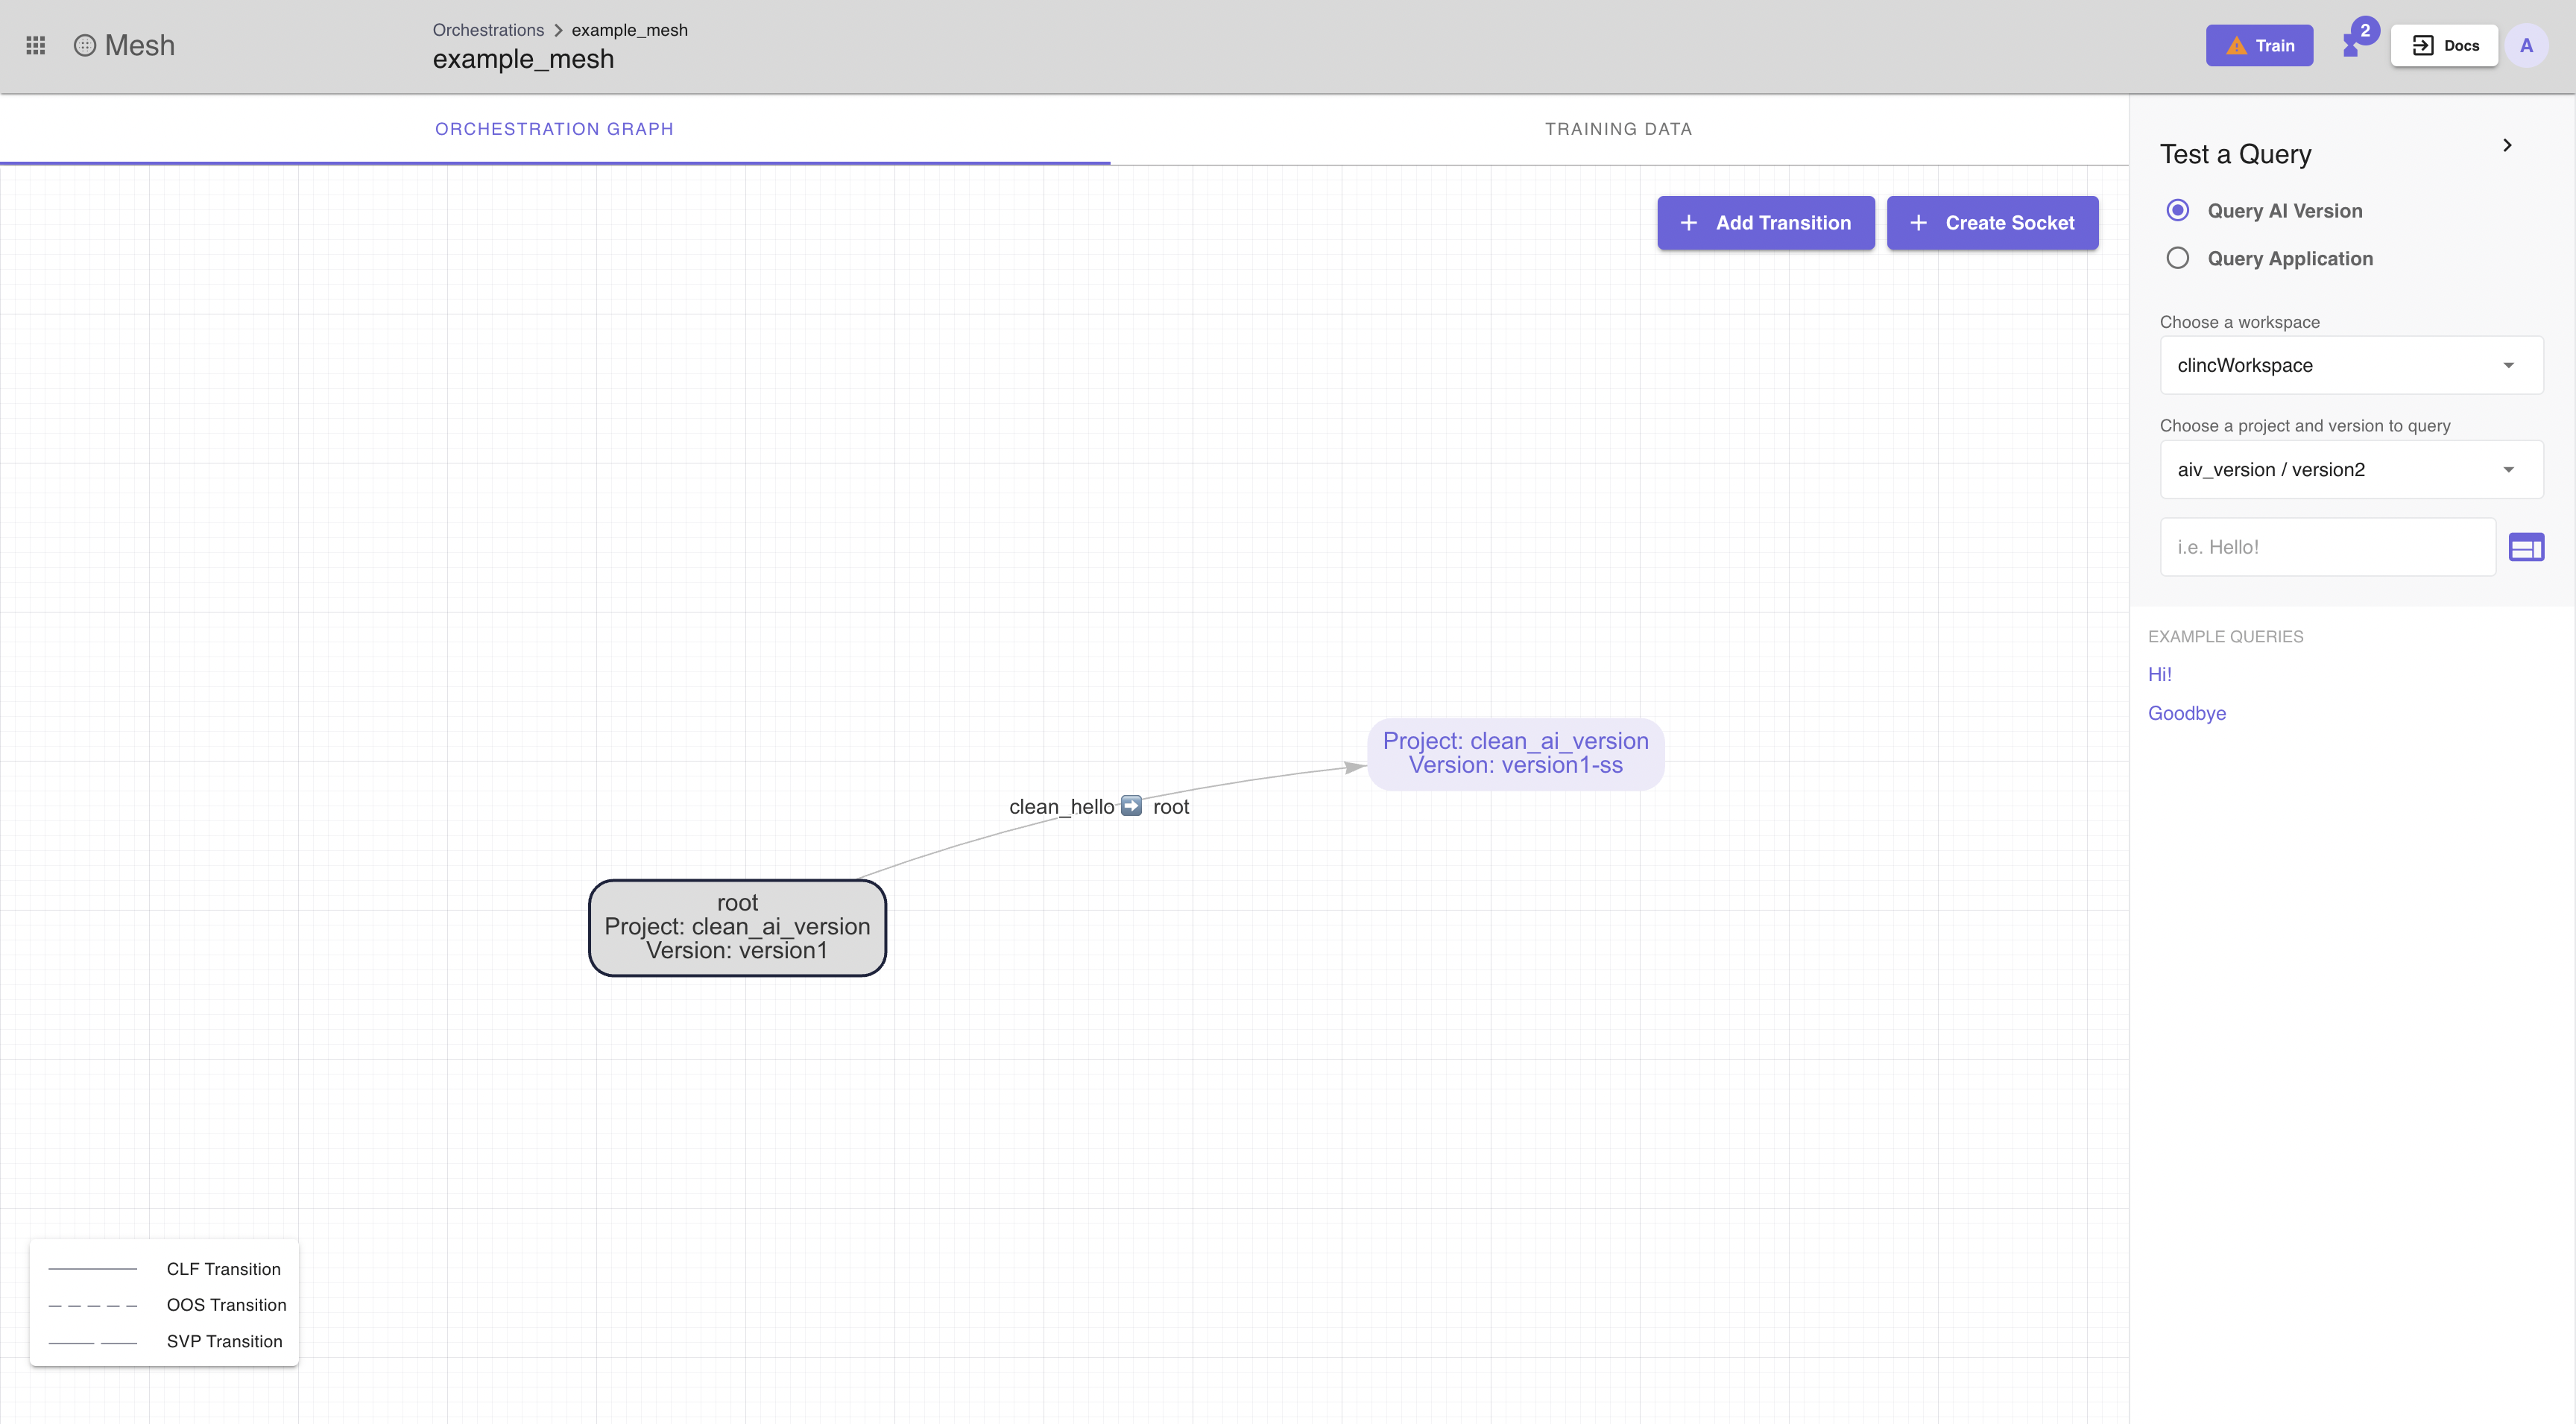
Figure 9: The mesh depicted above is not valid for training and still requires at least two mesh-level transitions
To make a state valid for training it must include at least two transitions. Figure 10, below, adds a self transition to the clean_hello state from the AI Version in Figure 8. Adding a transition on the mesh level validates this for training since there is one transition on the clean_hello state and one mesh level transition.
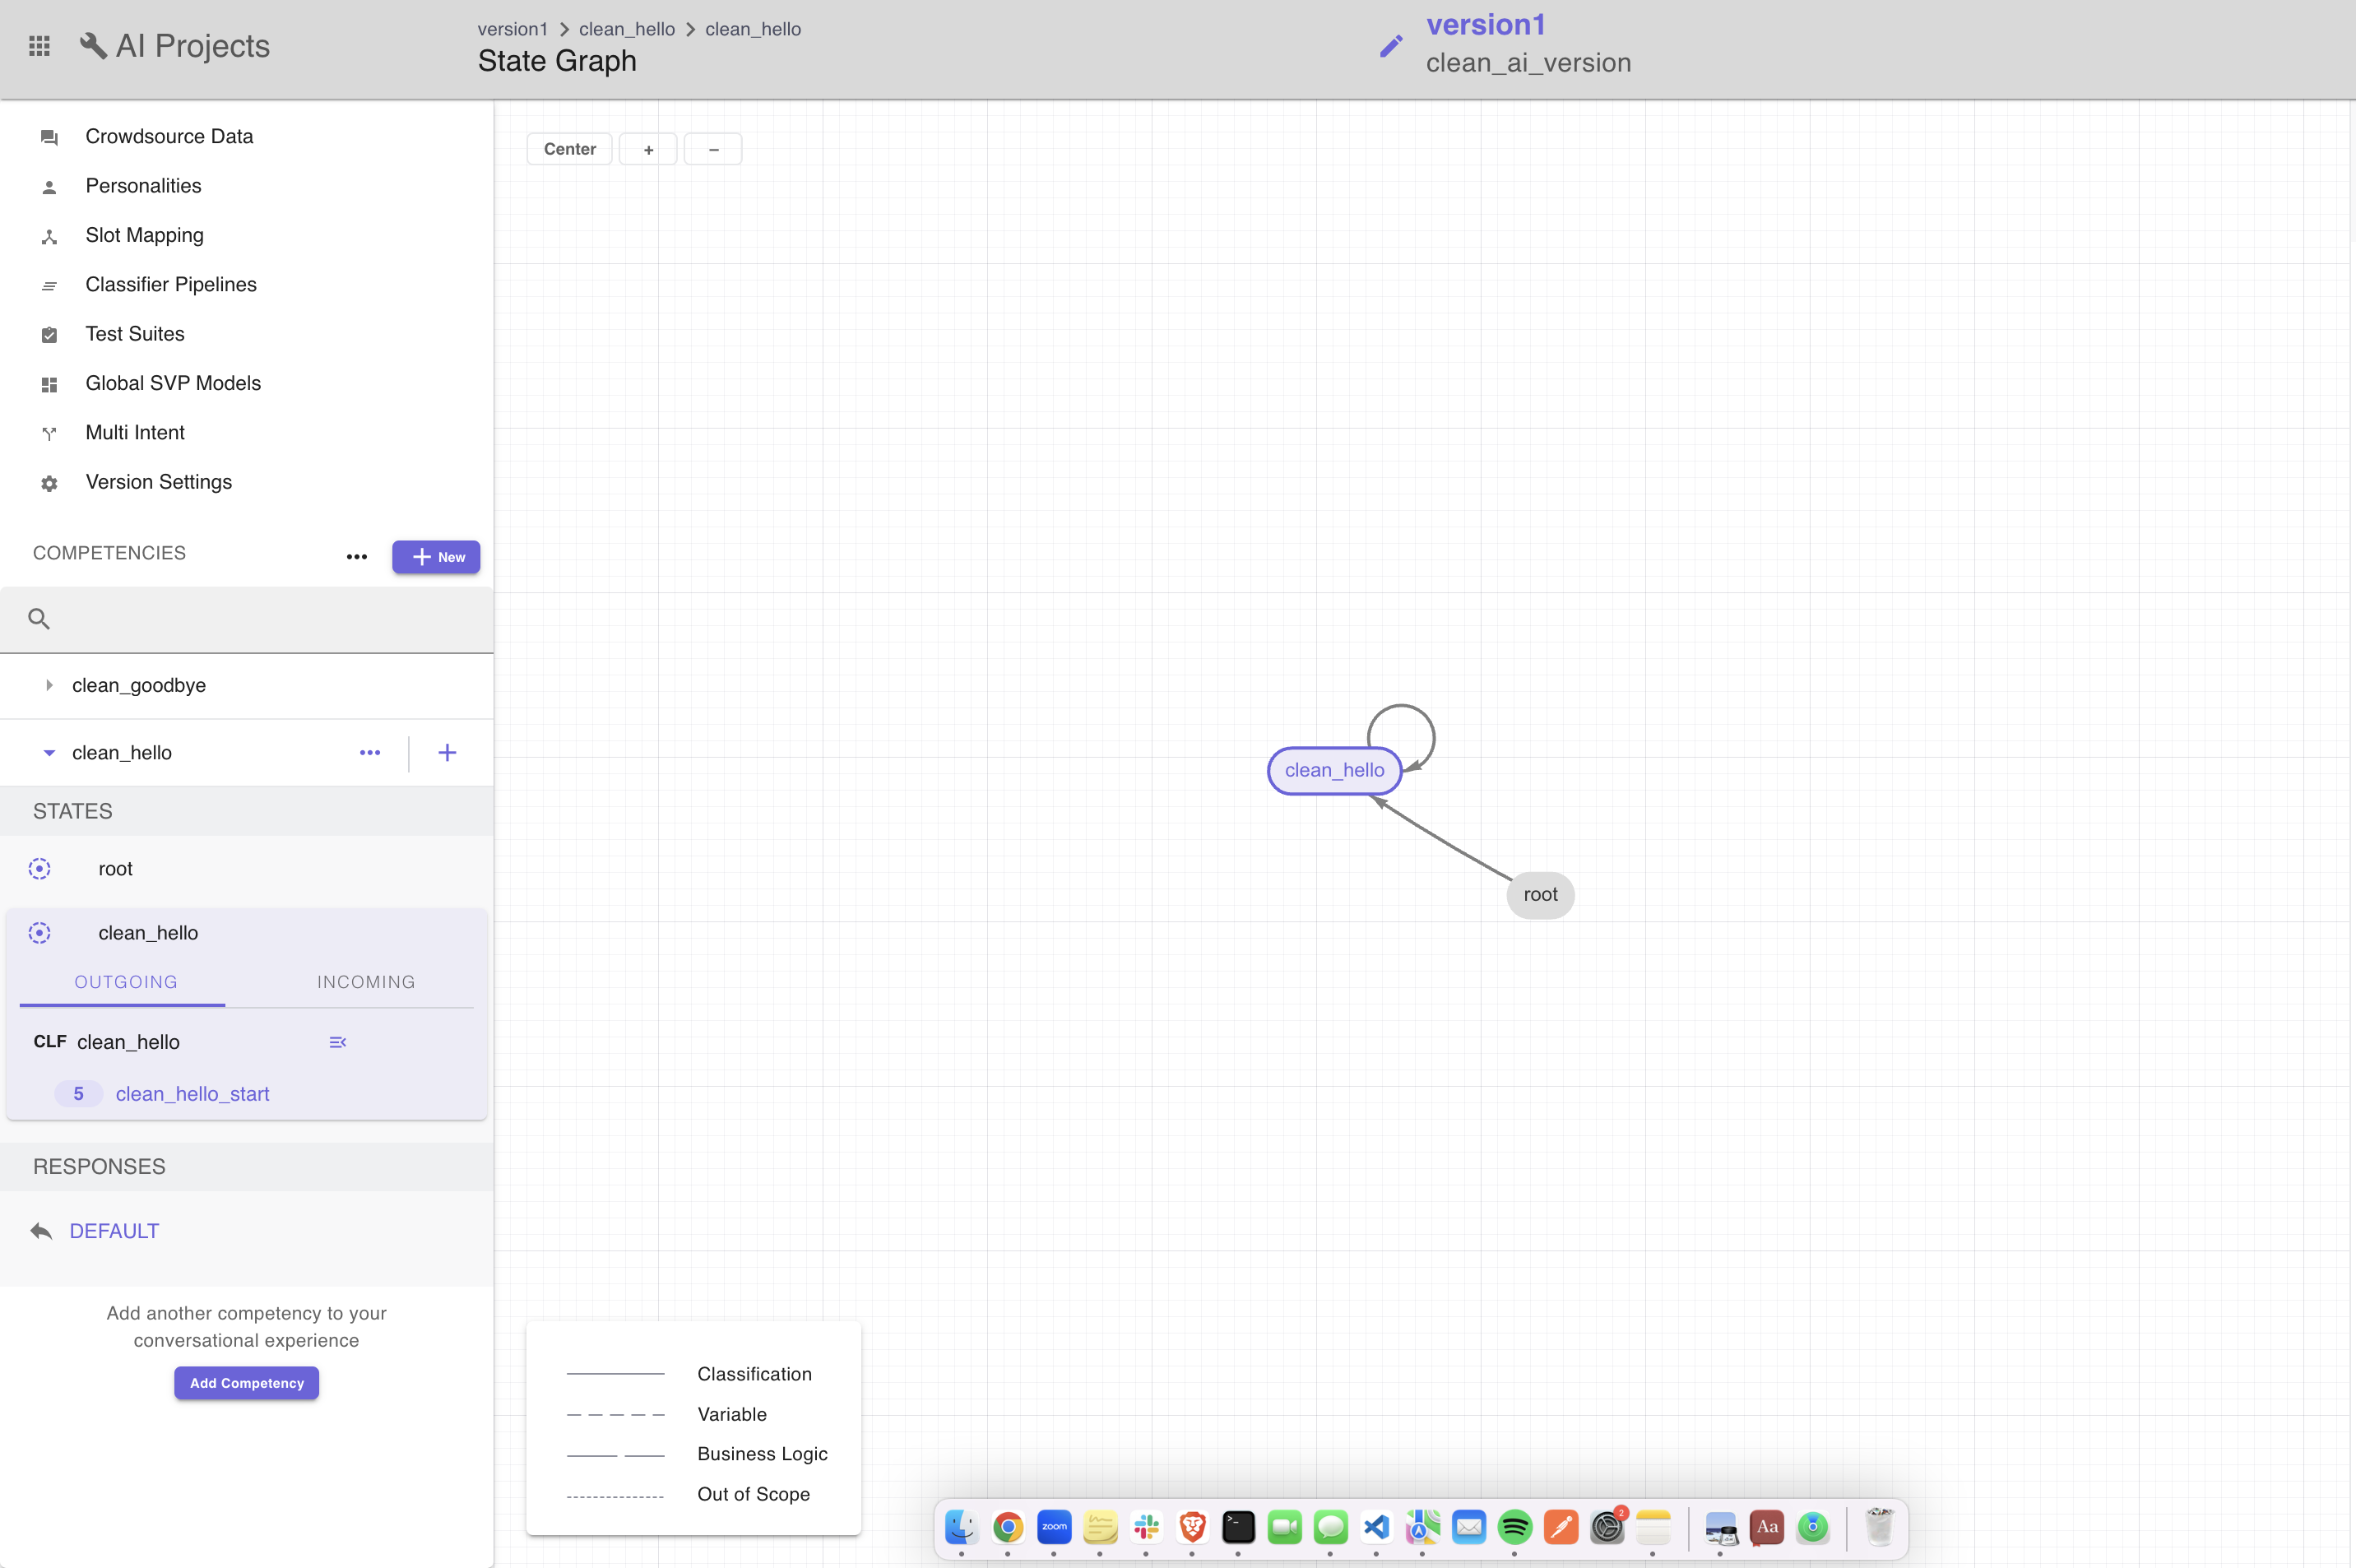 Figure 10: The self transitions on the clean_hello state
# Training Caveats
There are some things to be aware of when a user begins training their orchestrator.
Orchestration triggers or "intents" require data before training.
Upon successful training of the Bot Orchestrator, a user needs clear the progress before any the training button is reenabled. A user can view progresses by clicking on the hour glass at the top right of the screen. Once a progress is cleared a user will be able to train the orchestrator, should it need training. Note that even if a user manipulates the data or changes the intents on an orchestration transition the training button will not be enabled unless progresses from the previous training have been cleared.
Competency states require two or more transitions total to be considered a valid classifier for training. A terminal_state used as the source state in a mesh will be valid if it has at least two outgoing Mesh Classification transitions. If the state being used on the Ochestration Transition is a terminal state and does not have at least two outgoing mesh transition the Orchestration will not be trainable.
The root socket (glossary.md#orchestration-root-socket) in a Bot Orchestration Mesh much have an AI Version assigned to it. Note that, when an mesh is first created, it is generated with the root node's AI Version as null. It must be edited to contain an AI Version to train.
# Productionizing your Orchestrator
# Deploying an Orchestration
Deploying an orchestration requires a user to use the platforms environments and applications feature. In order to deploy an orchestration, navigate to the deployments tab in our app menu. Next, create an Environment and an Application inside of the Environment. Please see our documentation on environments and applications for further information.
When creating an Application, you should see a tab option called Attach Orchestration, be sure to attach the orchestration that you want to deploy to that Application (Figure 11).
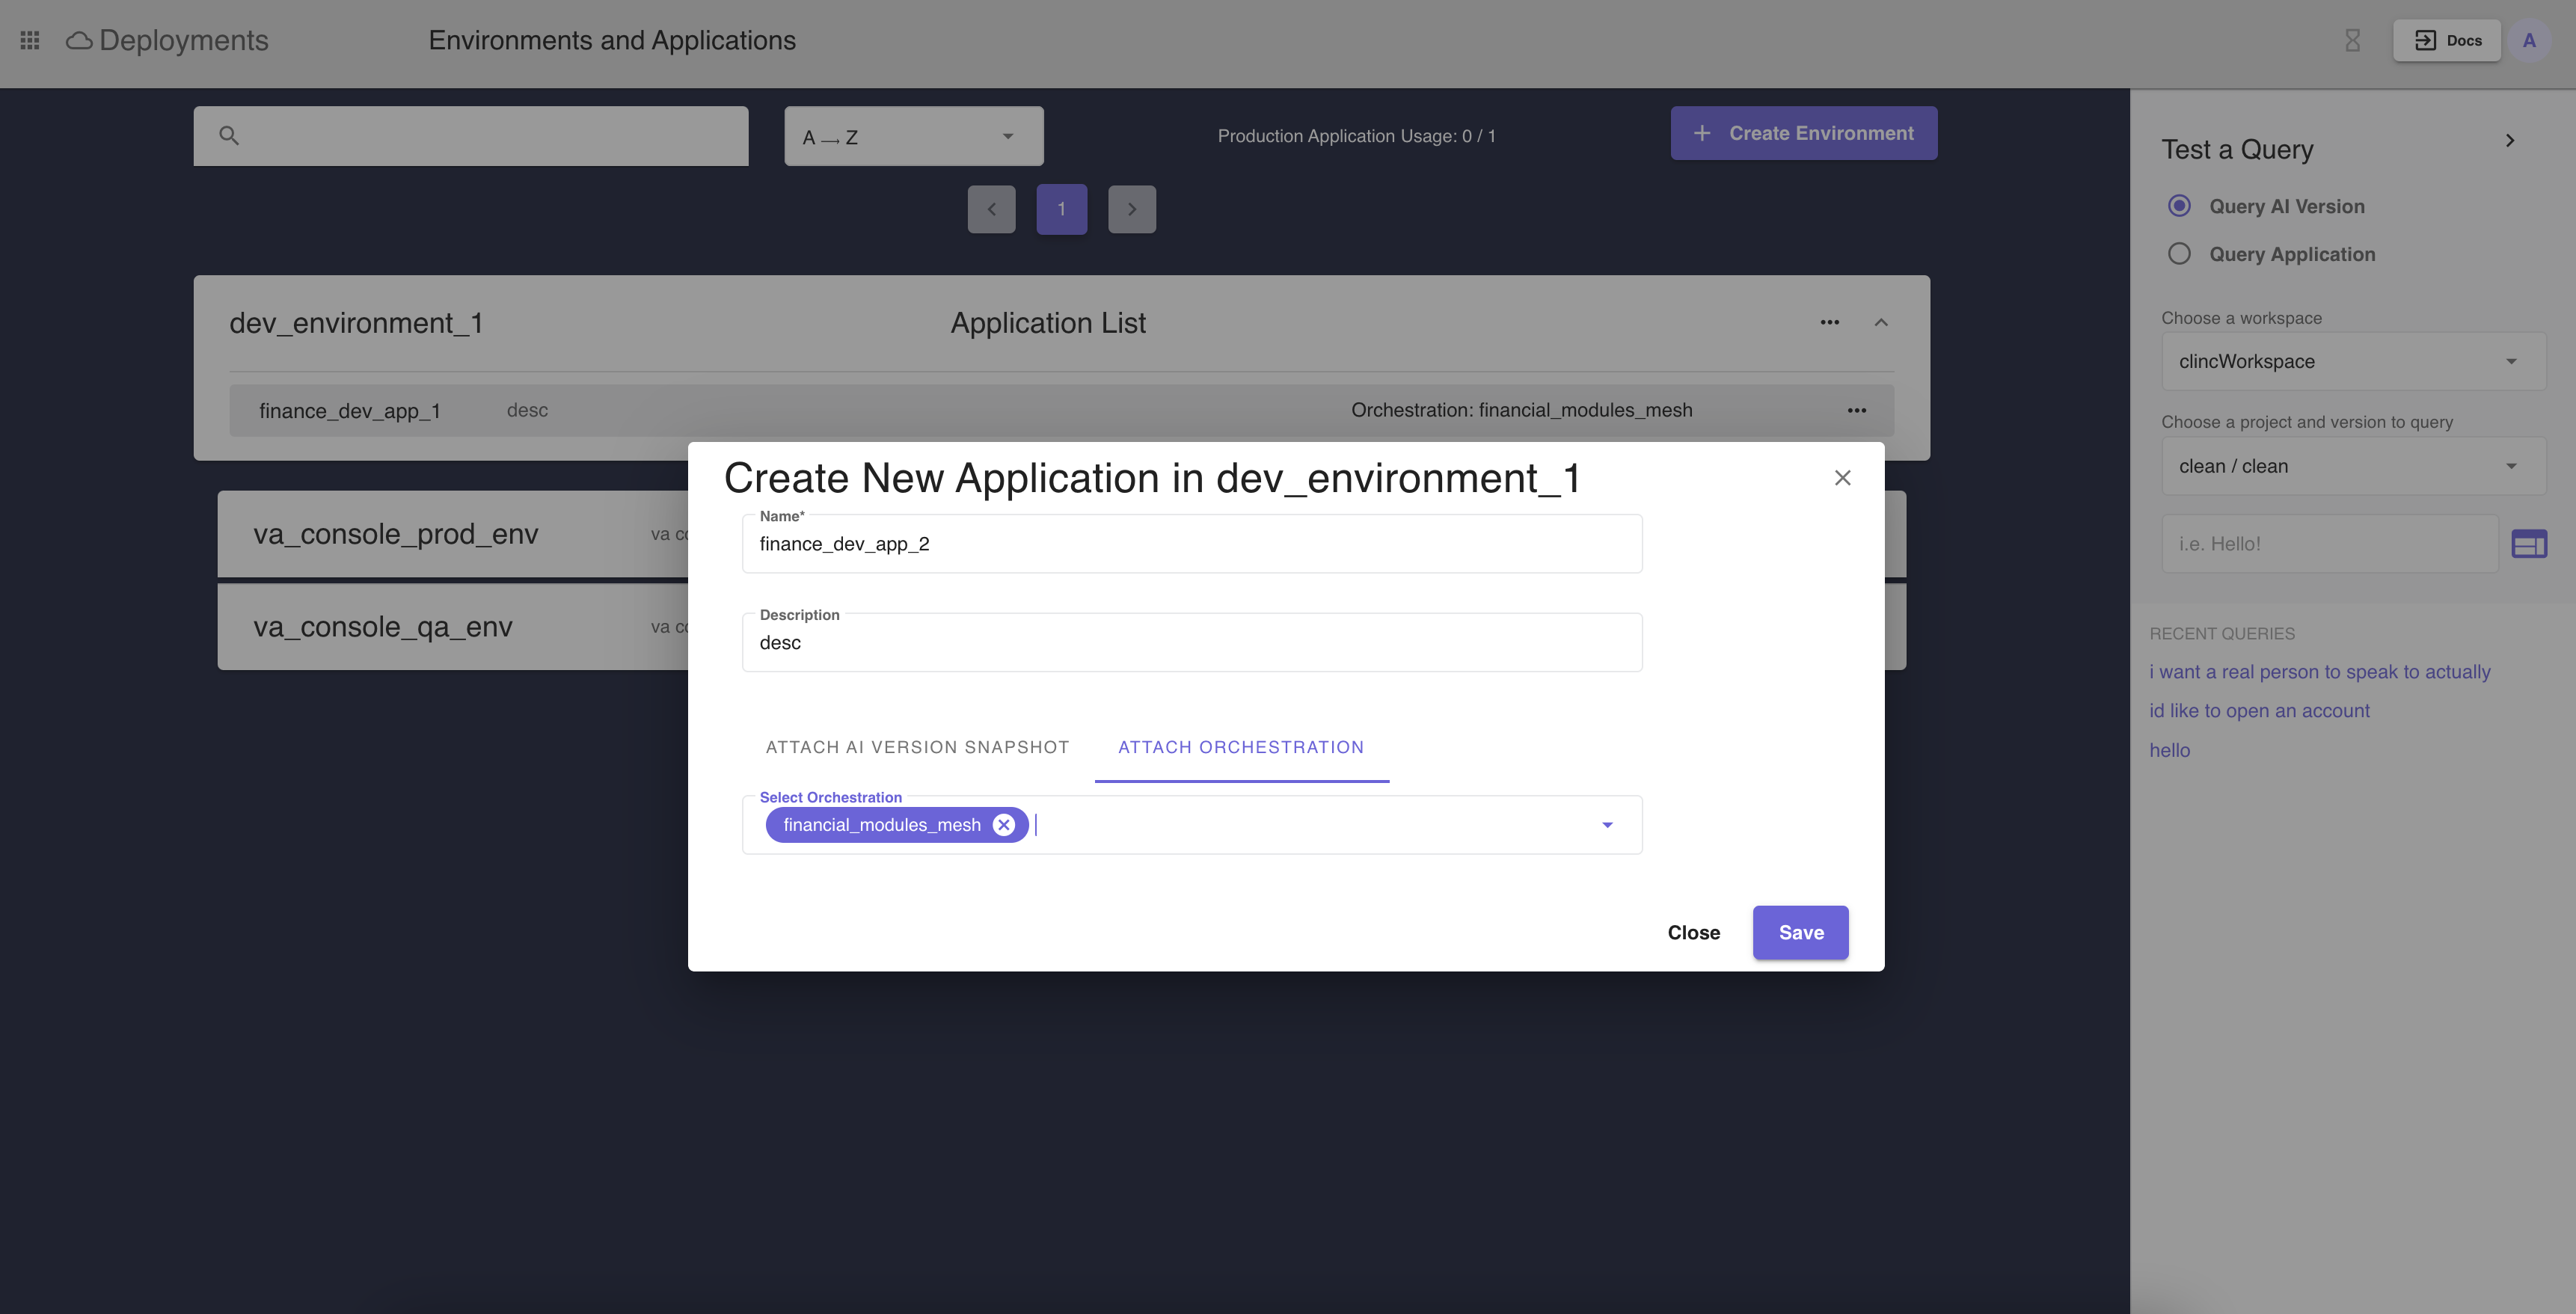 Figure 11: Create Orchestration Application Dialog
# Deploying an Orchestration to Production
Once a Bot Orchestrator is ready to be deployed for production, navigate to the environment listings page. Click on the three dots on the environment row, where the application with the configured orchestration resides and select Deploy to Production menu option. See environments and applications for more information on how to take Bot Orchestrators to production.
To deploy a mesh to an application within a production environment, all slotted AI Versions on the mesh must be snapshots.
# Querying the Orchestration
# Querying via Environment/Application
Once a Bot Orchestrator has been deployed, it may be queried using the Query Sidebar. Select Query Application on the Query Sidebar and specify the Environment/Application to which the Bot Orchestrator is deployed.
# Querying via Query Endpoint
Furthermore, a user can query a Bot Orchestrator using the query endpoint. Be sure to specify the Application in which the Orchestration is configured to, in the request body. See query endpoint
# Integrations with the Orchestration
Integrations support Bot Orchestration. When a user has attached an orchestration to an Application it is ready to be used in an integration.
At the present, there are no differences when it comes to creating an integration for an AI version or for a Bot Orchestrator. Please visit our documentation on integrations to learn more about what integrations are and how to create them.