# Genesys Web Integration
# Clinc Platform Setup
If you don't already have an integration, please reference How to create an integration.
# Creating Genesys Integration
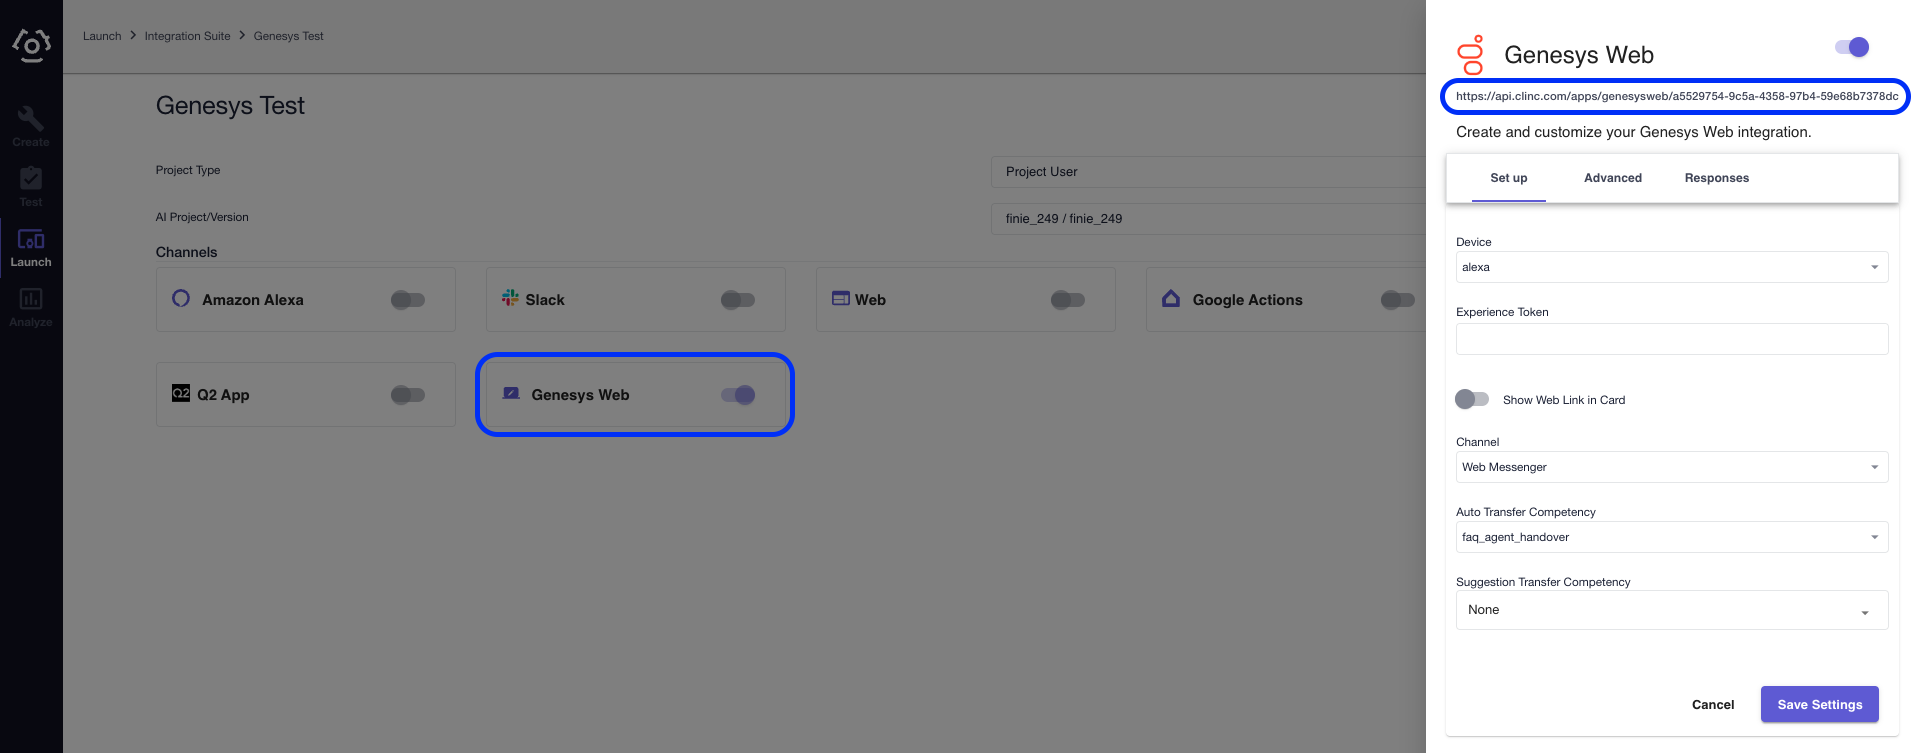
- In the integration, select the Genesys card under the Channels section to open the integration sidebar.

Configuration
Field Description Configuration Tab Device Select the device for the associated Clinc Personality Set up Experience Token Personality selection for supported AI Set up Show Web Link in Card Toggle to show web link as card instead of text Set up Title of Web Link Cards Title of cards used to show web link Set up Channel Select a Genesys Channel Set up Auto Transfer Competency Competency that will automatically initiate a transfer. List is compiled from currently supported competencies of your AI version. Set up Suggestion Transfer Competency Competencies that display a Genesys Suggestion to transfer. List is compiled from currently supported competencies of your AI version. Set up Query Search Enabled Toggle for presenting the visitor with the option to auto navigate to a dynamic URL defined in "Query Search Template" along side the OOS response. Advanced Query Search Template Template URL that must contain the placeholder where the visitors out of scope query should be placed. i.e. "https://www.example.com/search/". Advanced Language ISO 639-1 Code. Currently only "en-US" is supported. Responses Fallback Error Message A fallback message to display to the visitor when an error prevents the AI responses from being presented to the visitor. Responses Transfer Prompt Prompt for transfer shown to the visitor for Genesys Suggestion Transfer competencies. The "Transfer Confirmation" button is displayed below. Responses Transfer Ongoing Message shown to the visitor when a new transfer request has been initiated but there is already a transfer in-progress. Responses
Note: When the integration is saved, Clinc will publish
At the bottom of the integration sidebar, click Save Settings.
Under the Channels section, click on Genesys to reopen the integration sidebar.
Copy the integration URI at the top of the sidebar (also highlighted in the image above). This will be referenced later as
Bot Connector Handle Utterance URIto be used in later setup and configuration.
# Configuring Genesys
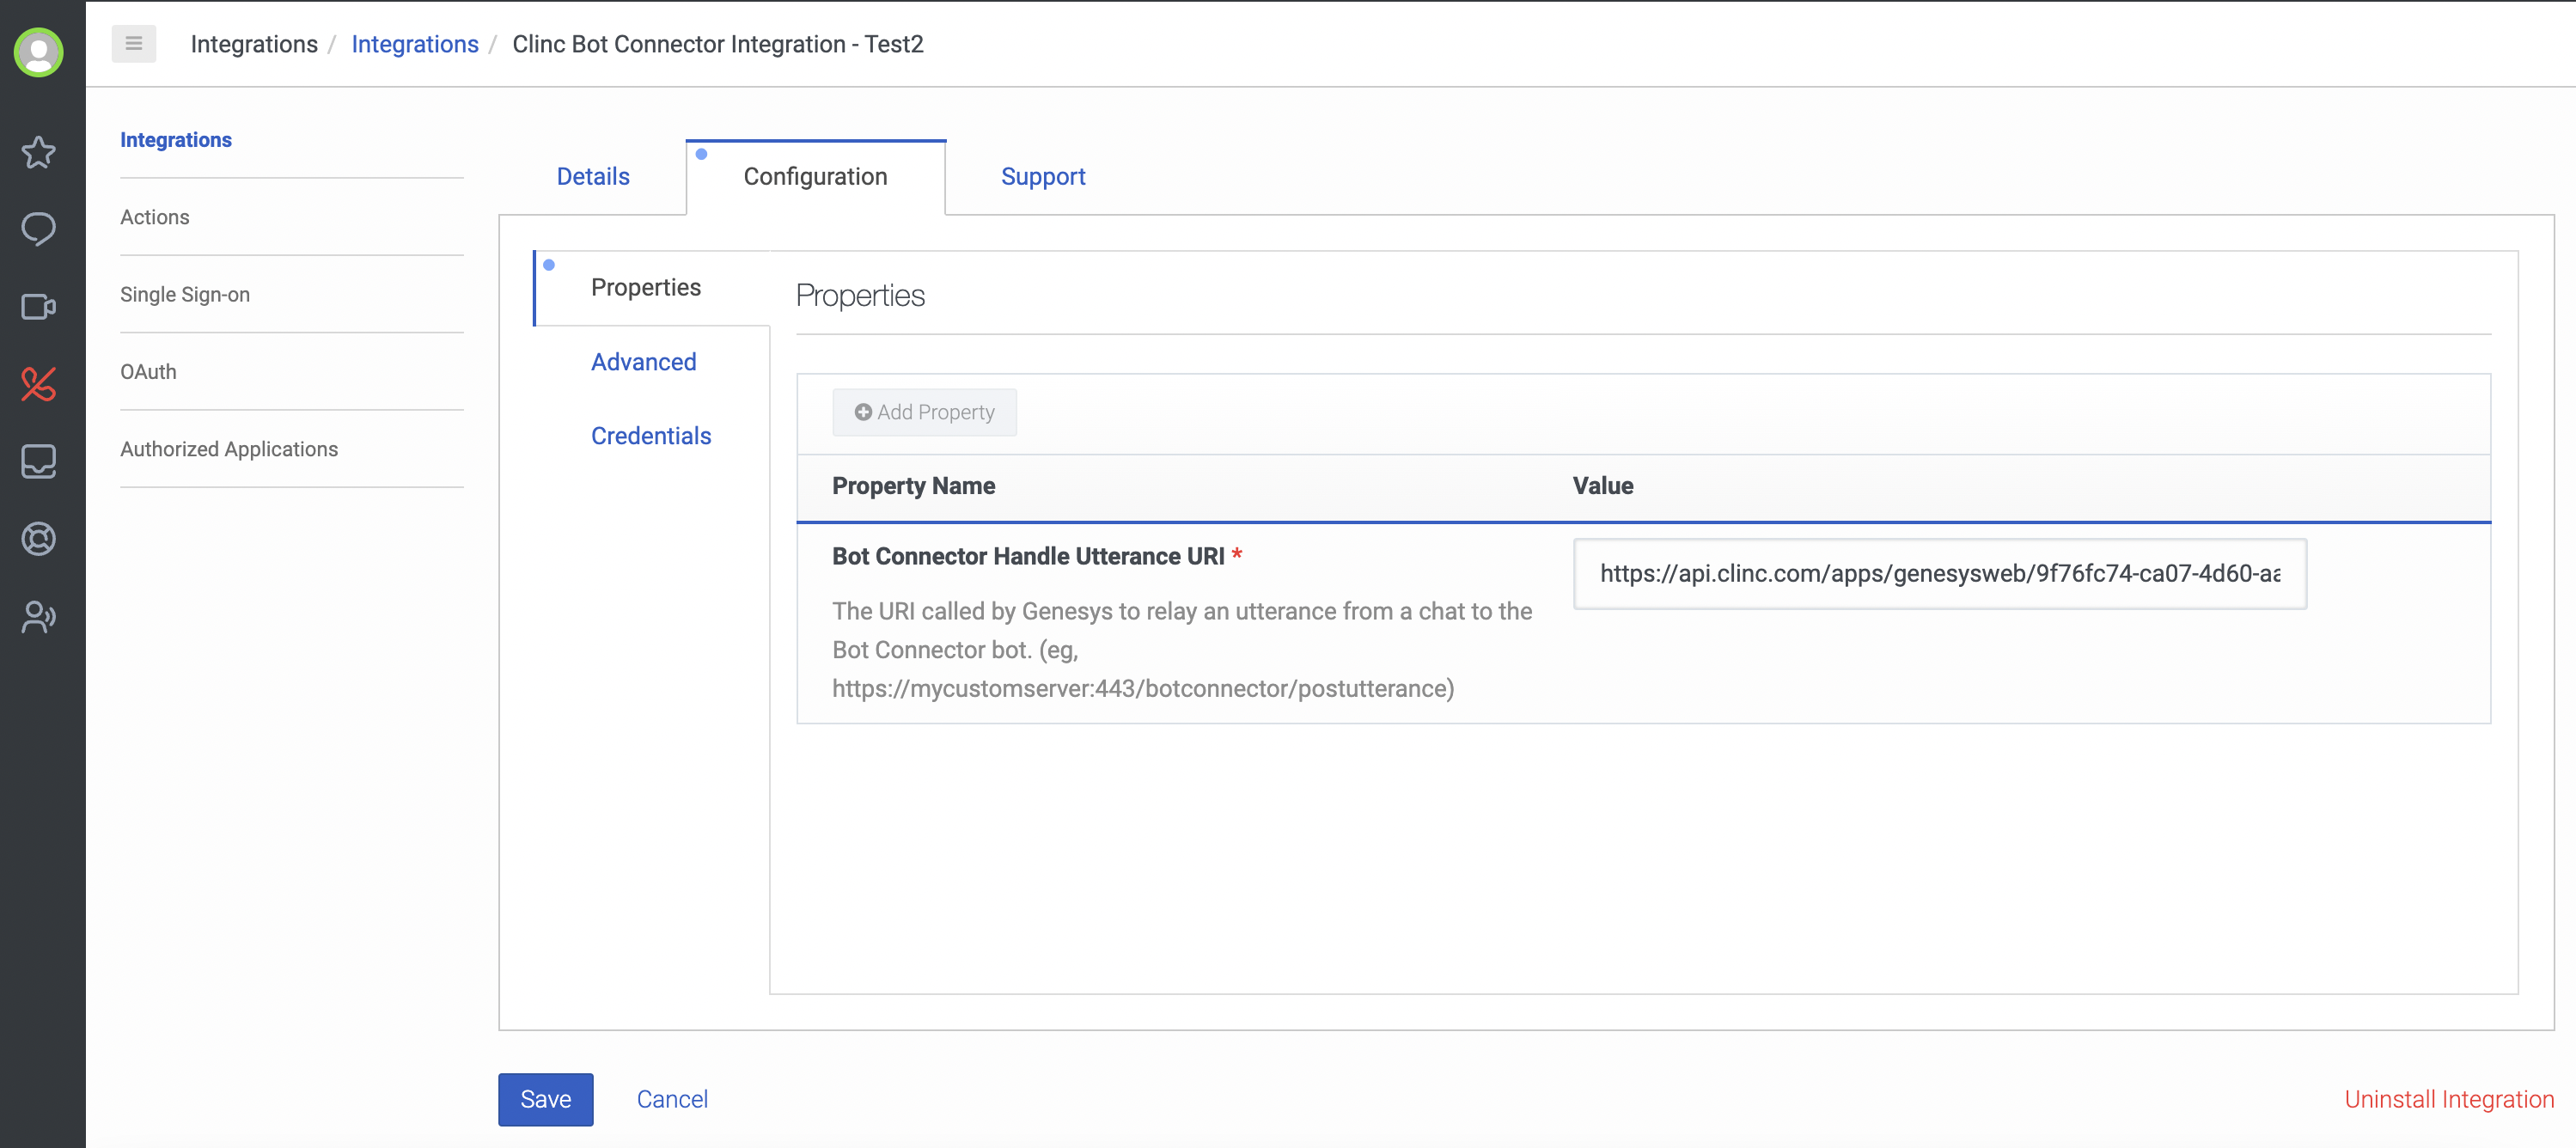
In Genesys Cloud, we will now set up a new Bot Connector Integration that will allow us to integrate Clinc chatbot into an existing/new inbound message flow.
- Follow the steps in the official Genesys Bot Connector documentation here (opens new window). Supplementary instructions for steps 9 and 10 in the documentation are shown below:
- Step 9: Set the
ValueofBot Connector Handle Utterance URIto the previously provided URI mentioned above in “Clinc Platform Setup”.

- Note: Alternatively, you can just set the base url excluding the integration id, and pass the
IntegrationIdvia Session Variables in Genesys Architect.

- Step 10: Add a
Field NamecalledAuthorization. ItsValuewill beApp-Key <UUID>that shall be provided to you. This header is required to access/query Clinc Platform.

- Click
Save. Once the integration is created you will have to publish the clinc bot definition to Genesys Cloud. (Genesys Architect requires this bot definition as we will see shortly). Below is the request you need to execute. More info on the api documentation can be found here (opens new window)
curl --location --request PUT 'https://api.usw2.pure.cloud/api/v2/integrations/botconnector/<Integration-ID>/bots' \
--header 'Authorization: bearer <Genesys Access Token>' \
--header 'Content-Type: application/json' \
--data-raw '{
  "chatBots": [
    {
        "id": "<Random Integer>",
        "name": "<Bot Name>",
        "description": "test bot pointing to clinc integration",
        "versions": [
            {
                "version": "<Bot Version>",
                "supportedLanguages": [
                    "en-US"
                ],
                "intents": [
                    {
                        "name": "clinc_intent"
                    },
                    {
                        "name": "clinc_error"
                    },
                    {
                        "name": "clinc_agent_transfer"
                    }
                ]
            }
        ]
    }
  ]
}'
- <Genesys Access Token>: to generate an access token, follow the documentation [here](https://developer.genesys.cloud/authorization/platform-auth/)
- <Random Integer>: `id` field should be a unique integer
- <Bot Name>: `name` field is the name of the bot that you will select on Genesys Architect UI
- <Bot Version>: `version` field is the unique version of the bot that you will select on Genesys Architect UI
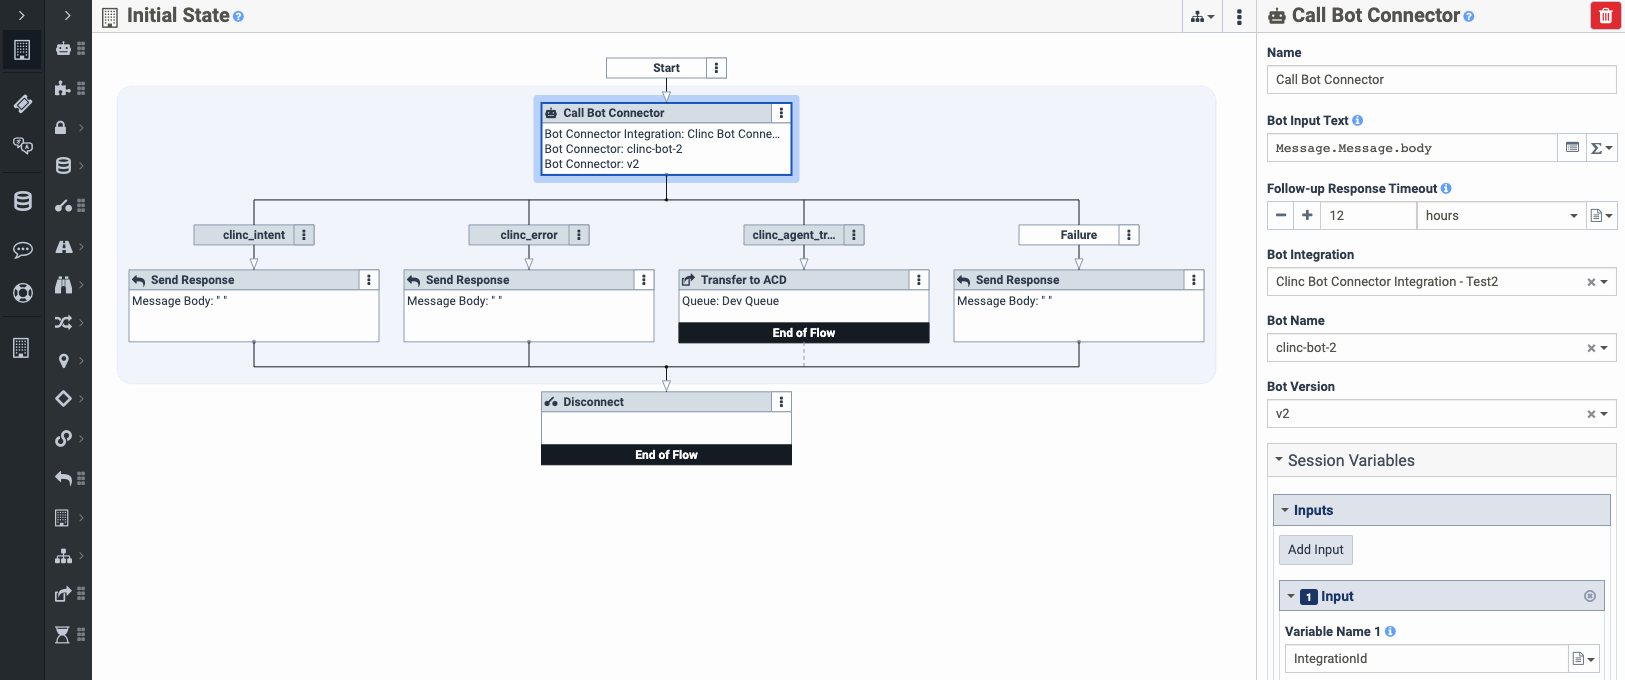
- Next go to Architect (opens new window) -> Flows: Inbound Message. In the state diagram, bot connector integration is used via "Call Bot Connector" block.
- Select the
Bot Integration(created in step 1) - Select
Bot Name(published in step 2) - Select
Bot Version(published in step 2) - Add any
Session Variablesyou want to pass to Clinc.

- Assuming you already have a Messenger Configuration (opens new window), go to Messenger Deployments (opens new window) section. Here, select the required Configuration and then select the Architect Flow from step 3. A deployment key and deployment snippet will be generated.
# Configuring Genesys Inbound SMS Messaging
Within the Clinc Configuration, if the chosen Genesys Channel is SMS, these additional steps are required on Genesys side to enable Inbound SMS Messaging:
- Purchase an SMS Number (opens new window). The number will be use as inbound and outbound number.
- Setup Inbound SMS Messaging (opens new window)