# Unblu Integration
# Clinc Platform Setup (Creating Unblu Web Integration)
If you don't already have an integration, please reference How to create an integration.
# Creating Unblu Integration
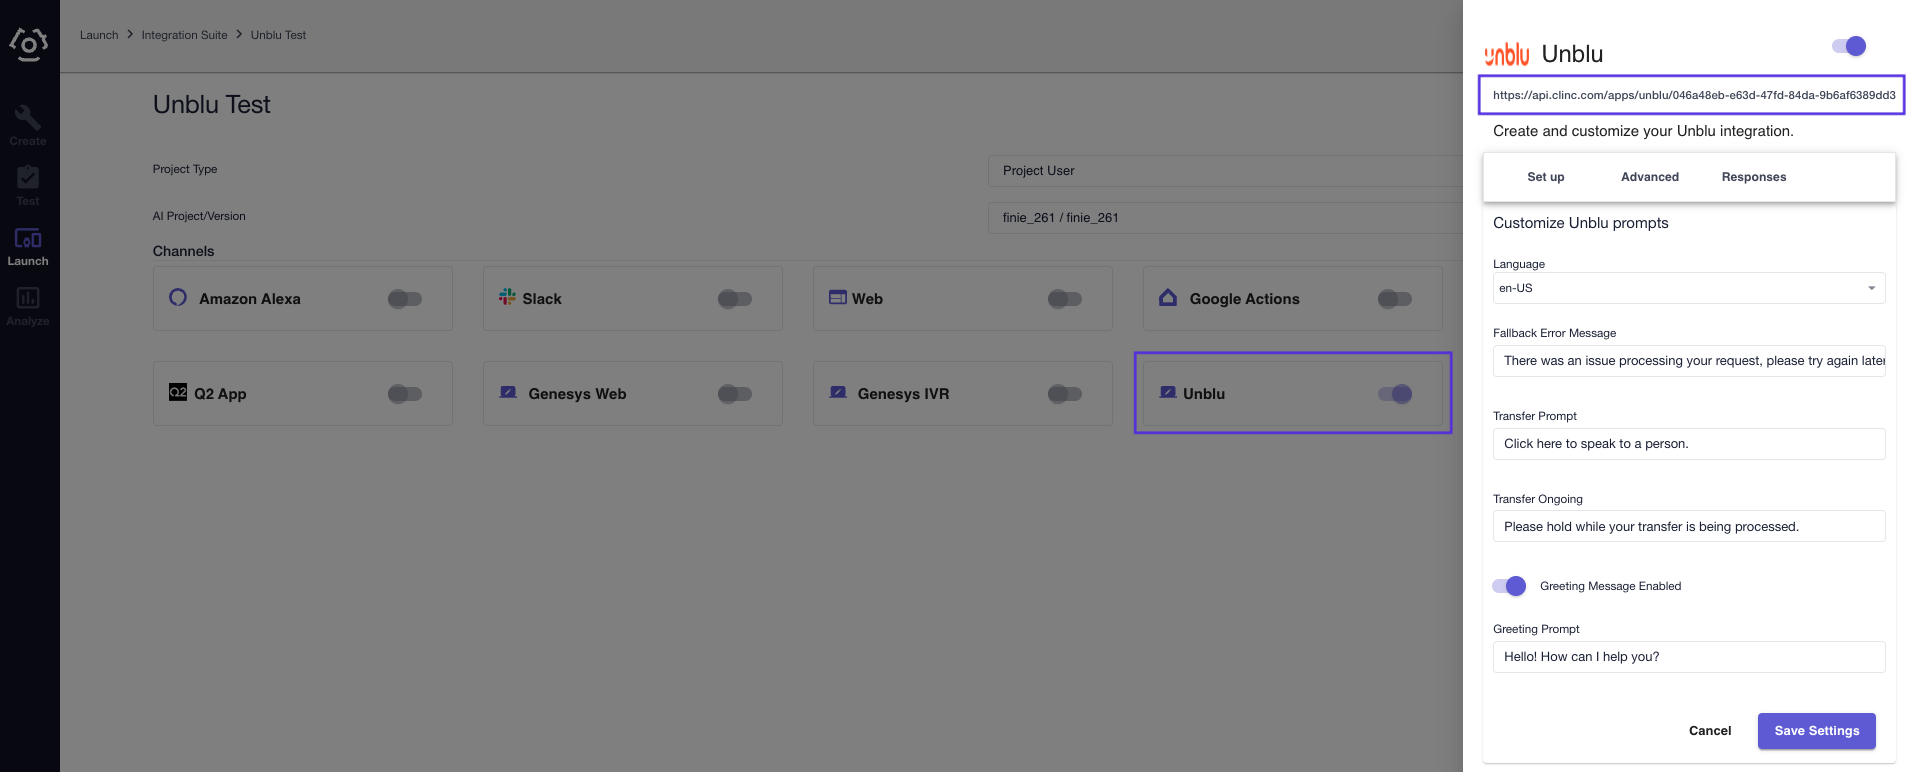
- In the integration, select the Unblu card under the Channels section to open the integration sidebar.

Configuration
Field Description Configuration Tab Device Select the device for the associated Clinc Personality Set up Experience Token Personality selection for supported AI Set up Suggestion Transfer Competency Competencies that display a Unblu Suggestion to transfer. List is compiled from currently supported competencies of your AI version. Set up Query Search Enabled Toggle for presenting the visitor with the option to auto navigate to a dynamic URL defined in "Query Search Template" along side the OOS response. Advanced Query Search Template Template URL that must contain the placeholder where the visitors out of scope query should be placed. i.e. "https://www.example.com/search/". Advanced Maximum Idle Time Maximum time in seconds that may pass between two messages of a bot dialog. Should be equal to com.unblu.conversation.bot.botMaxTimeBetweenMessagesAdvanced Unblu Server Your Unblu server host. Default: https://latest.demo.unblu.com Advanced Bot-Person Source ID sourceIdused while creating bot person via /persons/createOrUpdateBotAdvanced Bot-Person First Name firstNameused while creating bot person via /persons/createOrUpdateBotAdvanced Bot-Person Last Name lastNameused while creating bot person via /persons/createOrUpdateBotAdvanced Dialog Bot Name nameof Dialog Bot used while creating it via /bots/createAdvanced Language ISO 639-1 Code. Currently only "en-US" is supported. Responses Fallback Error Message A fallback message to display to the visitor when an error prevents the AI responses from being presented to the visitor. Responses Transfer Prompt Prompt for transfer shown to the visitor for Unblu Suggestion Transfer competencies. The "Transfer Confirmation" button is displayed below. Responses Transfer Ongoing Message shown to the visitor when a new transfer request has been initiated but there is already a transfer in-progress. Responses Greeting Message Enabled Toggle to enable starting the conversation from bot's side. Responses Greeting Prompt Start the conversation from bot's side with this message. Responses
Note: More details on the API endpoints mentioned above can be found at Unblu Web API Documentation (opens new window). Their usage will be discussed in upcoming sections.
At the bottom of the integration sidebar, click Save Settings.
Under the Channels section, click on Unblu to reopen the integration sidebar.
Copy the integration URI at the top of the sidebar (also highlighted in the image above). This will be referenced later as
Endpoint URLto be used in later setup and configuration.
# Configuring Unblu
- Go to Account Configuration page in your Unblu Account.
- Go to Domains Section. Add the domain of website that's going to host the unblu chat window.
- Go to API Keys Section. Here, you'll find the Javascript Code Snippet that is to be placed into the section of every page of your website where you need a chat window.
Now, we are going to setup and configure what Unblu describes as a Dialog Bot. Dialog bots are bots that have a one to one dialog with a visitor during the onboarding, reboarding or offboarding phase of that person.
- Clinc handles the entire conversation with a person during onboarding phase.
- Clinc does not support reboarding phase.
- Offboarding happens when
- A
clean_goodbyeintent is detected. - When the maximum idle-time allowed between two consecutive messages has passed. (See
Maximum Idle Timein configuration section) - Upon transferring to an Agent.
- A
- Conversation ends after offboarding. (i.e. reboarding is not supported)
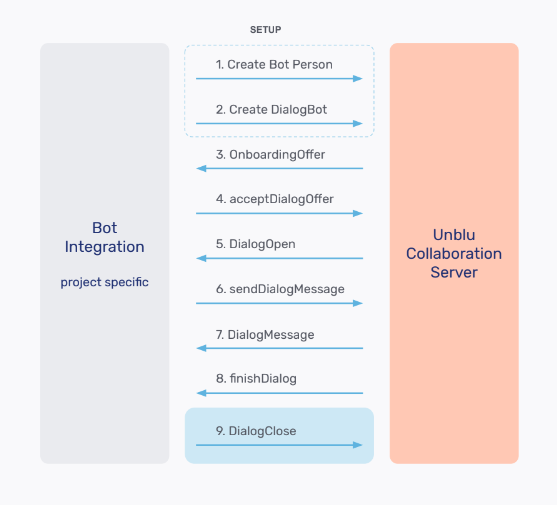
Below is the diagram showing the communication process between Clinc's bot integration and Unblu's Collaboration Server.

# Configuring Unblu Part 1: Bot Setup
In order to setup an Unblu Dialog Bot,
Create a person to represent the bot. (and on whose behalf Clinc will make all the unblu API calls): Please note down Bot's name, lastname and source-id while creating the person using createOrUpdateBot (opens new window) API, as you'll have to add those as
Bot-Person Source ID,Bot-Person First NameandBot-Person Last Namevalues respectively.Define a Dialog Bot with bot-person created in previous step.
Dialog Bot Nameis the Clinc Configuration field that points to the Dialog Bot. Clinc will create the Dialog bot with the default settings if it is not found (later, settings can be updated by going into Bots section in Unblu Account Configuration page).
One can also create a Dialog Bot with botsCreate (opens new window) API.
- Go to Bots section in Account Configuration page. You should see the new Dialog Bot listed. Click on it. Add the Endpoint URL created in point 5 in Creating Unblu Integration Section above. You will have to pass some query parameters in order to authenticate with clinc, and provide clinc with Unblu authentication details. It should look like:
https://api.clinc.com/apps/unblu/3afba6d5-ad0a-xxxx-xxxx-4c72dd601e1d?app-key=<clinc-app-key>&unblu-username=<your-login-username>&unblu-password=<your-login-password>
- Hit
Saveafter making all these changes.
# Configuring Unblu Part 2: Conversation Template Settings
- Go to the Conversation Templates Section. It contains the UI configs as well as response templates for variety of scenarios.
- Scroll down to Visitor-initiated Section. You can pick any template with Engagement Type = Chat Request.
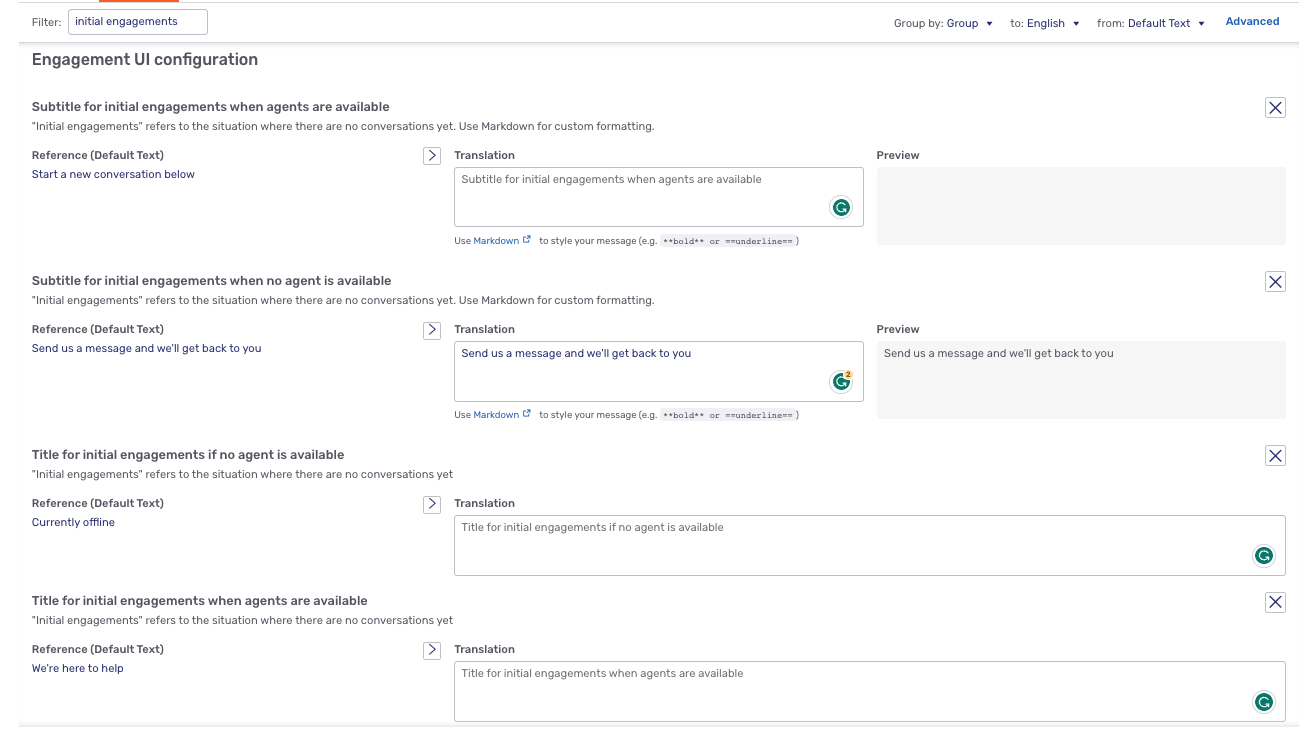
- For your Chat Window to function smoothly with Clinc, make the changes shown shown below.
Unblu's concierge is a simple rule-based chatbot. We don't need it as all aspect of conversation will be handled by Clinc. This is not a strict requirement, you may be able to use it pre-onboarding or post-offboarding (e.g. rating a conversation) depending on your needs but make sure it gels well with the Clinc Experience.

Allow Chat during Onboarding.

Add the created Dialog Bot as Mandatory external bot.

Make engagement UI Configuration (Chat Window).


Hit
Saveafter making all these changes.You should now be able to query your Finie AI Version residing in your Clinc Institution from the Unblu Chat Window