# Glia Integration
# Clinc Platform Setup
If you don't already have an integration, please reference How to create an integration.
# Creating Glia Integration
- In the integration, select the Glia card under the Channels section to open the integration sidebar.
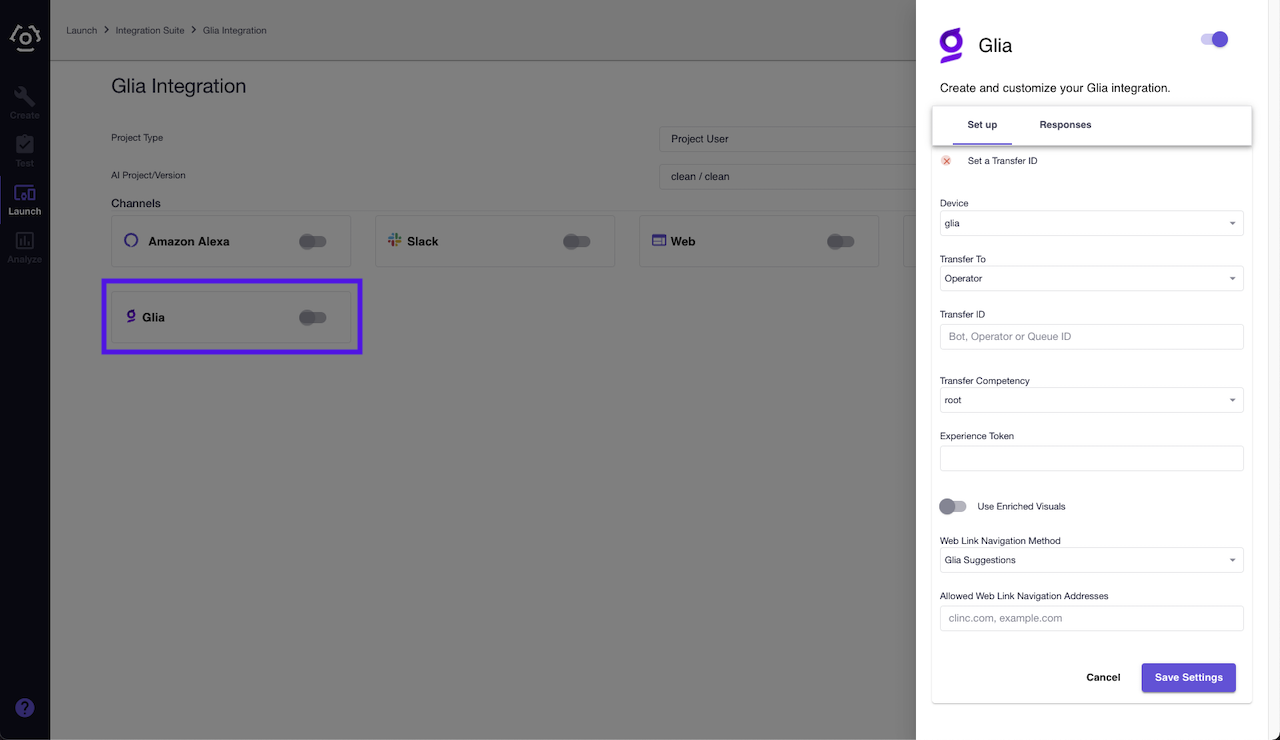
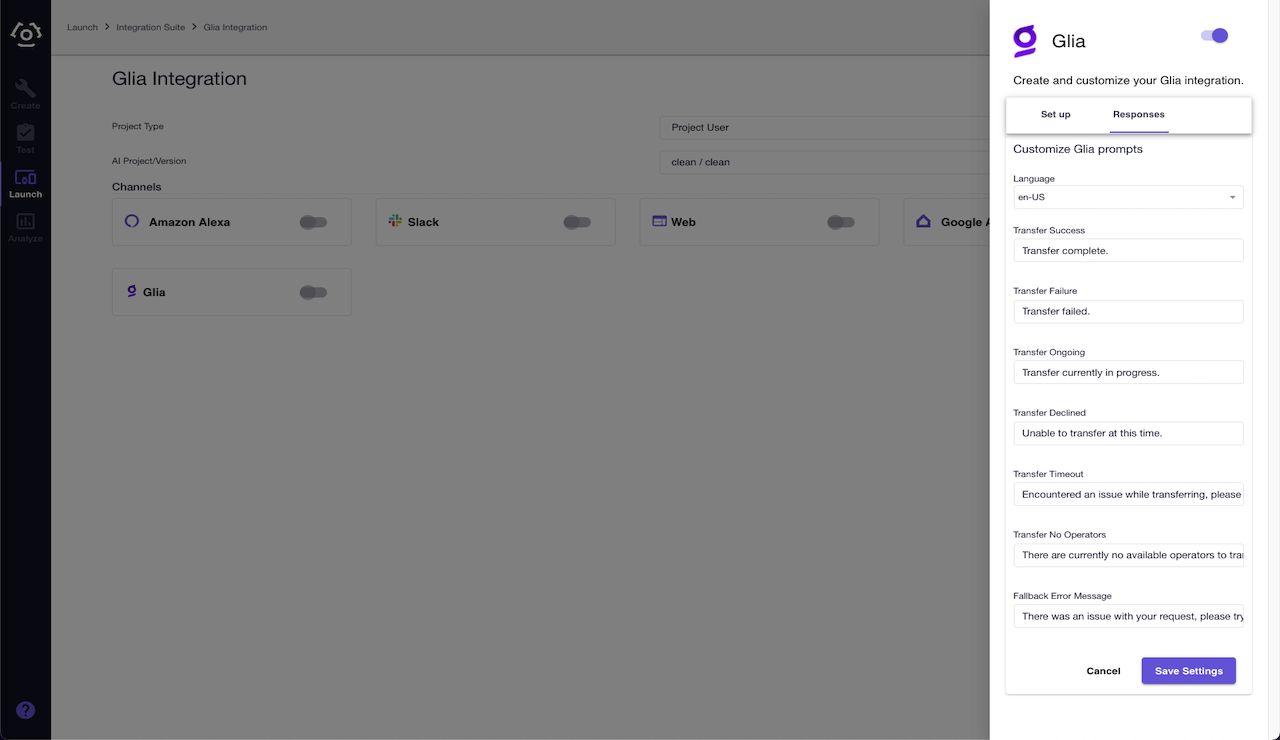
Configuration
Field Description Configuration Tab Device Select the device for the associated Clinc Personality Set up Transfer To Transfer destination, such as a queue or Virtual Assistant. Set up Transfer ID ID of the Operator, Queue or Virtual Assistant that you wish to transfer to. Set up Queue Unavailable Message Available when Transfer Tois set toQueue. Toggle on to enable the use of theQueue Unavailablecustom message.Set up Auto Transfer Competency Competency that will automatically initiate a transfer. List is compiled from currently supported competencies of your AI version. Set up Suggestion Transfer Competency Competencies that display a Glia Suggestion to transfer. List is compiled from currently supported competencies of your AI version. Set up Experience Token Personality selection for supported AI. Set up Web Link Navigation Method Configure how links are shown to the visitor, such as Glia Suggestions for a visual experience or plain text links. Set up Allowed Web Link Navigation Addresses A comma-delimited list of allowed domains that should mirror the configured Glia Web Addresses (opens new window) Set up Show Queue Wait Time Toggle on to display the average wait time of visitors currently in the queue Set up Queue Wait Time Threshold If the average visitor wait time is below this value in seconds a message is not presented to the visitor. Set up Glia Site ID Glia Site ID in which the current virtual operator is associated. The queue_id set in the Transfer ID field must belong to this site ID. Set up Use Enriched Visuals Toggle to show visual responses of supported competencies instead of text. Set up Authentication Toggle for if prompting the visitor to log in to a provided authentication provider should be enabled. Advanced Login Mode How the visitor should be prompted to log in. When "Custom" is set, see Glia Direct ID Connect Support Advanced Authentication Provider ID The Glia Authentication Provider that should be used when prompting the visitor to log in. Advanced Log in Before Transferring The mode in which the user should be prompted to log in before transferring. Other than setting the feature to "Disabled", the visitor can either be "Forced" or "Suggested" to login before transferring. Advanced Query Wait Time Allows setting the extended wait time for a response to a user query in seconds. This only triggers when the query requires user data and is representative of the time it takes to fetch the visitors data. Actual wait time is variable and could be up to 3 seconds longer than provided. Advanced Query Search Enabled Toggle for presenting the visitor with the option to auto navigate to a dynamic URL defined in "Query Search Template" along side the OOS response. Advanced Query Search Template Template URL that must contain the placeholder where the visitors out of scope query should be placed. i.e. "https://www.example.com/search/". Advanced Glia Mobile Experience Toggle that will update the configuration and experience to better align with a Glia mobile integration. Advanced Override Config State State to trigger a configuration override. The active configuration will be replaced with the configuration set in Override Configbelow.Advanced Override Domain Rules Visible when Override Config Stateis set toDomain. Accepts a comma delimited list of domains, paths and or query parameters to trigger a config override. i.e.clinc.*.com, clinc.com*?test=1, */some-path/*Advanced Override Config Glia configuration that will be used to override the current configuration when Override Config Statehas been triggered.Advanced Language ISO 639-1 Code. Currently only "en-US" is supported. Responses Transfer Success Message shown to the visitor when a transfer successfully completed. Responses Transfer Failure Message shown to the visitor when a transfer failed. Responses Transfer Ongoing Message shown to the visitor when a new transfer request has been initiated but there is already a transfer in-progress. Responses Transfer Declined Message shown to the visitor when a transfer has been declined by an Operator. Responses Transfer Timeout Message shown to the visitor when a transfer was made, but the request was not handled in time and failed. Responses Transfer No Operators Message shown to the visitor when a transfer has been made, but there are no available operators. Responses Transfer Queue Closed Message shown to the visitor when a transfer has been made, but the queue being transferred to is currently closed. Responses Fallback Error Message A fallback message to display to the visitor when an error prevents the AI responses from being presented to the visitor. Responses Transfer Prompt Prompt for transfer shown to the visitor for Glia Suggestion Transfer competencies. The "Transfer Confirmation" button is displayed below. Responses Transfer Confirmation Confirmation button presented to the visitor to accept the transfer prompt. Responses Transfer Cancel Cancelation button presented to the visitor to cancel the transfer prompt in a Glia mobile experience. Responses Transfer Cancel Message Message shown to the visit when pressing the Transfer Cancelbutton in a Glia Suggestion.Responses Login Prompt Prompt for transfer when the visitor is given the option to login beforehand. The buttons for "Pre-Transfer Login Confirmation" and "Immediate Transfer Confirmation" are displayed below. Responses Pre-Transfer Login Confirmation Confirmation button presented to the visitor when they want to log in before transferring. Responses Immediate Transfer Confirmation Confirmation button presented to the visitor when they want to transfer immediately. Responses Queue Wait Time Message Message shown to the visitor before transferring to display the average wait time. This field must contain the placeholder in which the time will be displayed. i.e. "5 seconds" or "3 minutes". Responses Auto Navigation Prompt Prompt for Glia Auto Navigation shown to the visitor to accept the auto navigation. Responses Auto Navigation Message Button presented to the visitor for each Auto Navigation destination. This field must contain the placeholder where the destination summary will be displayed. i.e. "Auto Loans". Responses Query Search Prompt Prompt for Glia Auto Navigation to a dynamic search result based on the "Query Search Template". The button "Query Search Button" is displayed below. Responses Query Search Button Confirmation button presented to the visitor before navigating them to the "Query Search Template" URL. Responses Queue Unavailable Configurable message using data from a queue's schedule that is displayed when the queue is not available. Responses At the bottom of the integration sidebar, click Save Settings.
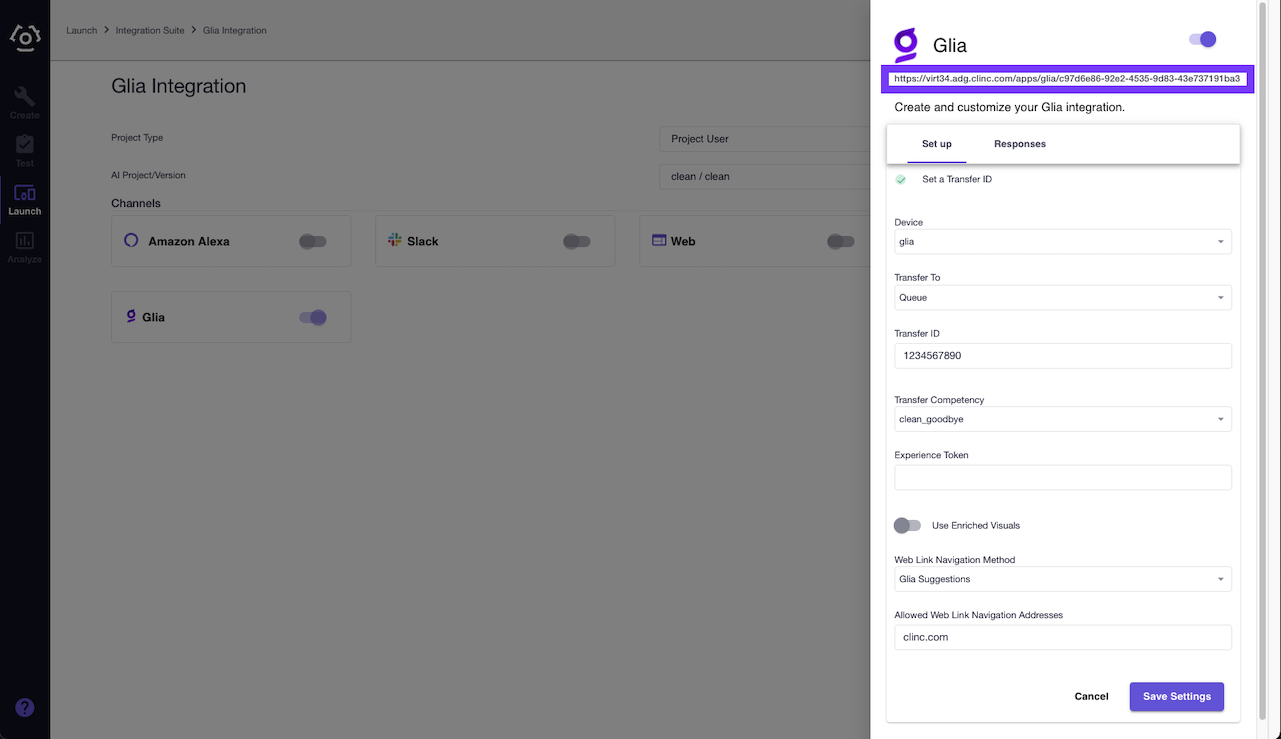
Under the Channels section, click on Glia to reopen the integration sidebar.
Copy the integration URL at the top of the sidebar. You will need your Glia integration URL when configuring your Engine in Glia.
# CDN Setup
Deploy our Glia features over CDN using a single, configurable script tag.
# Core Script
Copy and paste the the following script into the head of your site(s).
<script
    type="text/javascript"
    src="https://d22ee76qbp0fi6.cloudfront.net/glia/release/main.js"
    features="all"
    >
</script>
# Configurations
Custom Attributes
| Attribute | Description | Value(s) | Required |
|---|---|---|---|
| version | Choose the release version of our Glia features. | latest or specific release version. Example release version: 1-0-0. | No (Defaults to latest if attribute is not detected) |
| features | List of features to enable | See Feature table below. | Yes |
Features
| Feature | Description |
|---|---|
| all | Will enable all Glia features, excluding include_glia_script |
| engagement_start | Enables an event to trigger on the start of an engagement. Can be used to trigger a welcome message. |
| enhanced_visuals | Enables a custom chat render that will provided enhanced visuals for specific VBA queries. |
| retain_visitor_id | Enables logic to retain a visitor's ID after authentication. |
| include_glia_script | Will set the Glia Salemove script. |
# Example Scripts
Script that uses the latest release and requests only a few features.
Note: version is non-required field that always defaults to latest. Adding version to the attributes and setting the value to latest will have the same result as not including version in the script attributes.
<script
    type="text/javascript"
    src="https://d22ee76qbp0fi6.cloudfront.net/glia/release/main.js"
    features="engagement_start,enhanced_visuals"
    >
</script>
Script that uses a specific release and also requests the Glia Salemove script be added.
<script
    type="text/javascript"
    src="https://d22ee76qbp0fi6.cloudfront.net/glia/release/main.js"
    version="1-0-0"
    features="enhanced_visuals,retain_visitor_id,include_glia_script"
    >
</script>
# Configuring Glia
# AI Engine
The following steps will detail how to create your AI Engine in Glia
Login to Glia (opens new window).
Navigate to the Admin screen and select Advanced.
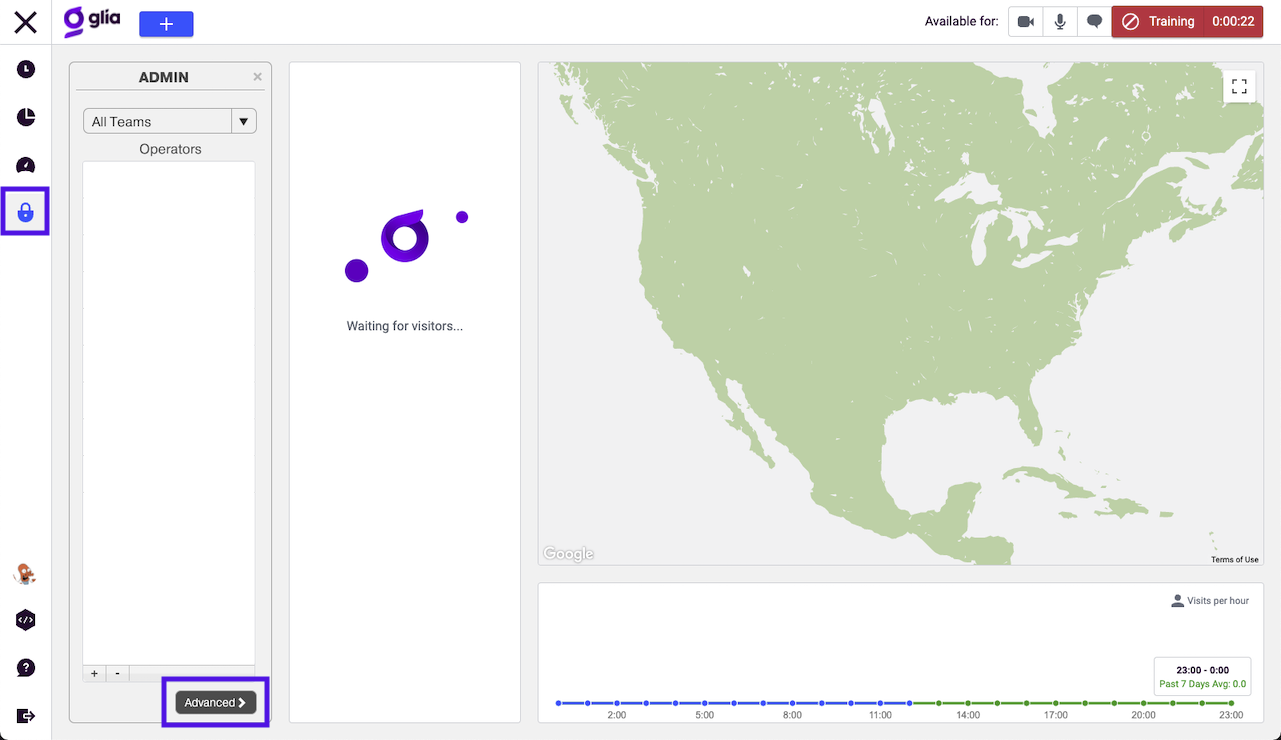
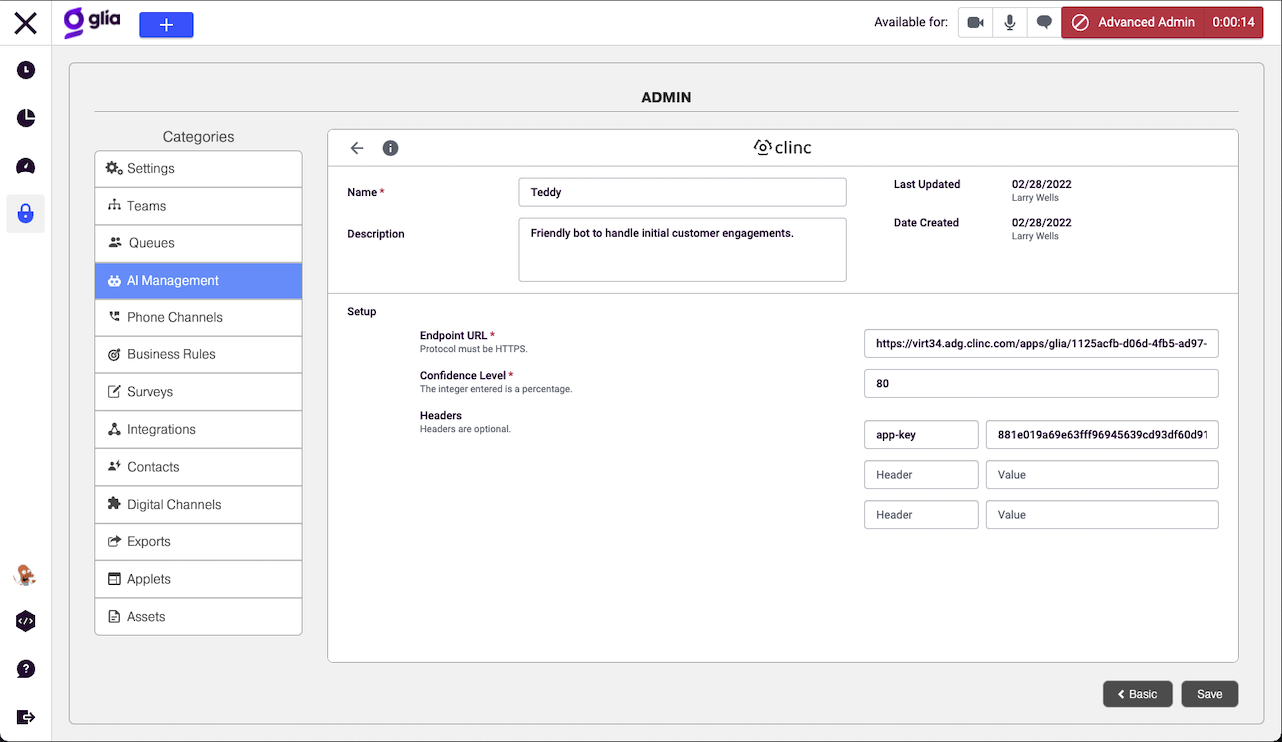
Select AI Management under Categories and then click Add Engine.
Select Clinc from the list of AI providers.
Complete the following fields and click Save.
AI Engine Basic Setup
Field Value Required Name Name of your AI Engine. Yes Description Provide details about your AI Engine. No Endpoint URL Enter the Glia integration URL copied from step 5 of Creating Glia Integration.Yes Confidence Level Required level of confidence of the Virtual Assistant. 1-100 Yes AI Engine Headers
Header Value Required App-Key Your generated API key. Yes gliaidsecret Glia User API Key ID and Secret. This value bust be a colon seperated i.e. GLIA__USER_KEY_ID:GLIA_USER_KEY_SECRET No The header gliaidsecret is required when the configuration Show Queue Wait Time has been enabled in step #2. This allows the service to make a Glia Live Reporting Request (opens new window) and display the average wait time to visitors during transfer requests. If this feature is disabled or the
gliaidsecretheader is not set then Glia will only display a message notifying the user that a transfer is being attempted without addition wait time information.
# Virtual Assistant
We will now configure your Virtual Assistant according to Glia's Virtual Assistant Guide (opens new window)
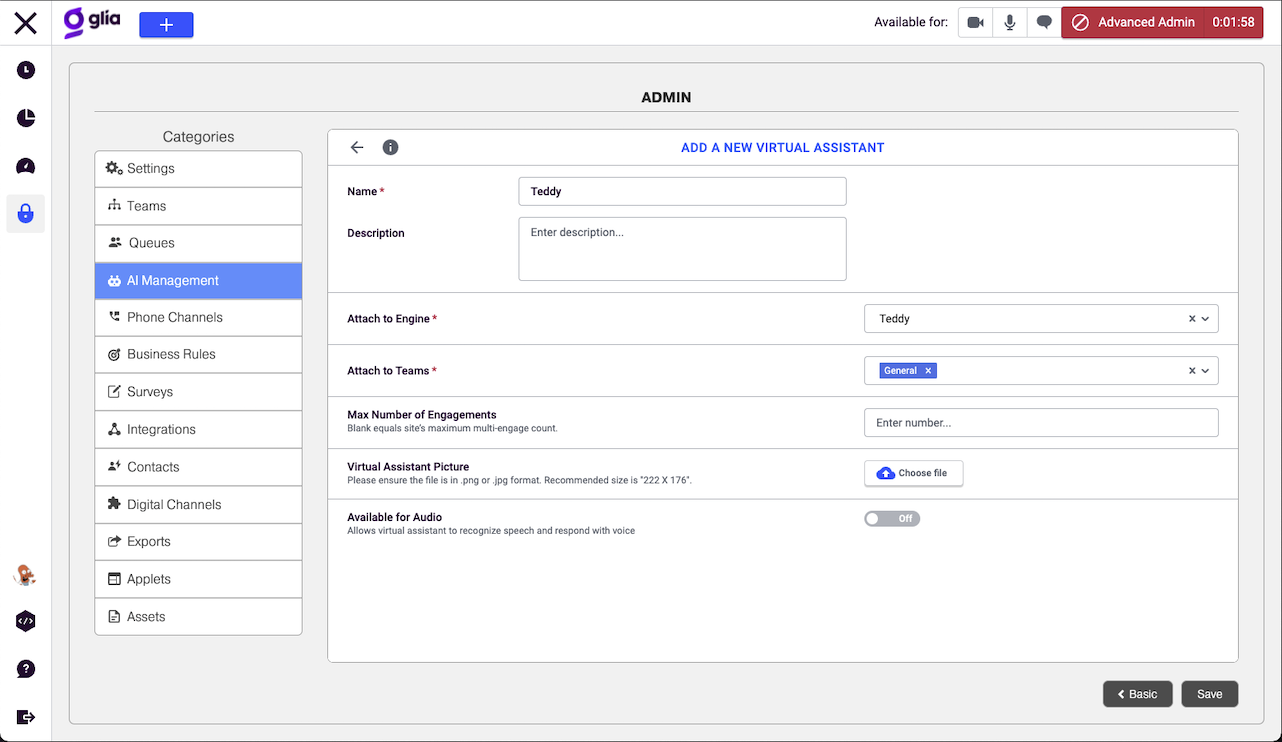
Still in the Glia App Dashboard, select Virtual Assistants from the AI Management menu bar and click Add Virtual Assistant.
Complete the following fields and click Save.
Virtual Assistant Basic Setup
Field Value Required Name Name of your Virtual Assistant Yes Description Provide details about your Virtual Assistant. No Attach to Engine Select the AI Engine you created in step 10. Yes Attach to Teams Select a team that the Virtual Assistant will belong to. Yes Max Number of Engagements Provide a max number of allowed engagements. No Virtual Assistant Picture Upload a picture to respresent your Virtual Assistant to customers. No Available for Audio Allows Virtual Assistant to recognize speech and respond with voice. No
From Categories select Settings.
Ensure Glia is toggled on and copy and paste the script into your website.
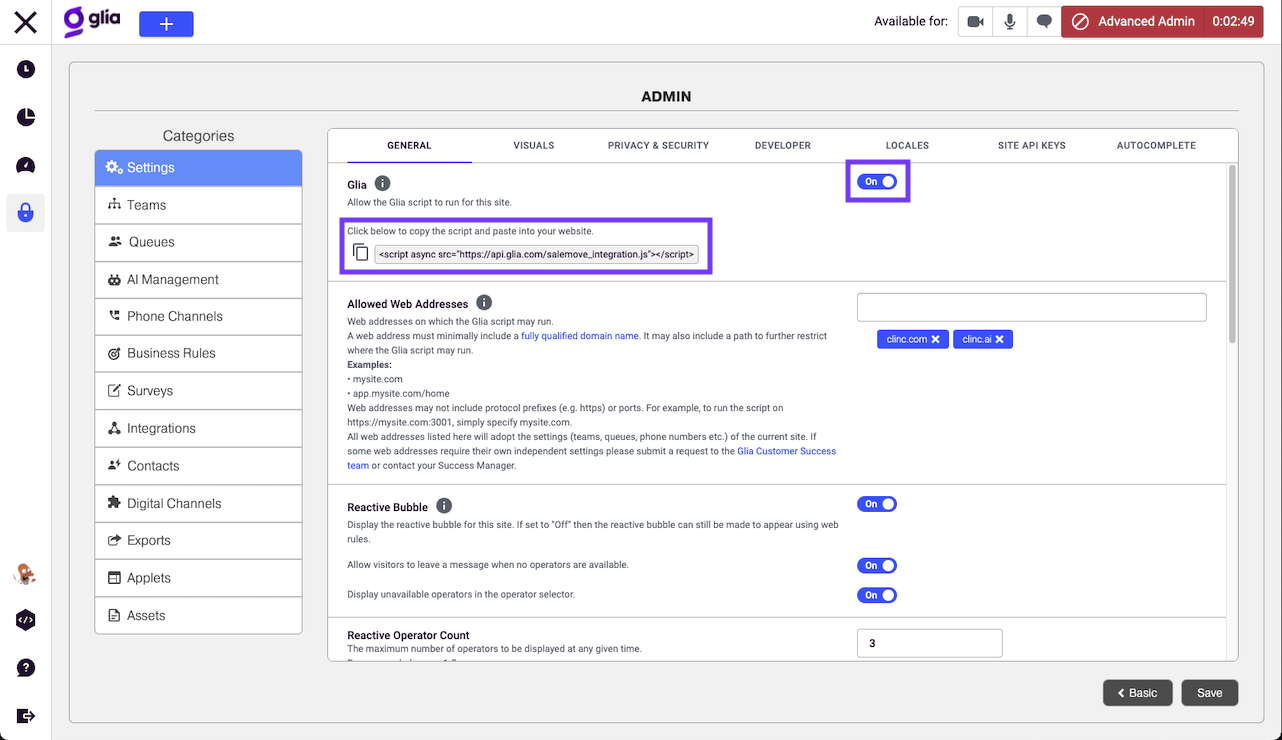
- At this point you should be able to visit your website and click the chat icon to initiate a chat with your Clinc powered Virtual Assistant.
# Queue Unavailable Message
The Queue Unavailable message can be used to inform endusers that a queue is currently unavailable and display operating hours.
# Setup
To utilize the Queue Unavailable message the following items are needed.
- A queue setup in Glia Admin Console.
- A Queue Schedule (opens new window) configured for the queue.
Note
When configuring a Glia queue we recommend leaving Accept Visitors When Queue is Unstaffed turned off. When Accept Visitors When Queue is Unstaffed is enabled it will force a queue's status to always be open which will cause compatiblity issues with our Queue Unavailable Message features.
# Building Queue Unavailable Message
Tokens are used to represent data in a queue's schedule. When building the Queue Unavailable message we replace those tokens with their corresponding values from the schedule. Tokens should be surround by two opening and closing curly braces.
Tokens
| Token | Value | Schedule Index Required |
|---|---|---|
| OPENS_AT | Start time of a specific schedule. | Yes |
| CLOSES_AT | Close time of a specific schedule. | Yes |
| DAYS_OF_WEEK | Days available for a specific schedule. | Yes |
| DAYS_CLOSED | Days that are not assigned to a schedule. | No |
| FULL_QUEUE_SCHEDULE | Comprehensive message that combines all schedules that belong to a Queue Schedule Policy. | No |
| NEXT_BUSINESS_DAY | The next available time for a Queue Schedule Policy. | No |
Modifiers
| Modifier | Action |
|---|---|
| LONG | Use full spelling of days of the week. By default days of the week are abreviated. |
| HIDE_AMPM | Do not display meridiem for OPENS_AT or CLOSES_AT tokens. |
# Schedule Index
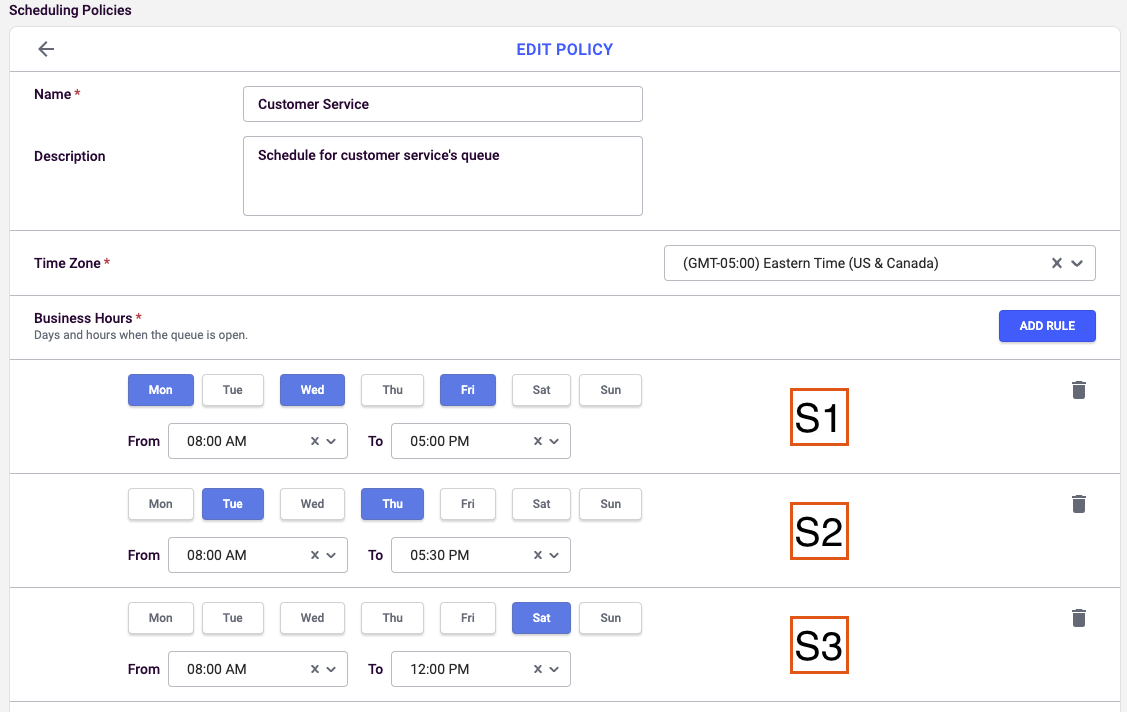
Some tokens that use specific data of a schedule belonging to a Queue Policy Schedule require an index value. This tells the token processor which schedule to pull data from.
Here is an example schedule with labels denoting the schedule index.
# Example Messages
The examples in the table below are using the schedule in the image above.
| Pre-Processed | Post-Processed |
|---|---|
I am sorry, there are no available customer service representatives. Our hours are {{LONG FULL_QUEUE_SCHEDULE}}. | I am sorry, there are no available customer service representatives. Our hours are Monday-Friday 8:00-5:00 PM Tuesday,Thursday 8:00 AM-5:30 PM Saturday 8:00 AM-12:00 PM Sunday: Closed. |
There are no available operators. The next available time is {{NEXT_BUSINESS_DAY}}. | There are no available operators. The next available time is Thu 8:00 AM-5:30 PM. |
Our hours are {{DAYS_OF_WEEK S1}} from {{OPENS_AT S1}} to {{CLOSES_AT S1}}. Our weekend hours are {{DAYS_OF_WEEK S2}}: {{HIDE_AMPM OPENS_AT S2}} to {{CLOSES_AT S2}}. | Our hours are Mon-Fri from 8:00 AM to 5:00 PM. Our weekend hours are Sat: 8:00 to 11:30 AM. |
Our hours of operation are {{LONG DAYS_OF_WEEK S1}} from {{OPENS_AT S1}} to {{CLOSES_AT S1}}, {{LONG DAYS_OF_WEEK S2}} from {{OPENS_AT S2}} to {{CLOSES_AT S2}}. Our weekend hours are {{LONG DAYS_OF_WEEK S3}}: {{OPENS_AT S3}} to {{CLOSES_AT S3}}. We are closed the following days {{LONG DAYS_CLOSED}}. | Our hours of operation are Monday-Friday from 8:00 AM to 5:00 PM, Tuesday, Thursday from 8:00 AM to 5:30 PM. Our weekend hours are Saturday: 8:00 AM to 12:00 PM. We are closed the following days Sunday. |
# Queue Policy Scheduling Exceptions
Add Scheduling Exceptions (opens new window) to modify the queue's schedule on holidays. Exceptions can close a queue, or modify the hours that a queue is open for a particular day. If we detect that a scheduling exception policy is associated with a queue, we will take the rules into consideration when determining to show the Queue Unavailable Message.
# Glia Custom Visitor Attributes
By leveraging Glia Visitor Attributes the visitor experience can be modified on a per user basis. This can take the form of modifying the prior configuration or by modifying and/or appending data to a visitors query request. The following code snippets are examples that will allow setting these visitor attributes.
# Web Example
Note Glia Visitor Attributes are required to be set on every web page where the above described functionality is required.
const customAttributes = {
    clinc_body_language: 'en',
    clinc_header_clinc_authorization: '1234-5678-abcd'
};

sm.getApi({ version: 'v1' }).then(function(glia) {
    glia.updateInformation({
        customAttributes
    }).catch(function(error) {
        console.error(`Error Saving Glia Custom Attributes: ${error.cause}`);
    });
});
# Mobile Example (iOS)
Note The following snippet follows the Glia Visitor Information Guide (opens new window) which requires the Glia Visitor iOS Core SDK to be configure prior to leveraging this feature as seen in the Setup Guide (opens new window)
let visitorInformation = VisitorInfoUpdate(
    customAttributes: [
        "clinc_body_language": "en",
        "clinc_header_clinc_authorization": "1234-5678-abcd"
    ],
    customAttributesUpdateMethod: .merge
)
Salemove.sharedInstance.configure(with: saleMoveConfig) {
    Salemove.sharedInstance.updateVisitorInfo(visitorInformation) {_ in
        print("Visitor Information Set")
    }
}
# Mobile Example (Android)
Note The following snippet follows the Glia Android Visitor Information Guide (opens new window)
Map<String, String> customAttributes = new HashMap<>();
customAttributes.put("clinc_body_language", "en");
customAttributes.put("clinc_header_authorization", "1234-5678-abcd");

Glia.updateVisitorInfo(
    new VisitorInfoUpdateRequest.Builder()
        .setCustomAttributes(customAttributes)
        .build(),
    error -> {
        // Error message
    }
);
# Creating Custom Attributes
Custom Attributes are constructed of four components. Each component is required to have a functional attribute.
Example Attribute Breakdown
clinc_body_ai_version=6c3b730e-d8b7-47b8-a47a-de8e5c5bccc5
| Component | Description |
|---|---|
| clinc | Prefix used to identify which Glia visitor attributes should be used by the Clinc service |
| body | Applied location for visitor attribute. Use body to add a Custom Attribute to the query body. Use header to add a Custom Attribute to the header of the query request |
| ai_version | Field |
| 6c3b730e-d8b7-47b8-a47a-de8e5c5bccc5 | Value |
The following Field values are not customizable. These values must be modified in the integration where your Glia channel resides as described earlier in this guide. For unique configurations it is recommended to create multiple Integrations.
Blocked Custom Attributes
| Name |
|---|
| Authorization |
| dialog |
| dialogseed |
| external_user_id |
| query |
| ai_version |
| device |
| experience_token |
| allowed_web_link_addresses |
| queue_wait_time_response |
# Authentication
Authentication is required to use Virtual Banking Assistant and can be levered in the Public Banking Assistant product to require users to login before transfering to an agent.
# Pass Token To Clinc
You can use Glia Custom Attributes to pass in a user's access_token.
Example
Add access_token to the customAttributes dictionary passed along in the Glia Visitor Attributes. Below is the web code snippet modified to demonstrate this feature.
const customAttributes = {
    clinc_body_language: 'en',
    clinc_header_clinc_authorization: '1234-5678-abcd',
    clinc_header_access_token: 'USERS_TOKEN_HERE'
};
# Glia Direct ID Token Authentication Support
Glia supports a custom authentication mode called Direct ID Token Authentication (opens new window). Once this feature has been built out and supported between the deployed website and Glia the following features can be enabled through this integration with Clinc.
# Seemless Authentication
If the Glia visitor is interacting with the Glia chat window on a page that suppports this authentication method they will be able to seemlessly (without prompting for a secondary login) to be able to ask queries that are enriched with their data.
# Glia Login Prompts (Custom Commands)
The webpage hosting the glia chat window can be sent a Glia Custom Command (opens new window) in place of all other login prompts if the user is not already authenticated. These should be handled by prompting the user to log in through a method that supports "Direct ID Token Authentication". Below is a code snippet for consuming these Clinc login requests.
Note
- The configuration option
Login Modemust be set toCustom. - If you already have a "Glia Custom Command" event listener running you only need to add the
Clinc Specific Snippet
Example
sm.getApi({ version: 'v1' }).then(function(salemove) {
    var customCommandEventListener = function(engagement) {
        engagement.addEventListener(engagement.EVENTS.CUSTOM_COMMAND, function(
            customCommand
        ) {
            // Clinc Specific Snippet - START
            // Check if Clinc Custom Command
            const isClincCommand = command =>
                command.properties.type === 'clinc';
            if (isClincCommand(customCommand)) {
                const getSubType = command => command.properties.sub_type;
                const getTask = command => command.properties.task;
                const getQuery = command => command.properties.query;

                if (getSubType(customCommand) === 'login') {
                    // Trigger Custom Login Process
                }
                if (getTask(customCommand) === 'transfer') {
                    // Visitor was trying to talk to an agent
                }
                const query = getQuery(customCommand);
                if (query) {
                    // Visitor query that resulted in custom command
                }
            }
            // Clinc Specific Snippet - END
        });
    };

    salemove.addEventListener(
        salemove.EVENTS.ENGAGEMENT_START,
        customCommandEventListener
    );
});
# Use an Authentication Provider
Glia supports the use of OpenID Connect or OAuth2 providers. Based on your configuration, your Virtual Assistant can prompt the user to authenticate.
# Add Authentication Provider
Follow the Glia documentation on creating an authentication provider (opens new window).
Note:
Copy your Authentication Provider ID as you will need it in the next step.
# Configure Glia Integration
Enabling this feature will allow the chat window to present an model in which the visitor can log in to the desired authentication service before transfering to an agent or when a query response requires user data.
Navigate to the Advanced tab of your Glia Integration in the Clinc Platform.
Toggle on
Authentication, three new fields will appear.Field Value Login Mode Set to On RequestAuthentication Provider Id Id of the Authentication Providercreated in Glia.Login Before Transferring Shows a Glia Suggestionto ask or require a user to authenticate before transferring.Add the ID of the
Authentication Providercreated earlier in theAdd Authentication Providersection of this guide and clickSave Settings.
# Glia Business Rules Setup
This section will go over the Glia Business Rules as it pertains to Clinc. Everything else can be configured according to the documentation for Glia Business Rules (opens new window).
Login to Glia (opens new window).
Navigate to the Admin screen and select Advanced.
Select Business Rules under Categories.
# Configure Multiple Virtual Assitants
Follow the steps below to set up a Glia business rule to switch between virtual assistants given a known trigger/rule/variable. An example scenario requiring this setup would be multiple virtual operators that functions uniquely for desktop users vs mobile users. The steps will walk through this scenario but can be modified to fit your exact use case.
Note: Must have followed the Clinc Platform Setup and Configuring Glia sections for each Glia virtual operator to be used below.
The following section assumes the Glia Reactive Bubble Settings (opens new window) has already been enabled.
- While in the Business Rules section, make sure you are on the Web tab and click "Add Web Rule" in the top right.
- Give the Web Rule a unique name and make sure it's assigned to the required site.
- Under the Conditions section you can set the URL template in which you want this rule to be limited, for most cases you will want to apply this to every page on which the Glia chat window can appear. To enable for all webpages leave this value set to
*in the Coming From text field. - Also in the Conditions section is an option for Context Conditions, this is where you set the case in which this rule should be made available. In this scenario select
Device Typefrom the drop-down list and click the plus symbol to create the condition. - There should now be a new dropdown list after
Device type is, here you should select the required device in which this rule should be associated, eithercomputerormobile. - Alternatively instead of steps 4 and 5 you could have selected
Operating system typefrom the dropdown and selected each operating system in which this rule should be associated. The top three options (windows, linux, and osx) are for computer users, and (ipad, ios, and android) are for mobile users. This is recommended if you need more granular control. - Under the Source section, select
Navigationfrom the drop-down list and click the plus symbol to creat the source. Then add the value*in the resulting text field. - Under the Actions section, select
Set visitor queuesfrom the drop-down list and click the plus symbol to create the action. - There should now be an action titled "Set visitor queues" with a new dropdown list to the right, in this dropdown list select the previously created queue in which you want to associate with the condition set in steps 4-6.
# Now click Save in the bottom right corner to save your new web rule. After which, when a visitor navigates to your web page using the device set in step 5 or 6, they will be prompted with the virtual operator that belongs to the queue set in step 8.
# Configure Feature/Help Prompt
This section will go through the process of created automated prompts to the user that will be presented as chat messages, and will appear after a set period of inactivity. These prompts are meant to encourage the user to ineracting with the chat window. Examples include clarifying or describing how to use features of the chat window (how to make a query), or by suggesting or informing about types of questions that can be asked.
- While in the Business Rules section, make sure you are on the Platform tab, and click "Add Platform Rule"
- Give the Platform Rule a unique name and make sure it's assigned to the required site.
- Under the Sources section, select the
Visitor has not replied from engagement chatoption in the drop-down list. - In the newly created "Source" in the textfield under Parameters, input the required time to wait before prompting the user. For example if you want to wait 10 seconds before sending an automated massage to the user the paramters section should read Threshold
10seconds. - Under the Actions section, select
Send chat messagefrom the drop-down list. - In the newly created "Action" in the drop-down list under Parameters sleect either
Stringand go to step 7 for a simple text message or selectJSONand skip to step 8 for a message containing Glia supported Command types (suggestions, cards, etc) - If you have not selected
Stringin step 6 you should skip this step. In the new "Message" text field, enter in the message you want to send to users. - If you have not selected
JSONin step 6 you should skip this step. A template would have been created in the "Message" text field, replace any values and/or content with the desired Glia command and/or message. Follow Glia Commands (opens new window) for the required format. - Now click Save in the bottom right corner to save the new platform rule. You may repeat this section for each message you want prompt the user with increasing the seconds in step 4 each time.